
What is this tutorial?
In this tutorial we will look at how to set up arcade style vehicle physics on a 3D model. As with my previous tutorial, in an attempt to keep it as clear and concise as possible I will keep the game design quite simple, therefore this should be seen as a basis from which to build a game, rather than a tutorial for a complete and finished game.
Who is this tutorial aimed at?
This is aimed at people with a reasonable knowledge of C# and Unity as I won’t be explaining in depth basic C# programming concepts or basic Unity concepts, unless it is appropriate to do so within the scope of the tutorial.
Part 1 – The vehicle game object
As this is a tutorial on coding rather than building game objects in the editor, I’m not going to give step by step instructions on how to put together the car and terrain, instead I’ll just give a brief description of the important bits and how they relate to the code, and I’ll provide all assets in a download link at the end of the tutorial.
First of all I should point out that the method we will be using isn’t a realistic physics simulation, instead it uses forces to ‘fake’ the physics, but the outcome is reasonable and gives a nice Mario Kart style feel to the vehicle handling.
The way we’ll achieve this is by firing a raycast down from each corner of the vehicle a certain distance (hoverheight), and if it detects a hit, it adds an upward force. We also adjust the strength of the upward force depending on the distance from the vehicle that the raycast detects the hit. So effectively the closer the vehicle gets to the ground the stronger it is pushed back away from it, and vice versa.
The length of the ray we fire can be adjusted, and the longer it is the further the vehicle will float above the ground, we will be using a fairly short ray, because we want this to appear as if it is actually on the ground. However by increasing the hoverheight and hoverforce you can simulate a nice hover car type behaviour instead.
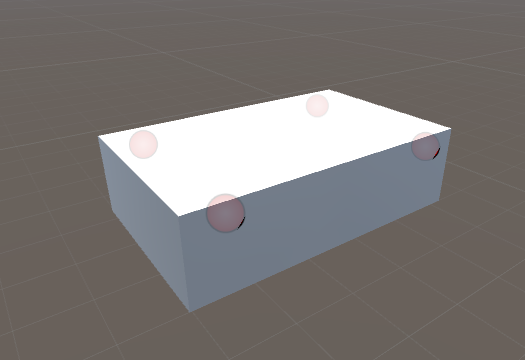
This is a very basic example of how we would set up the vehicle game object with the hover points. The red circles indicate where the hover points are positioned. Notice that they are placed vertically above the centre of the vehicle, this is because of the way we simulate gravity in our code, as I’ll explain a bit further on.
We’ll also attach a rigidbody component, and for this example we’ll give it a mass of 70, drag 3 and angular drag 4. These figures work quite well as they are, but you can achieve different handling effects by tweaking them also.
Lastly we give it a box collider to detect collisions with other scene objects and also to prevent the vehicle from falling through the terrain when the downward velocity is very high and we’ll put it on its own layer (vehicle), so we can ignore it in the raycasts.
We’ll also untick Use Gravity, as we will be handling gravity ourselves.
So that’s pretty much all that’s needed for a basic vehicle setup (in the finished project I have added a buggy model which looks a bit nicer than a plain cube).
Part 2 – The code
So now let’s take a look at the code that will turn this into something a bit more interesting. First off we’ll add the various properties that we’ll use to control the behaviour of the buggy as so.
Most of this should be pretty self explanatory, but I’ll explain what some of them do.
The deadZone value is just a way to make the controller not so sensitive to small movements. Basically any input below the deadZone threshold is ignored.
The groundedDrag value is used to change the buggy RigidBody drag factor depending on whether the buggy is grounded or in the air.
The dustTrails array will hold references to the particle systems that play when the wheels are grounded.
The layerMask property is used to prevent the hover point raycasts from registering hits on the buggy.
Next we have the Start function, which stores a reference to the buggy Rigidbody and stores a reference to the inverse of its LayerMask, for use in the Raycast later.
It also sets the Rigidbody.centerOfMass to be one unit below the buggy, this helps to keep it a bit more stable when it’s in the air.
In the Update function we read the current input and assign a value to the acceleration and rotation from it.
Most of the work is done in FixedUpdate, so let’s take a look at this one bit at a time:-
This block of code above handles the hover/bounce behaviour.
To start with it clears the grounded flag.
Then, for each of the hover points, it fires a raycast of hoverHeight length downwards, and if it detects a hit it applies a force in the opposite direction and scales it depending on the distance the hover point is away from the hit point. So the closer the hover point is to the point which the ray cast hits, the greater the force that is applied to push it back. Kind of like what happens when you compress a spring.
Grounded is also set to true if any of the raycasts detect a hit.
If, however the hover point raycast doesn’t detect a hit, then that means this wheel/corner of the vehicle is off the ground, so we need to handle this differently as follows.
It compares the y position of each hover point with the y position of the vehicle, and pushes it up if it’s below it, or down if it’s above it. This serves two purposes, firstly it makes the vehicle automatically level out when it’s in the air, and secondly it applies a fake gravity effect. This is why the hover points need to be positioned above the centre of the vehicle transform, so that when the vehicle is in the air it will be pushed back down by the gravityForce amount. If we positioned the hover points below the y position of the vehicle transform, once it left the ground it would fly up into the air and never come down.
The next section of code handles other behaviour differences between when the vehicle is grounded and when it is airborne.
So basically, if the vehicle is on the ground, we set the Rigidbody.drag value to the amount we set in the inspector, and we give the dust trail particles a suitable emission rate.
But if the vehicle is in the air we set the Rigidbody.drag to a very low value, and we also drastically reduce the thrust and turn values, as we don’t want to have full control whilst we aren’t on the ground.
Lastly for this section, we iterate through the dustTrails array and set the particle emissionRate to the appropriate value (10 if grounded, zero if in the air).
Last of all we apply the thrust and turn forces to the vehicle and then limit it’s velocity to the maxVelocity value we set in the inspector.
So that’s the entire vehicle controller script, it produces quite a nice arcade style drive and with a bit more work could form the basis of a fun driving game, you can test out the complete project which can be downloaded from here. Once you have loaded it into Unity you will need to open Assets\Scene 1.
The behaviour of the vehicle can be modified to make it feel like it’s driving on different surfaces by changing the various properties exposed in the inspector, for example to make it feel like it’s on ice change the following properties:-
- Grounded Drag = 0.5
- Max Velocity = 30
- Forward Acceleration = 1500
- Reverse Acceleration = 750
- Turn Strength = 500
It uses the standard WASD and Arrow keys to control acceleration, braking and turning.
Thanks to Carbon Concept for the free buggy model
I hope you enjoyed this tutorial, and please feel free to post any comments or suggestions.