Welcome to part 3 of my Photon Unity Networked Game tutorial. In this part we will add the player object and the game scene.
Disclaimer: There are many solutions to any one given network game design, which will differ greatly due to a number of factors, including but not limited to, target audience numbers, security concerns and whether you are programming for fun or commercial gain.
Therefore, I do not suggest that is this the only approach you might take, or that this is even the best one, rather it is my attempt to demonstrate some core concepts in as clear and concise a fashion as possible, which can be used as a stepping stone into the often murky waters of networked game programming.
Part 3a – Setting up the game scene
Before we can set up the game scene in the editor we need some assets for the environment. This zip file contains a Unity package which has in it the game scene and player prefabs which are modified versions of some of the excellent assets from the Tanks Tutorial from the Unity Asset Store. Go ahead and download it then extract and install the Unity package.
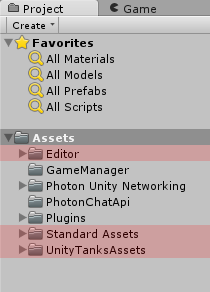
After you’ve installed it your project folders should look like this (I have highlighted the new folders contained in the package).
Now that we’ve got the assets installed, make a new scene (File->New Scene).
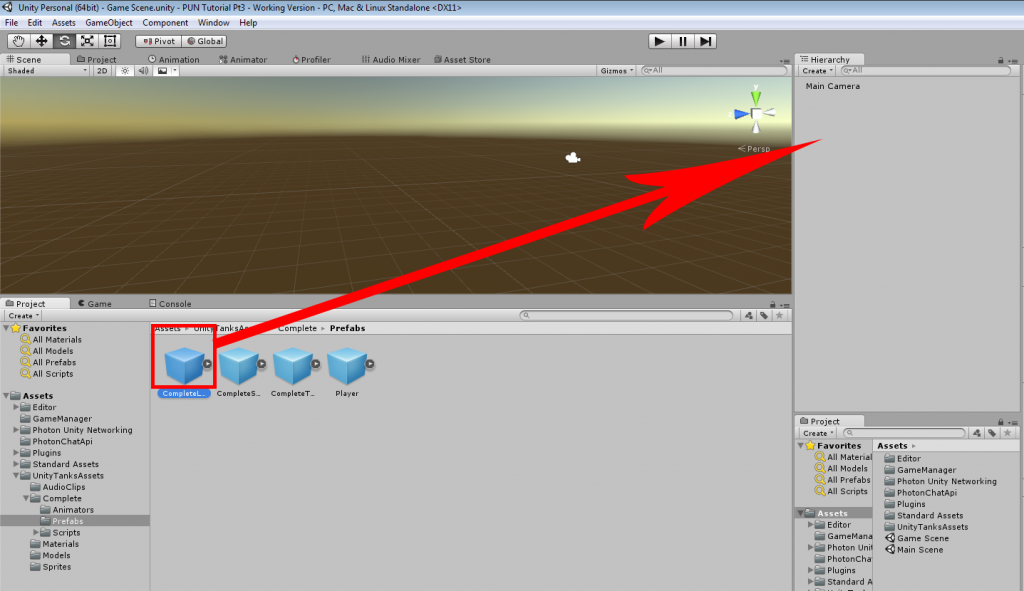
Delete the default directional light (the level art prefab has its own lights) and then find the level art prefab (UnityTanksAssets\Complete\Prefabs\CompleteLevelArt.prefab) and drag it into the Hierarchy Window, and make sure the transform position is 0,0,0.
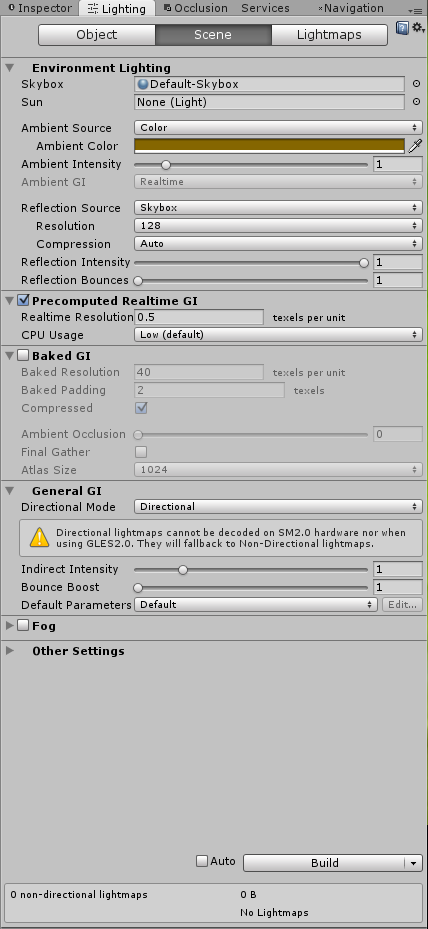
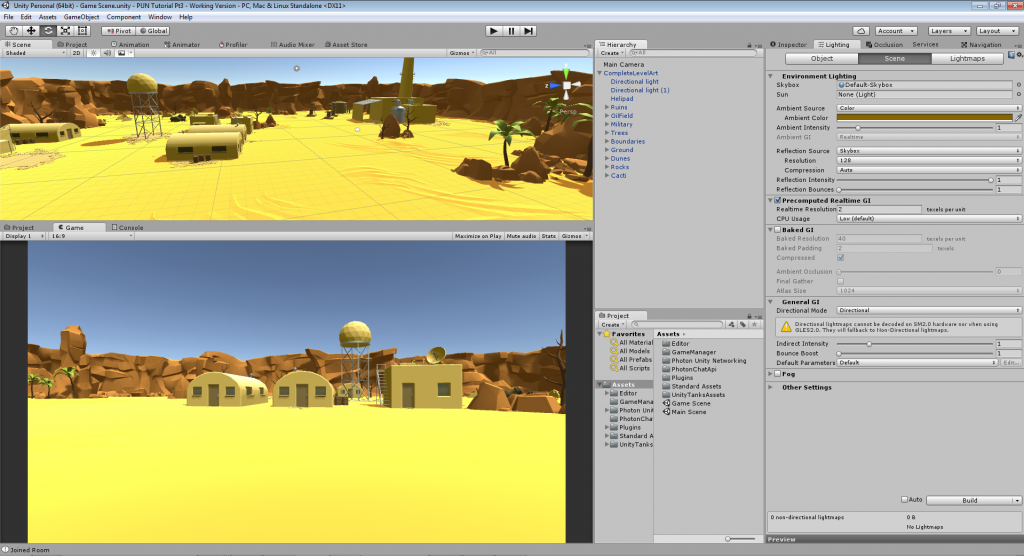
You should now have a nice gaming arena in the scene, however the lighting is a bit ‘flat’ by default, so the next thing we need to do is adjust that. Open the lighting window (Window->Lighting) and set the following values:-
Skybox = Default-Skybox
Sun = None (light)
Ambient Source = Color (Set the Ambient Color RGB values to 133, 102, 0 to get a mid brown colour)
Precomputed Realtime GI = Ticked
Baked GI = Un-ticked
Auto Build = Un-ticked
This is how the lighting window should look
This is how your editor should look if you have correctly imported the assets and added the level art to the scene.
Save the scene in the Assets folder, and call it Game Scene. Next we’ll add some code to handle loading of the game scene when we join a game.
Part 3b – Loading the game scene
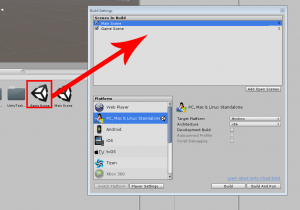
Once you have saved the game scene you need to add both the Main Scene and the Game Scene to the scenes in build, so open the build settings window (File->Build Settings) and drag them both into it as so, making sure that the Main Scene is first in the list.
Next, open the GameManager script (Assets\GameManager\GameManager.cs) for editing.
All we need to do is add this snippet of code to the OnJoinedRoom() function
and this line of code to the end of the Awake() function
What this does is, if you are the host (first player in the game) it instructs the Photon Networking system to load the game scene level. And then the line we added to Awake() ensures that any new players joining will automatically load whichever scene the host has currently loaded.
Strictly speaking as we are only using the one game scene at the moment, we could make the host and clients load the game scene manually using Unity’s SceneManagement class, however if we come to add extra game arenas later, doing it this way will make it much easier to keep everyone synchronised. If the host changes its current scene, then all connected clients will automatically change to the same scene, and new clients will join with the same scene active.
Note: Photon uses the term MasterClient to indicate which client is currently the host and ‘in control’. The Master Client can be used as “authoritative” client/player to make decisions, run AI or carry out other tasks that you don’t want all clients to be able to do themselves. If the current Master Client leaves the game, Photon will very quickly assign someone else, which means that the game doesn’t stop if the host leaves.
This is the full GameManager script with the additions we just made, so go ahead and save this now, and then open the Main Scene again in the editor.
If you build and run two instances of the game, you will see that once you click the join button, the scene switches to the game scene. This happens on the client as well, even though we don’t explicitly load the scene on the client, because we set PhotonNetwork.automaticallySyncScene = true.
If you run one of the instances in the editor, and you don’t see the main menu when it runs, that is because you didn’t switch back to the Main Menu scene after you had finished making the Game Scene.
So that’s the game scene working, next we’ll add the player.
Part 3c – The Player
Before we can add the player object, we need to make a couple more changes to the GameManager script as follows:-
First we need to declare a variable to store a reference to the local player object when it is instantiated as so:-
public static GameObject localPlayer;
We can use this as a handy way to reference the player object any time we need to.
Then we need to add the following function:-
The above function will run whenever a scene loads, including the main menu. So to avoid spawning the player when we aren’t in the game scene we check to see if we are in a room or not. The game scene won’t load until we have joined a room, so if we are in a room we know that we must be in the game scene, and therefore we need to instantiate the player object and we also store a reference to it in the variable we just added. Otherwise we just return.
This is the full GameManager script now, which you can now save before proceeding:-
We imported a player object along with the level art, but we need to get it ready for networking before we can use it in our game, so navigate to the Assets\UnityTanksAssets\Complete\Prefabs folder and select the Player prefab located in there.
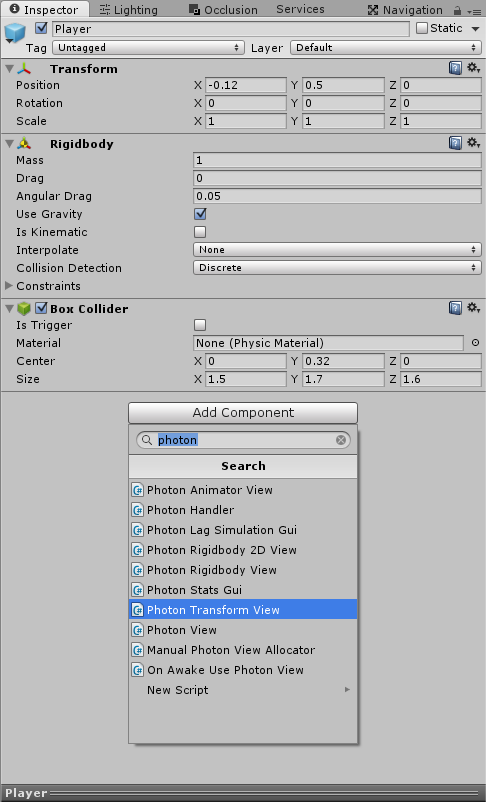
With the player prefab selected, click the Add Component button in the inspector, type photon in the search panel and add a Photon Transform View from the list of components.
This will add a PhotonTransformView and a PhotonView component to the player prefab, and it is these components that will do the work of synchronizing our player object across the network.
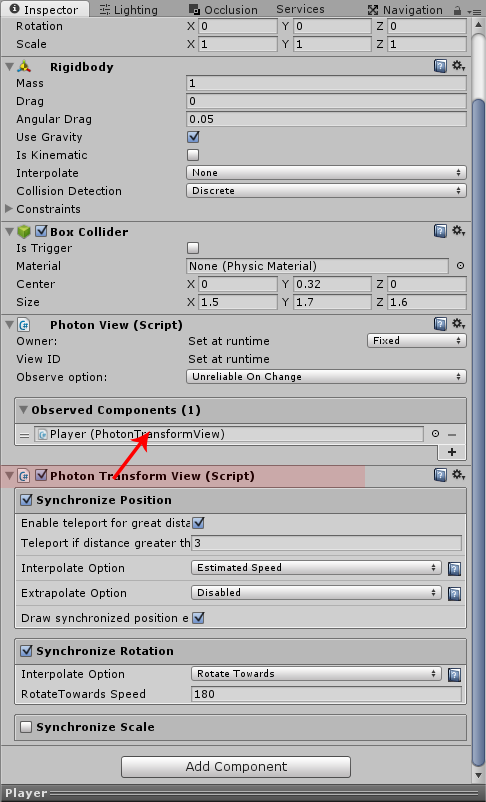
We need to tell the PhotonTransformView what we would like to synchronize, and in our case that will be position and rotation, which we indicate by ticking the two relevant boxes. When we tick each box further options will appear relating to ‘smoothing’ of the networked player movement on remote clients. We’ll leave these values on their defaults for now.
Lastly we drag the PhotonTransformView component into the Observed field of the PhotonView component. The PhotonView will then be able to send the position and rotation of our player object across the network.
The Photon instantiate command requires that the prefab is contained within a Resources folder, so we’ll sort that now. Create a new folder in Assets and call it Player, then in the Player folder create another folder and call it Resources. Next, drag the Player prefab from the Assets\UnityTanksAssets\Complete\Prefabs folder and into the Assets\Player\Resources folder.
Next create a new script in the Assets\Player folder and call it Player and then open it for editing.
Replace the default code with the following:-
This does three things, firstly it makes sure that the player object is set to DontDestroyOnLoad, so that if we change levels during the game our player won’t get destroyed.
Secondly, it grabs a reference to the Camera gameobject attached to the Player prefab.
Thirdly it checks to see if photonView.isMine is false and if it is, it disables the player camera.
photonView.isMine is how we determine if this script is running on the local player object (the one we are controlling) or on a player object belonging to a remote player. True means that it is our Player object, false means it belongs to someone else. We only want the camera to be enabled for our own player object.
Note that this script derives from PUNBehaviour, which gives us easy access to lots of Photon stuff. In this case it gives us convenient access to the attached PhotonView component via the photonView property.
Save the script and then add it to the Player prefab (select the player prefab, click the Add Component button in the inspector and select Scripts->PunTutorial->Player).
You can now build and run two instances of the game, you’ll see that when the 2nd player joins it spawns in the same place as the first player, and the physics moves them apart. You’ll also notice that the positions of the tanks is synchronised in both clients, which means the PhotonTransformView component is doing its job.
Now we need to add a script to allow us to drive the tanks.
Create another new script in the Assets\Player folder and call it PlayerMovement and then open it for editing.
Replace the default code with the following:-
Notice that it derives from Photon.PunBehaviour, so we can easily check photonView.isMine. If it’s false, we disable the script as we only want this to run on our local player object.
I won’t go into much detail about how the rest of this script works, as it isn’t particularly relevant to networking. But basically it reads the values of the horizontal and vertical input axis, and uses those values to move and rotate the rigidbody of the player object.
Save the script and then add it to the Player prefab (select the player prefab, click the Add Component button in the inspector and select Scripts->PunTutorial->PlayerMovement).
There’s just one last thing we need to do, and that’s to remove the camera from the game scene, as our player prefab has its own camera attached and we’ll use that instead. So open the game scene, delete the Main Camera game object, then save the scene.
Next, open the Main Scene again, and if you run the game you’ll see that you can control the tank with the WASD keys. If you build and run two instances of the game, you’ll see that each tank can be controlled independently, and that their movement is synchronised across both clients.
That’s it for this part of the tutorial, in the next part we’ll add a system to handle different spawn positions.
See you next time.
Download UnityTanksAssets package
Download Complete Project for Part 3
I got a curious problem. After of attach the PUNTutorial script to the Player prefab (tank) when I run th instance of the game and join to a room, my prefab change to a worker :l Its normal that???
That’s because you have got the PUN demo folder in the project, and it’s picking up the player prefab contained in that before the player prefab we made for the tutorial.
You can either delete the PUN demo folder, or rename the tutorial player prefab (don’t forget to also update the name in the line of code that instantiates it, line 49 of the GameManager script, to reflect the new name).
Thanks for pointing this out, I’ll update the tutorial to prevent this from happening in future.
Thanks, it was the demo folder.
Every time I hit the play button to play the UI (created in part 2 of this tutorial), I get an error message saying: “ArgumentException: Input Axis Horizontal is not setup”. What is causing this and how do I fix it?
This sounds like your Input Manager settings in Unity have been changed from their default settings, and the horizontal axis has been deleted or had its name changed.