
Part 1
What is this tutorial?
This tutorial aims to demonstrate the basic concepts needed to create a multiplayer game. In an attempt to keep it as clear and concise as possible I will keep the game design quite simple, therefore this should be seen as a basis from which to build a game, rather than a tutorial for a complete and finished game.
Who is this tutorial aimed at?
This is aimed at people with a reasonable knowledge of C# and Unity, but little or no experience of network game programming. As such I won’t be explaining in depth basic C# programming concepts or basic Unity concepts, unless it is appropriate within the scope of the tutorial. I also won’t be delving too deeply into the complexities of networking, I’ll just explain enough to cover what we do in the tutorial which should hopefully give enough information to go on from here.
Notes
For the Unity editor layout I will be using the default Tall layout (Window->Layouts->Tall), but with the Game Window docked beneath the Scene Window, however you are free to use whichever layout you are most comfortable with.
Any names I suggest for things such as project names, scene names and gameobjects etc. are completely arbitrary, and you can change them if you wish. However if you do change them you need to make sure you also change any references to them that may come up later in the tutorial to avoid errors.
For ease of following this tutorial I would suggest you probably just go with my names for now.
Part 1a Setting up the project and scenes
- Start by creating a new 3D project and call it Unity Networking Tutorial.
- Create a folder in Assets, and name it Scenes
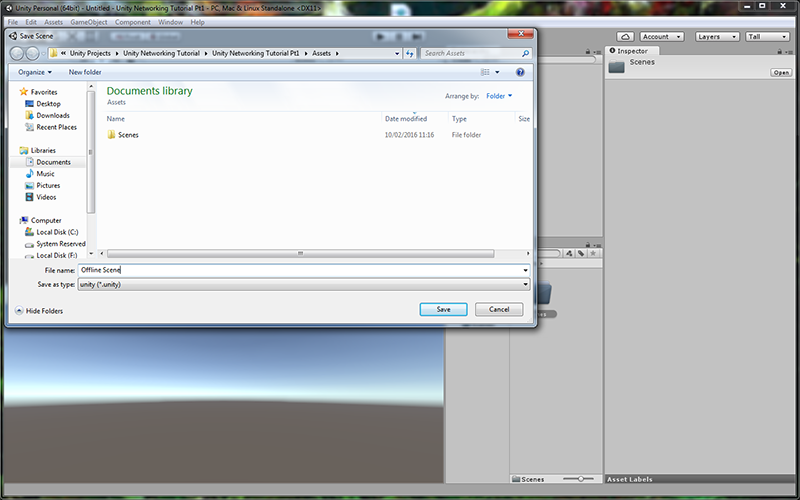
- Save the current scene into the Scenes folder, and name it Online Scene
- Save the current scene again into the scenes folder, but this time call it Offline Scene
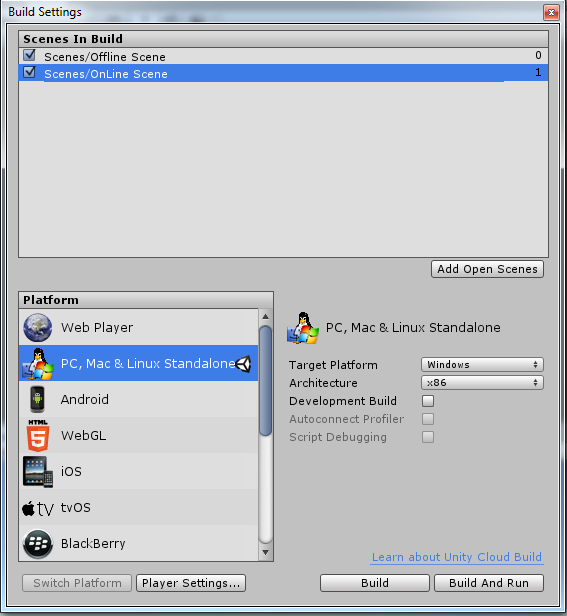
Now add the Offline and Online scenes to the build settings, if we don’t do this we will be unable to use them with the NetworkManager in the next step.
Part 1b Setting up the NetworkManager scenes
Now we’ve got the empty scenes saved and added to the build settings, we need to start populating them with gameobjects. The first thing we need is a Network Manager, which fairly obviously manages the network, so we’ll add that now.
With the Offline scene open (it should already be open, if you followed the above instructions), create an empty gameobject (GameObject->Create Empty) and rename it NetworkManager. Now with the NetworkManager gameobject selected in the hierarchy use the Component Menu to add a NetworkManager and NetworkManagerHud component.

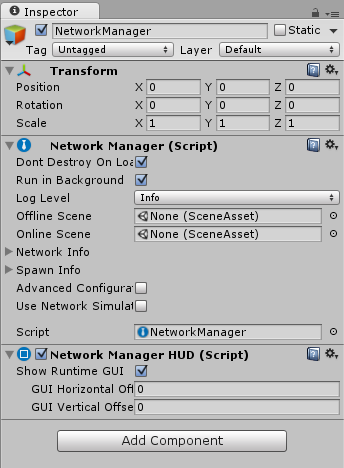 Once you have added these components your NetworkManager gameobject should now look like this.
The NetworkManager component will handle the nitty gritty of the network connection between all the players, and has various settings exposed in the inspector, only some of which we need to worry about for this tutorial.
I’ll cover these as we go along and explain what they do.
The first thing we need to look at in the NetworkManager is the Offline Scene and Online Scene settings.
The Offline Scene is where we will show the menu that will allow players to host or join a game, and the Online scene is what will load when the player joins a game (either as a host or client). This switching of scenes is handled automatically by the NetworkManager.
Strictly speaking there is no need to have separate scenes for this, however by doing so you will save yourself some possible headaches later.
So with that in mind, go ahead and drag the Offline Scene from the scenes folder in the project window and drop it onto the Offline Scene entry in the NetworkManager, then do the same for the Online Scene and drop that into the Online Scene entry in the NetworkManager.
The NetworkManagerHUD is solely for the purposes of displaying a basic menu that allows hosting and joining of game sessions. I intend to make another tutorial at a later date that shows how to implement your own UI instead.
Part 1c Setting up the player prefab
Now we have set the scenes up, we need to create a gameobject that will be our player in the game. For this tutorial we will just use a 3d Cube which we can create using the menu option GameObject->3D Object-> Cube.
Once you have added the cube to the scene, rename it to Player and set it’s transform and rotation to 0,0,0 if it isn’t already.
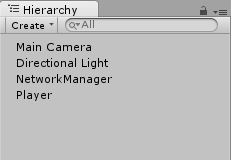 Your scene Hierarchy should now look like the picture to the left.
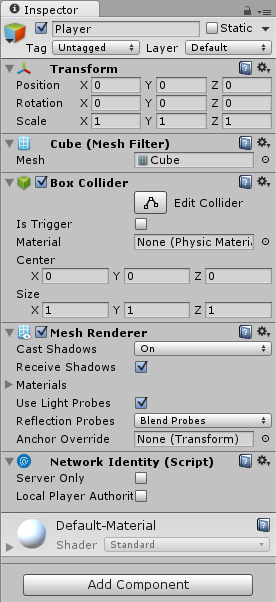
Before your player object can be used in a network game it has to have a NetworkIdentity component attached to it. The NetworkIdentity component controls an object’s network identity, and it makes the networking system aware of it.
Attach a NetworkIdentity component to your player by selecting the player and then using the menu item Component->Network->NetworkIdentity.
Your player should now look like this…
Now we need to create a prefab of the player object, so firstly create a new folder under Assets and name it Player, then drag your player object into this folder to create a prefab of it there. You can now delete the original from the Hierarchy.
Now we need to tell the NetworkManager about your player, so it can spawn you into the game when you start a host or join a game.
To do this, find the Spawn Info section of the game manager and if necessary, expand it by clicking the small triangle to the left of the words Spawn Info.
Under Spawn Info you will see an entry for Player Prefab. Drag the player prefab you just created into the Player Prefab slot in the NetworkManager.
Your NetworkManager should now look like this

At this point, we’ve got the bare minimum needed to run the game and host or join a session.
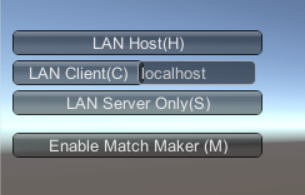
You can test this now if you like. If you run the game you will be presented with a menu (courtesy of the NetworkManagerHUD component) that allows you to host a game, join a game or start as a server (ignore the matchmaker option for the time being).
If you build the game you can run two instances of it and host a game in one, and join the game in the other.
For now all that will happen is that the menu will change to show the connection status and a disconnect button, and you’ll see a cube in the centre of the game scene (both player objects spawn exactly on top of each other). Not so obviously, the active scene will have also changed to the Online scene you created at the start of the tutorial.
That’s everything for Part 1 of the tutorial, without writing a single line of code we have the basic framework of a multiplayer game up and running!
In the next part we will set up the online scene, handle spawning the players in differing locations, and enable moving them based on player input.
Hi! This post could not be written any better! Reading through this post reminds me of
my previous room mate! He always kept talking about this.
I will forward this page to him. Fairly certain he will have a good read.
Many thanks for sharing!
Hi ong luon day dien,
thanks for the nice comment, and I hope your friend finds it useful too.
I like what I’ve seen in your tutorials, especially because I just started trying to learn UNet.
Do you have a copy of the latest project files available?
Thanks.
Hi Paul,
thanks for the feedback, and I’m pleased you like the tutorial. If things go according to plan I’ll be publishing the final part today, and I’ll be providing a download link to the project files for the complete project.
Would you find it useful to have the project files for each part of the tutorial as well? If so I may be able to sort something out for that over the next few days.