
Welcome to part 2 of my Unity 5 basic network game tutorial. In this part we will set up the online scene, handle spawning the players in differing locations, and enable moving them based on player input.
Part 2a – Online scene setup
Before we start on the player movement it will be a good idea to re-design the Online scene so that we have a (very) basic game arena in which our players can do battle. Feel free to embellish this scene as you see fit to make it more interesting.
Go ahead and load the Online scene (double click Online Scene in the Assets\Scenes folder) and save any changes to the existing scene if prompted.
With the Online scene loaded let’s make the ground. Create a plane (GameObject->3D Object->Plane) and rename it Ground, then set it’s transform settings to these values:-
![]()
Next, let’s give our ground a bit of colour.
- Create a new folder in your assets folder and name it Materials.
- Double click the new folder to open it, and right click in the empty window, then from the popup menu select (Create->Material) and rename the new material GroundMaterial.
- With the Ground material selected, in the inspector click on the colour selector to the right of the Albedo setting and change it’s colour. I went with a nice brown colour (RGB value 122,78,0).
- Lastly, left click and drag the Ground material from the Project Window onto the Ground plane in the scene view, and you should see your new colour applied to the ground.
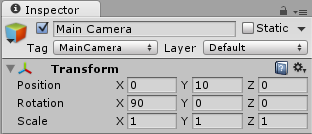
Now we should sort out the camera. This is going to be a top down game, so for the time being let’s move the camera into a position that better suits this (eventually the camera will be attached to the player object). With the Main Camera selected change it’s transform settings to the following:-
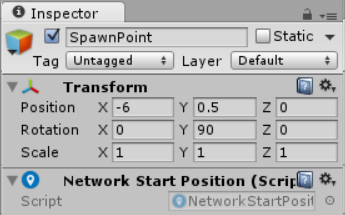
The final thing for our game scene is to create a couple of spawn locations for our players (you can in fact make as many of these as you like). Add an empty GameObject to your scene (GameObject->Create Empty) and rename it SpawnPoint. Now add a NetworkStartPosition component to it (Component->Network->NetworkStartPosition) and set its transform settings as follows:-
Now make a duplicate of this SpawnPoint and set its transform settings as follows:-
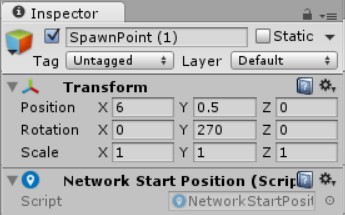
The network manager will use these GameObjects to set the spawn position for players when they join the game.
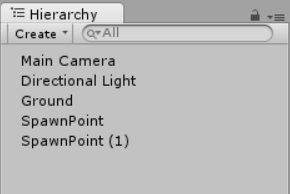
Your Online Scene hierarchy should look like this now:-
At this point it’s probably a good idea to save the scene (File->Save Scene) to avoid the risk of losing all our hard work so far.
If you switch back to the Offline scene, run the game and start a host, you will see a much more obvious scene change now.
While we are at it we can make one more small change to the NetworkManager. Under Spawn Info change Player Spawn Method to Round Robin. This means that players will be spawned at consecutive spawn points rather than randomly chosen ones.
Part 2b – Player movement
Now we’ve come to the part where it gets a bit more interesting and we even need to write a bit of code! But before we do that let’s first stop to talk about a bit about how the Unity networking system works.
The Unity networking system introduced in Unity 5 (often referred to as UNET), is what’s known as a server authoritative system, which simply put means that only the server PC can make changes to networked game objects, and it then propagates those changes to all connected clients.
To give an example, if a player picks up a health pack, it sends a command to the server telling it so, and then the server can update the health (by an amount decided on the server) for that player object, on all connected clients. This prevents possible cheating, because if the client was allowed to update it’s own health it could, in the hands of an unscrupulous player, be made to add more health than it should. By having only the server handle this sort of thing it makes the game far less prone to cheating.
Hopefully that all makes some kind of sense! But in any event it leads me onto a change we want to make to our player object. With the system as I have just described it, if we want to move our player, we would have to send the new position to the server and then wait for it to send back an update before our player would actually move.
Therefore, you would be in a situation where you pressed a movement key and your player didn’t respond instantly, this can make the game feel very laggy, with anything but the lowest of latency. So ideally we would like to be able to update our position ourselves so we get instant visual feedback, and then have our new position sent to all the other players.
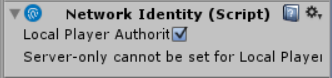
This is where the LocalPlayerAuthority setting of the NetworkIdentity component comes into play. By setting this to true, we can make changes to our own player without having to wait for the server to do it for us.
So before we do anything else let’s sort that out. Select your player prefab (in the Assets/Player folder) and in the inspector tick the LocalPlayerAuthority box.
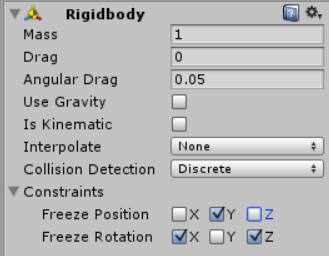
Next, with your player prefab still selected, add a RigidBody component (Component->Physics->RigidBody). untick Use Gravity and set Constraints as follows:-
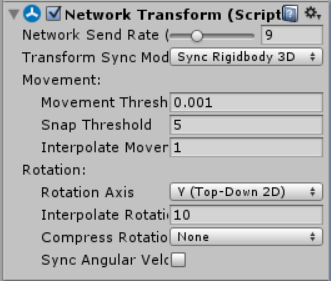
Now we need to add to the player a network component that will do the work of synchronizing our player’s position and rotation across the network. So with the player prefab selected, add a NetworkTransform component (Component->Network->NetworkTransform).
We need to check that the Transform Sync Mode is set to Sync RigidBody 3D, and we need to change the Rotation Axis to Y (Top Down 2D) as that is the only axis we will be rotating on, and it saves sending unnecessary network data. We’ll also change the Interpolate Rotation value from 1 to 10, otherwise the rotation on remote clients is very slow to catch up.
Your NetworkTransform component should look like this:-
Now comes some code, create a new script in the Assets/Player folder and call it PlayerNetworkMove and paste this code into it replacing the default code then save the file.
Now we need to add this script to the player prefab, so with the player prefab selected use the Component menu to add the script (Component->Scripts->PlayerNetworkMove) or just left click the script and drag it onto the player prefab.
This is a fairly simple script that reads keyboard input and the uses the result from the WASD key presses to rotate the player and move it forward and backwards in the direction it’s facing. Whilst this works perfectly well for a single player game, you will see if you build and run the game and run a host and client, that you have problems with it in a multiplayer game. As you move and rotate one player the other player also moves and rotates. This is because the PlayerNetworkMove script is running on every instance of the player in the scene. So we need to make a couple of changes to fix this.
Firstly we need to add UnityEngine.Networking to the list of using statements at the top of the code and then we need to change our class type from MonoBehaviour to NetworkBehaviour.
Making these changes gives us access to all the new networking features introduced in Unity 5.
Next we need to make sure that we only read the input from the local player and only manually move the player object owned by the local player. As our script is now a NetworkBehaviour, it has a boolean property called isLocalPlayer, which will only be true for scripts that are running on the client that owns the player object. So we can check the value of that and act accordingly.
Change the Update function to this
This checks to see if the script is running on the local player, and if not it just returns without doing anything else, otherwise it gets the player input as before.
We also need to add the same check to the FixedUpdate function, as so
If the script isn’t running on the local player, fixed update will return without doing anything, otherwise it will move the player as before.
The player position and rotation for the local player is automatically synchronized with all the other clients by the NetworkTransform component we added earlier, so we don’t have to worry about that.
This is the full network aware PlayerNetworkMove script
With this script on the player object, you can build and run two instances of the game and start a host and client. You’ll see two cubes in the scene, both of which can be controlled independently of each other, and as you move a player in one client it is updated in the other client.
That’s it for part 2 of the tutorial, in the next part we will make the camera follow the player, and give each player its own name and name label.
Very good tutorial !
I search for a tutorial like this for a long time !
So, I hope you will continue this !
Bye, xyHeat
Hi Nathan,
thanks for the nice comment and glad you found it useful.
I’ll definitely be continuing this, I should be able to post a new part approximately once a week. I’ve already made a start on part 3.
Excellent tutorial,
this is exactly what i was looking for, thank you.
Can i ask you a question?
How i can create a fixed server, like a MMO for example?
Hi Rodrigo,
thanks for the nice comment.
Regarding the server for the MMO, I’m not sure this can be achieved with the Unity HLAPI in its current form. But in any event it’s not something I’ve ever set up myself, so I’m not really in a position to offer advice. Sorry about that.
It’s okay man, thanks for the reply.
can i make one more question?
What’s the limitations with the Unity HLAPI? perhaps my example was
exaggerated, i was thinking of something like a small map with a group of 20 players, with all players connecting on a fixed server.
If i run this tutorial example on a server but without spawn a player, and on the client build connect automatic to this server. This make any sense?
Sorry, i dont know anything about networks… :/
I imagine that should be achievable, but it’s still bigger than anything I’ve ever made. Most of my multiplayer games have been fast paced FPS until now, and I found the performance dropped off quite quickly above 8 players.
I would imagine that with 20 players+ you would need to implement some kind of network visibility to reduce network traffic. The UNET HLAPI has built in support for this http://docs.unity3d.com/Manual/UNetVisibility.html.
Regarding the fixed server, assuming you aren’t intending to host it on your own hardware, I guess you could rent a dedicated server and run your game in dedicated server mode on it.
Thinking about it a bit more, that probably pretty much answers your original question as well.
Thanks again Martin, this helped me a lot.
I’m looking forward part 3 =D
You’re more than welcome.
Part 3 is well under way now, and on schedule for release this week as planned.
Hey Martin,
All my players are spawning at 0, 0. I have two Spawn points with Network Start Position in it.
Hi Rodrigo,
have you followed the tutorial exactly as I posted it, or have you made any alterations?
I get what i did wrong, i was doind everything on OfflineScene lol.