
Welcome to part 3 of my Unity 5 networking tutorial.
In this part we will give the players their own name and name tag, and we’ll make the camera follow the player that you are controlling.
Part 3a – Synchronizing the PlayerID
To keep things simple we are going to automatically generate a unique name for each player that joins the game, rather than let the user specify one. So first of all we need to decide on a way to obtain a unique identifier for each player.
Luckily the Unity networking system provides us with an easy way to do this, by virtue of the NetworkIdentity.netId. Every networked GameObject is allocated a netID number by the networking system, which is used by Unity to keep a track of that object, and as the netId is unique for every gameObject we can make use of that.
So with that in mind create a new script in the Assets/Player folder and name it NetworkPlayer. Double click the new script to open it in MonoDevelop (or whichever editor you use) and replace the default code with the following code.
The job of this script is to detect when the player joins the game, and then generate and store a unique name for said player.
First of all, note that like the PlayerNetworkMove script we wrote in part 2, this is also a NetworkBehaviour, rather than a MonoBehaviour.
Then, next we have
[SyncVar] public string playerID;
Basically this is a variable like any other, except that it has a [SyncVar] attribute (Synchronized Variable). What this attribute does is make sure that any time the variable’s value is changed, the new value is automatically sent to all connected players. Furthermore, whenever a new player joins, they receive the current value of that variable for all the other players already in the game.
In this case, we are going to use this variable to store the unique player name we generate later in the script, and as mentioned this will be automatically synchronized with all the other players so they will be able to see our name.
Let’s look at the next bit now, the CmdSetPlayer method.
[Command]
void CmdSetPlayerID(string newID)
{
playerID = newID;
}
If you remember in Part 2 of the tutorial I mentioned that only the server can make changes to networked objects, well, this is a case in point, we want to be able to change the playerID, so we need a way for the server to change it for us. In order to do this, we need to create a method that updates playerID and give it an attribute, the [Command] attribute. Essentially what this does is make sure the following function will only be run on the server. We also need to follow a specific naming convention for a server command, specifically it has to start with Cmd.
In this example, all the CmdSetPlayer method does is set the playerID value to the value of the newID argument, and because of the [Command] attribute this can only run on the server. Once the value of the variable has been changed, the [Syncvar] attribute of the variable means that the new value will propagate to all connected clients.
So now we come to the final part of the script.
public override void OnStartLocalPlayer ()
{
string myPlayerID = string.Format(“Player {0}”, GetComponent<NetworkIdentity>().netId.Value)
CmdSetPlayerID(myPlayerID);
}
This function is called on network player objects (but only on the client that owns the player), when they join the game. What this means is, that when you join the game, the OnStartLocalPlayer function will run on your player game object on your PC, but not on the game object representing your player on anyone else’s PC.
First of all it retrieves the player’s netId, which is a uInt value, and constructs a string in the format ‘Player n’ (where n is the netId value).
Then it calls the CmdSetPlayerID method, passing in the new playerID, which instructs the server to change the value, this new value is then sent to all connected clients (including the one that made the call) and their copy of playerID is updated with the new value.
Add this script to the player prefab in the Assets/Player folder, by dragging it onto the prefab, or using the Component menu (Component->Scripts->NetworkPlayer) and then save the scene.
If you build and run the game now and run one instance in the Editor and one instance in standalone, windowed mode, you will be able to see this working.
With a host running and a client connected you can check the player(clone) game objects in the inspector, and you will see that the exposed playerID syncvar has a different value for each player.

So far, so good, but what we actually want is for the playerID to be displayed in the game, so that ourselves and other players can see it. However, before we do that I want to deal with the camera, and make it so that it follows your player as you move, we’ll come back to the playerID label afterwards.
Part 3b – Setting up the camera
The first step in setting up the camera is to load the Online scene, this is important, because if you do the following steps with the Offline scene loaded you’ll end up with no camera on the menu and two cameras in the game scene.
So, with the Online scene loaded, drag the player prefab from the Assets/Player folder into the Hierarchy window, to create an instance of it in the scene. Then we need to drag the Main Camera game object onto the player game object you just created, so that the camera becomes a child of the player, and make sure its transform settings are set to Position (0,10,0) and Rotation (90,0,0) like so:-
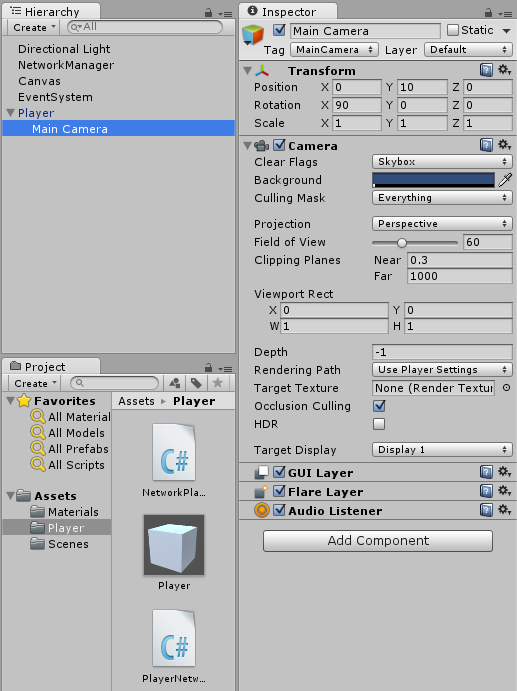
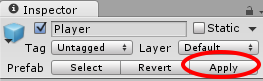
Once these changes have been made, we need to click the Apply button on our player game object in the hierarchy, to save the changes to the prefab.
Once the changes have been applied go ahead and delete the player game object from the hierarchy. You will notice in the Game window there is a message saying that the scene is missing a fullscreen camera, you can safely ignore this for our purposes.
One further change I’d like to make, is to add a texture to the ground material we made in part 2, as this will make it easier to see that the players are moving, compared to how it would be with a featureless brown ground surface. So to do this, firstly create a new folder in Assets and call it Textures. Then download this texture (Click on the picture or the link below it to open it in your browser, then right click and select Save Picture As…)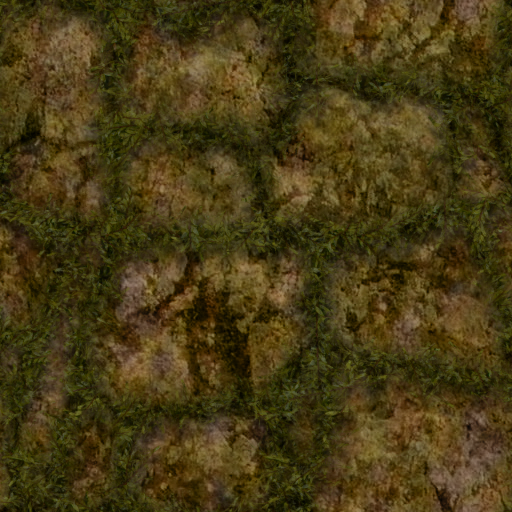
http://www.doofah.com/tutorials/wp-content/uploads/2016/02/groundTexture.png
Once you have saved the texture to your PC, copy it into the textures folder you just made. You can also, if you wish, use instead any suitable texture you may already have.
Next, select the GroundMaterial in the Assets/Materials folder, and click the small circle just to the left of the word Albedo in the inspector.
This will open the Select Texture dialog… 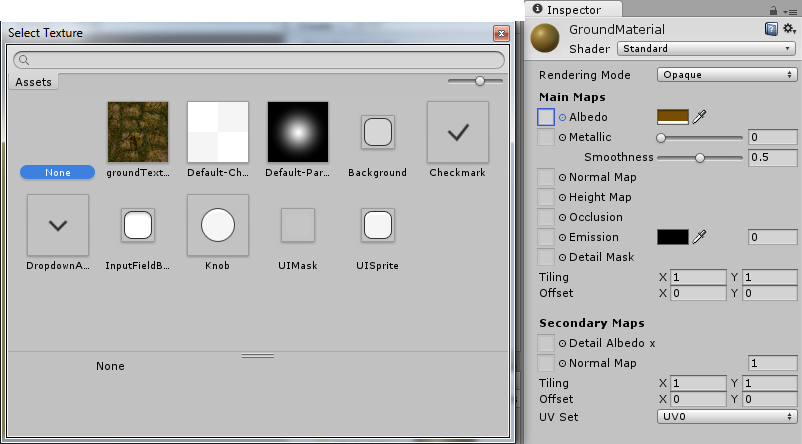
…within which you should see the groundTexture you just downloaded. Double click the groundTexture to apply it to the material and dismiss the dialog.
Then set the albedo colour to white and lastly set the X and Y tiling values for the Main Map both to 5, so the texture isn’t stretched quite so much. Your Ground Material should look like this now…
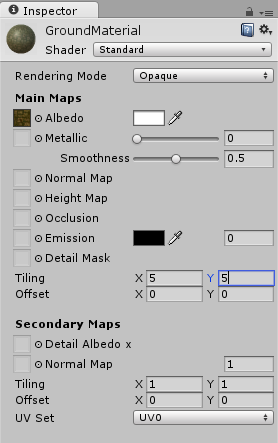
… and your ground plane should have a nice tiled texture on it.
Now, save the scene and re-open the Offline scene.
If you build and run the game, and start a server and client, you’ll notice that there is some strange behaviour; Namely on one client the camera doesn’t move when you move the player, but if you move the other player, the camera moves in both clients. This is because both player objects in the game have their own camera and they are fighting for control. We can however, fix this with a small change to the NetworkPlayer script.
So to fix the camera problem, open the player script in MonoDevelop and just below the playerID variable add a private variable of type Camera and call it playerCam and below that add an Awake function like this :-
Camera playerCam;
void Awake()
{
playerCam = GetComponentInChildren<Camera>();
playerCam.gameObject.SetActive(false);
}
What this does, is as soon as any player object is created (local player or otherwise), it gets a reference to the attached camera and then disables it, which is ideal for player objects that belong to other players, but not so good for our own player, on our own player we want the camera to be enabled. To manage this we can make use of the OnStartLocalPlayer function again by the addition of the following line
playerCam.gameObject.SetActive(true);
which is just the opposite to what we did in the Awake function, and re-enables the camera, but because we are doing it in the OnStartLocalPlayer function, it only happens for the player object we are controlling. So the overall effect is that the only camera that is enabled is the one that is on the player object we are controlling. Also a side effect of disabling the Camera GameObject rather than just the Camera component, is that we don’t need to specifically disable the associated AudioListener as it is automatically disabled along with the camera.
This is the entire NetworkPlayer script as it should now look.
If you build and run the game now, you will see that the camera now works as it should, i.e. it only follows the local player as it moves. Now we have the camera working how we want, it’s time to sort out the playerID label as previously promised.
Part 3c – Add The Player ID label
What we’d like is a label that displays every player’s unique playerID and one way to achieve this is to use a TextMesh component.
So first off, drag the player prefab into the hierarchy to create an instance of it. Create a new empty game object (GameObject->Create Empty), rename it LabelHolder, drag it onto the player game object to parent it to the player game object and make sure its position is set to 0,0,0 and it’s rotation is set to 0,0,0.
Then create another empty GameObject and rename it Label, then drag this onto the LabelHolder gameobject to parent it to the LabelHolder . Next ,select the Label game object and add a TextMesh component (Component->Mesh->Text Mesh).
Your player should now look like this :-

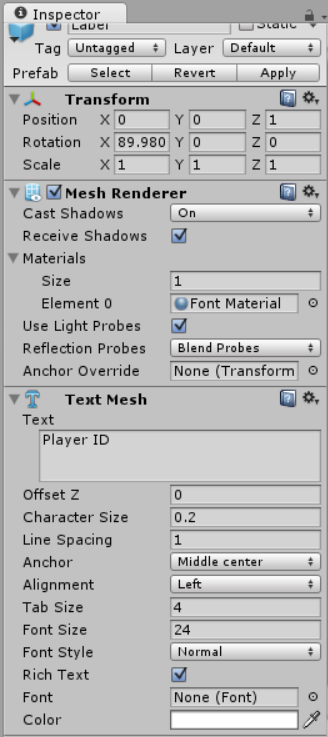
Now we need to change some of the default properties of the TextMesh we just added, so with the Label game object selected,
Set the Position to 0,0,1
Set the Rotation to 90,0,0
Set the Text Mesh Text property to “Player ID”
Set the Character Size to 0.2
Set the Anchor to Middle center
Set the Font Size to 24
Then select the player game object and click apply to save the changes to the player prefab.
Once you’ve done all that your player label should look like this in the inspector. (Note that when the prefab was saved the rotation.x was subject to some floating point rounding error, so isn’t exactly 90 any more).
Having saved the changes to the player prefab you can now go ahead and delete the player object in the hierarchy window.
If you build and run the game, you should see that each player has a name tag above them with the default text “Player ID”. So all we need to do now is make it show the correct playerID and also tidy up the way the labels are rotated for other players that you can see.
The easiest way to stop the player labels from rotating as the players move around, is to stop both the camera and the labels from rotating at all, and we can do that in the NetworkPlayer script.
Open up the NetworkPlayer script for editing, and add the following under the playerCam variable, this gives us somewhere to store a reference to the label holder.
Transform labelHolder;
Then add the following line to the Awake function, this gets a reference to the label holder that we can use later.
labelHolder = transform.Find(“LabelHolder”);
Finally add an Update function to the script as so
void Update()
{
if(isLocalPlayer)
{
playerCam.transform.rotation = Quaternion.Euler(new Vector3(90,0,0));
}
labelHolder.rotation = Quaternion.identity;
}
The update function first does a check to see if it’s running on the local client, and if it is it resets the rotation of the camera, (we are only interested in our own camera).
Then for all player objects in the scene it sets the label holder rotation to zero.
The net effect of this is that regardless of how the players move and rotate, all the labels will stay in place above the player, which makes it much easier to read them.
This is the new version of the NetworkPlayer script with all the above changes included.
Part 3d – Setting the name label text
Now we come to the final bit of this part of the tutorial, setting the label text to match the playerID.
We already know that the playerID is set when the player joins the game and that the value is synchronized to all players, however we then need a way for each player object to update the state of its components (in this case the TextMesh.text property) to reflect the change in the playerID variable. We can achieve this in one of two ways, either by using RPCs (Remote Procedure Calls) or by using a syncvar hook function, and for this task we’ll go with the hook function. I’ll cover RPCs later in the tutorial series.
Basically a syncvar hook function is a function that is automatically invoked on all clients whenever the associated variable is changed, and then we can make changes to the clients game object based on the value of the variable, in this case we will set the TextMesh to show the new name.
To set up our playerID syncvar to use a hook we first need to create the function that it will call when the variable value changes, like so :-
void OnPlayerIDChanged(string newValue)
{
playerID = newValue;
var textMesh = labelHolder.Find(“Label”).GetComponent<TextMesh>();
textMesh.text = newValue;
}
As you can see this is quite a simple function, its task is to locate the TextMesh component on the player object and then set its text to the new value passed into the function.
Also note that the first statement assigns the new value to the playerID variable. if this step is omitted when using hook functions, then when a player joins a game his copy of remote clients won’t have their version of that syncvar updated, which could lead to problems later on.
Now if you build the game and run a host in the editor you will see that your player’s name label is set to ‘Player 1’, and then if you run another instance of the game and join as a client, in the editor the 2nd player has the name ‘Player 2’. So that’s all as expected, the SyncVar has sent the new value of the second player’s playerID to the first player and both player objects have updated their labels.
But wait! If you check the player objects on the client instance, the player you control has the label ‘Player 2’, but the other one still has the default ‘Player ID’ text, so the hook function hasn’t been called for any player objects that were already in the game when you joined.
On the face of it, this looks like a bug, however Unity have confirmed that it is intended behaviour as explained by seanr on the Unity forums, much more concisely than I could
SyncVar Hooks are for changes in state, not for initial state. There is the OnStartClient callback for handling initial state.
There is no context during a SyncVar hook, so if they were called for initial state, the client would not be able to tell the difference between initialization of a variable and a change in the value of a variable. This causes un-expected results.
For example, for a “[SyncVar] int health” with a SyncVar hook that causes a client-side “blood-spurt” effect when the object takes damage, the object would play the blood-spurt for any objects with non-maximum health when joining a game in progress. The hook would be called with the new health value, which is different from the default health value, so the object thinks it has taken damage – so it plays its blood-spurt. But this is not what should happen. Setting the initial health of the object to its current value from the server should NOT play the effect.
This applies to all kinds of state changes, such as animation state, particles, etc. Initialization is different from incremental changes and the client-side code needs to know which is happening.
So with that in mind we need to add one more simple function to the NetworkPlayer script to override OnStartClient as follows :-
public override void OnStartClient ()
{
OnPlayerIDChanged(playerID);
}
And that’s it, all this does is pass current value of playerID to the OnPlayerIDChanged function, so that it can update the text on the TextMesh. The values of SyncVars on objects are guaranteed to be initialized correctly with the latest state from the server when this function is called on the client.
This is the full version of the NetworkPlayer script as it stands
If you save this and then build and run the game you should see that the labels are displayed correctly for all players on all clients and they stay horizontal above the player, no matter how it moves and rotates.
That’s it for part 3 of the tutorial – in the next part we will cover setting up team colors for the players and shooting.
Just curious, is there a reason you use GetComponent()?. The netId variable is already referenced to the NetworkInstanceId in the NetworkBehavior base class. This will work just fine as I understand:
public override void OnStartLocalPlayer ()
{
string myPlayerID = string.Format(“Player {0}”, netId.Value);
CmdSetPlayerID(myPlayerID);
}
You are right, that line shouldn’t have made it onto the tutorial. In fact you may notice the line beneath it actually references the built in version rather than the variable I declared above it, and in subsequent iterations of the script I had already removed the GetComponent call.
Thanks for pointing out the typo though, I’ll fix it now.
Everything working, amazing tutorial.
That’s really good to hear, glad you’ve found it useful 🙂
Part four will be following in the next few days.
Pingback: nanoo