Welcome to part 7 of my Unity 5 basic network game tutorial, in this, the final part, we will improve the respawn process and implement health pickups.
Part 7a – Improved respawn
In the last part of the tutorial, we implemented respawn behaviour when a player’s health reaches zero, however as it stands there is no delay between the player dying and being respawned, which dosn’t feel quite right. Also there is a subtle bug, whereby if the player dies close to his respawn point, you will see him ‘lerp’ to the respawn point on remote clients.
So we’ll go ahead and fix both of those issues now.
First of all, open the NetworkPlayer script in your editor and make the playerCam variable public.
public Camera playerCam
The reason for making the playerCam variable public is because we want to temporarily detach the camera from a player object when he dies. This enables us to reposition the player without the camera immediately following him. (This is a bit of a workaround to avoid the lerping issue mentioned earlier.
This is the only change we need to make to the NetworkPlayer script, so go ahead and save it, and then open the HealthAndDamage script in your editor, as we also need to make some changes there.
We’ll handle detaching and re-attaching the camera in the HealthAndDamage script, so we’ll store a reference to it in a variable in the HealthAndDamage script.
Add this line below the respawnPos variable:-
Camera playerCam;
And add this line to the OnStartLocalPlayer() function:-
playerCam = GetComponent<NetworkPlayer>().playerCam;
That’s the reference to the player’s camera sorted, so next we’ll add three new functions that will perform the improved respawn.
Add the following code just below the GetRandomSpawnPoint() function:-
So looking at these new fuctions, we have setVisibleState(bool state), what this does is turn on or off the player object renderer and name label, effectively making it invisible or visible depending on the state argument.
Then we have a coroutine, HandlePlayerDeath() which calls setVisibleState with a value of false, which makes all instances of the player object invisible.
Next, only if it’s running on the local player, it detaches the camera, preserving the camera’s current position, and then it repositions the player in the respawn position. As the camera is now not parented to the player, the game view stays in the position it was when the player died, and then it waits for two seconds. This is good for two reasons, first it gives a nice pause between dying and respawning and secondly it allows the clients to lerp to the new spawn position whilst they are invisible, so you don’t see it happen.
Finally it calls the Respawn() function.
The Respawn() function checks to see if it’s running on the local player, and if it is, it re-parents the camera to the player object and sets it’s local position to the correct value.
Then it tells the server to reset the player’s health to 100. Finally it makes the player visible again on all PCs on the network (which is why the last command needs to be outside of the isLocalPlayer check).
The final change we need to make is to the RpcHandlePlayerDeath() function, to make it call the HandlePlayerDeath() coroutine instead of handling the respawning itself. So replace the existing RpcHandlePlayerDeath() function with this new one:-
So that’s the new and improved respawn procedure finished, this is the new HealthAndDamage script with all the above changes implemented:-
Save this and then build and run the game, you will see that after a player dies he disappears for two seconds before reappearing at one of the spawn points with full health.
Part 7B – Health Pickup
Now let’s add a health pack that you can walk over to replenish your health. We’ll implement these as scene objects, so we can just place them in the editor and not have to worry about runtime instantiation and health spawn points etc. etc.
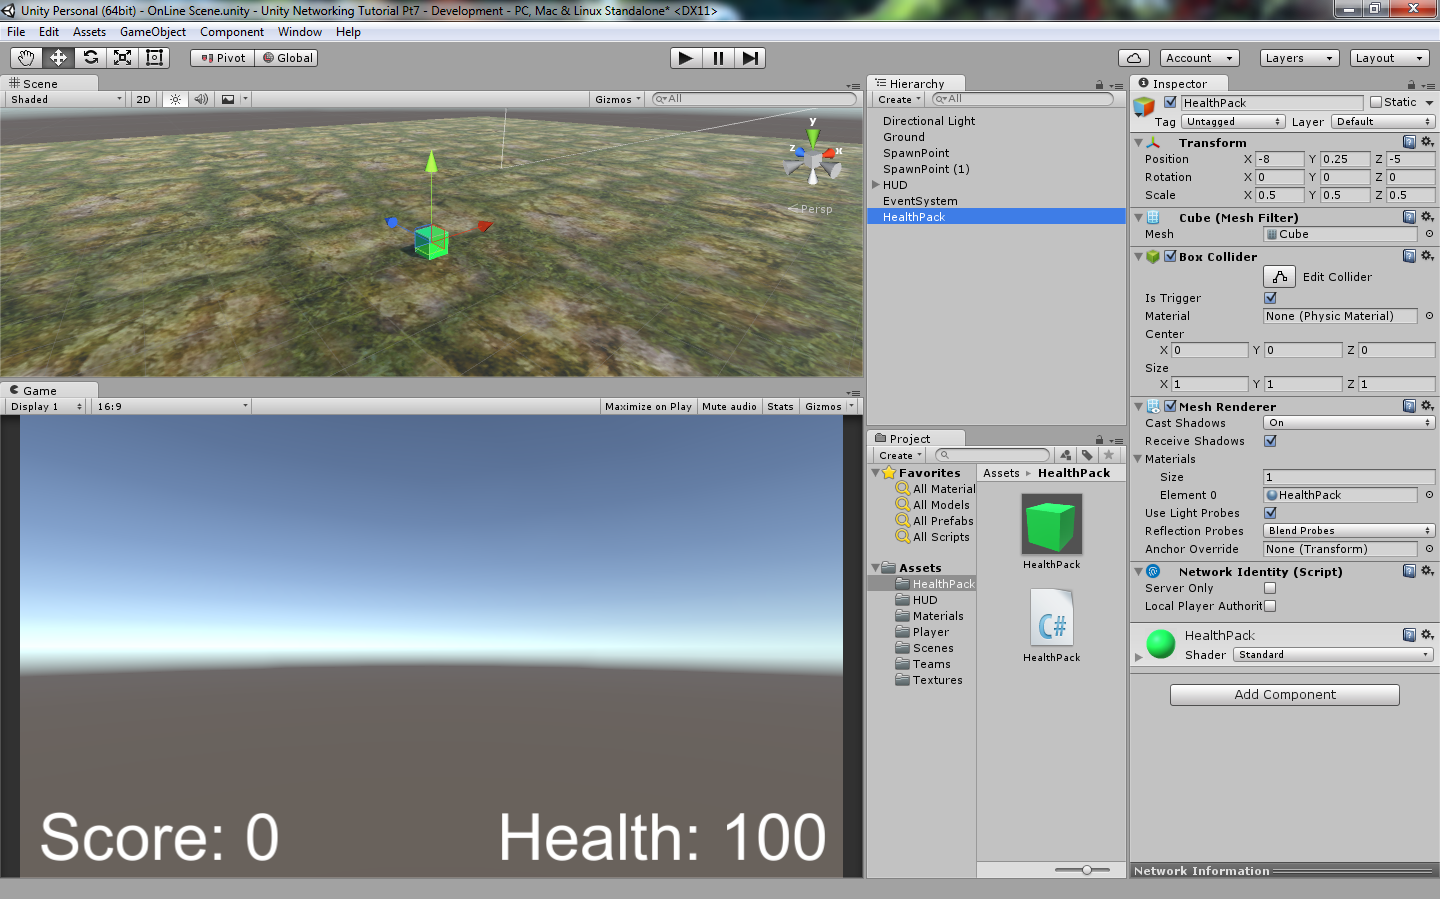
So the first thing we need to do is create a health pack game object. Open the online scene and add a 3d Cube game object (GameObject->3D Object->Cube) and rename it HealthPack.
Now make the following changes to the HealthPack game object:-
- Set its transform.position to -8,0.25,-5
- Set its scale to 0.5,0.5,0.5.
- Add a NetworkIdentity component to the HealthPack (with the HealthPack game object selected use the menu option (Component->Network->NetworkIdentity)).
- Set its Box Collider Is Trigger property to ticked
Next we’ll give it some colour; Open the Assets/Materials folder, create a new material in there and rename it HealthPack, then set the albedo Colour to a nice bright green.
Then drag this new material onto the HealthPack game object in the hierarchy and you should see the cube take on the colour of your new material.
Your scene setup should look like this after you have done all the above.
Now let’s add a script to the HealthPack game object to implement the functionality. Create a new folder in Assets and rename it HealthPack, and in that folder create a new c# script and rename it HealthPack. Then open the Healthpack script in your editor and replace the default code with the following:-
This is a fairly straightforward script with only five functions, also notice that it derives from NetworkBehaviour instead of MonoBehaviour. Now let’s take a look at each part in turn and I’ll explain what each one does.
Firstly we declare a variable, bool visible, and make it a SycVar with a hook function. The hook function OnVisibleChanged just activates or deactivates the attached Renderer and Collider based on the newValue argument. This has the effect of hiding or showing the health pack in the scene. Anytime the value of visible is changed this hook function will run and update the state of the HealthPack in the scene.
Next we have OnStartServer(), this will only ever run on a dedicated server when it starts, or the host when it starts. Therefore we can use this function to set the initial state of the HealthPack, and as we want all health packs to start enabled we set visible to true.
Next comes OnStartClient(), this runs on all clients when they join the game, and at this point all SyncVars are guaranteed to have the correct synchronized value, so we manually call the visible hook function, passing the current value of visible, so we can update the state of the health pack in our scene. This ensures that if a health pack is hidden on the server at the time we join the game, our local copy also gets hidden.
Then we have the HandlePickup() coroutine.
All this does is set visible to false, which makes the hook function run, which hides the health pack.
Then it waits 15 seconds and then sets visible to true, which makes the health pack visible and available for use again.
We can make direct changes to the visible variable as this script is running on the server.
Lastly comes OnTriggerEnter(Collider other)
By default, this function runs on all clients whenever a trigger collision is detected, however we only want to handle collisions with the HealthPack on the server. We could ensure this in a couple of ways, either by checking if isServer is true, or (and this is how we do it) with the use of attribute tags.
The use of the [Server] tag, would mean that the function will only run on the server, however as we can’t control when this function is invoked, we can’t prevent clients from calling this function, and although the function won’t run on the client, we would get a console littered with debug warnings. Therefore instead of using the [Server] attribute, we’ll use the [ServerCallback] attribute, which still makes it only run on the server, but also supresses the warning messages if the function is called from the client.
So having ensured this will only run on server, what does it do. Firstly it starts the HandlePickup coroutine as described above, to hide the health pack.
The ‘other’ argument, will contain a reference to the player game object that collided with the HealthPack, so we use GetComponent to access its HealthAndDamage script and add 10 points to its publicly exposed health variable.
There again we can do this directly as this script is running on the server.
This is where the power of SyncVars shows, because this updated health value is now automatically sent to all clients and because we had previously set up a hook function for the health variable, it in turn updates the health display on the HUD. So just by changing the value of the health variable everything automatically synchronizes and updates, very neat!
Save the HealthPack script and add it to the HealthPack game object by dragging it onto the HealthPack in the hierarchy window.
Then save the Online scene, and the open the Offline scene. You can now build and run the game and test the HealthPack.
So now we have a working health pack, which when a player walks over it will add some health and disappear, before respawning again 15 seconds later. You can duplicate the health pack game object as many times as you like and position them around your game scene.
There are a couple of obvious things about the health pack that could be improved, such as preventing it from increasing health above 100, and also stopping the player from flashing yellow when he picks up a health pack when he is below 100 health. But I’ll leave those as an exercise for you to figure out.
So that’s it for this tutorial series, I hope it’s proved understandable and useful and I’ll do my best to answer any questions that might arise.
You can download the complete Unity project files here:-
Unity Networking Tutorial