Photon Unity Networking Game Tutorial Part 4 – OnConnectedToMaster and Spawn Points

Welcome to part 4 of my Photon Unity Networked Game tutorial. In this part we will create a system for easily adding spawn points to any level, and also makes some improvements to the main menu.

Part 4a – Menu Changes
If you’ve been following the tutorial up until now, you may have noticed a minor bug when clicking the join game button. If you click it very quickly after starting the game you can get a run time error ‘JoinOrCreateRoom failed. Client is not on Master Server or not yet ready to call operations. Wait for callback: OnJoinedLobby or OnConnectedToMaster.’

This is because it takes a few seconds for the Photon networking system to connect and be ready, and until this is the case you can’t start or join a game. So to avoid the possibility of this happening we’ll disable the join game button until Photon tells us it is ready. While we are at it we’ll also make some changes to the way we have organised the menu in the game scene, in preparation for features that we’ll be adding later in the tutorial.

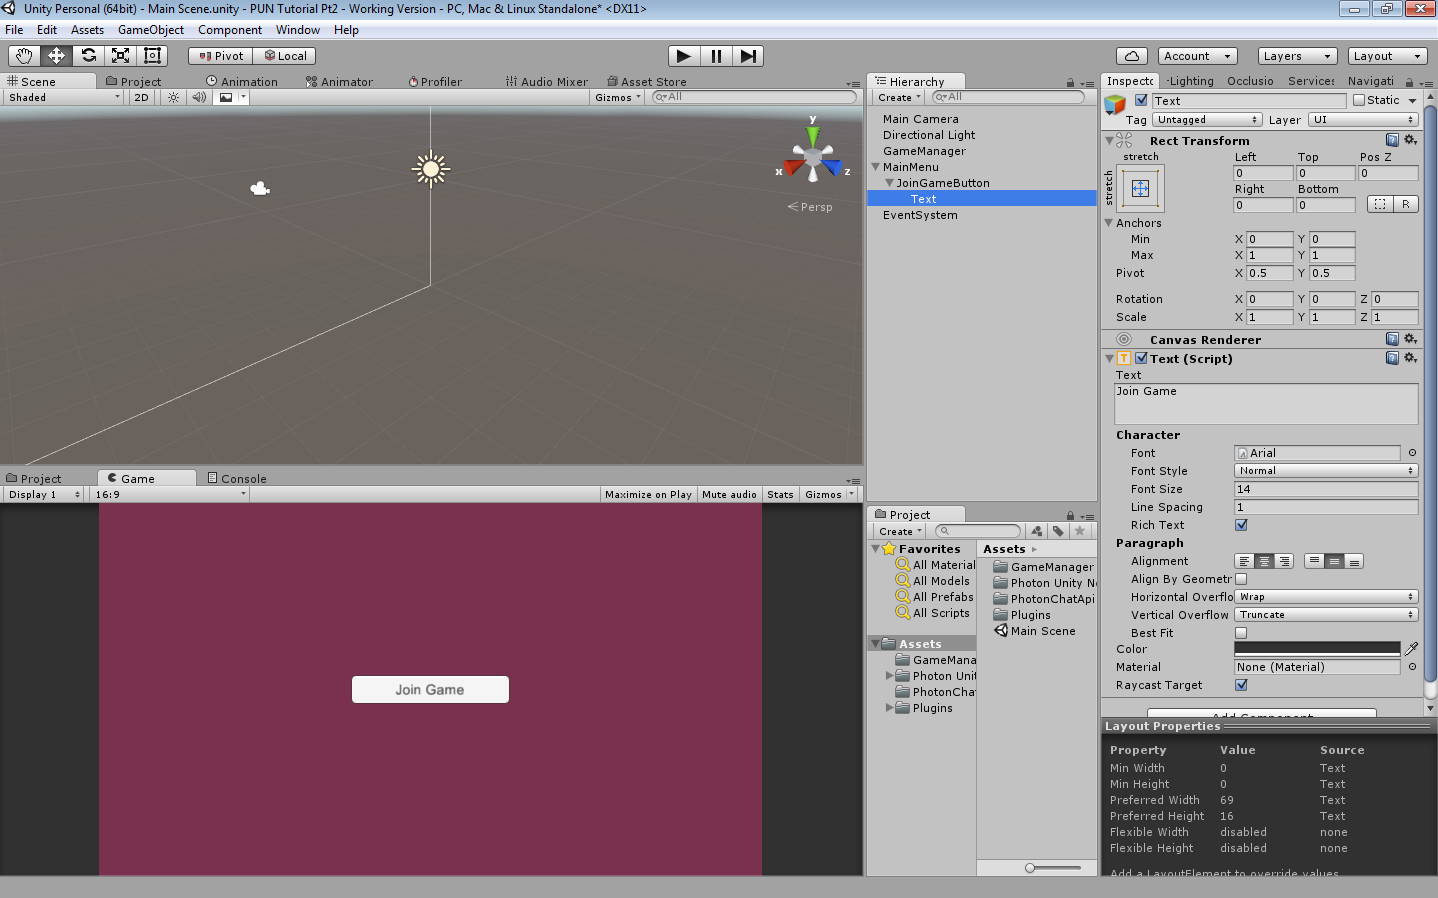
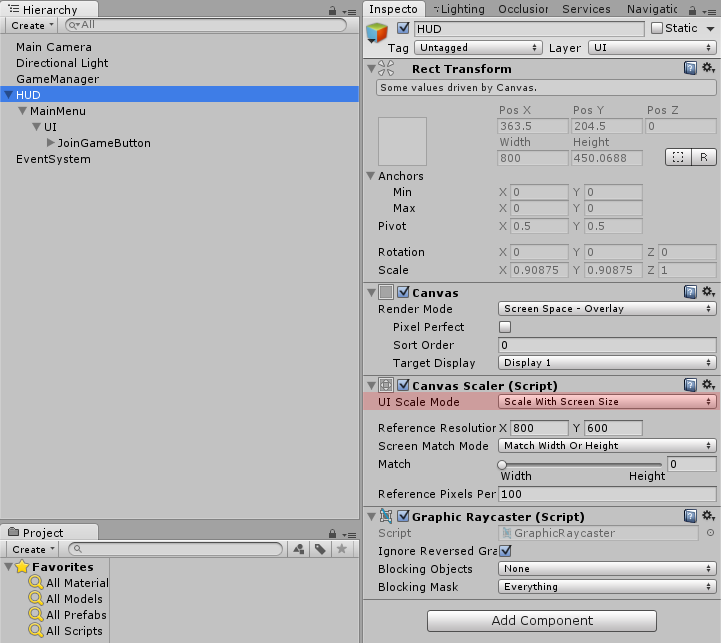
First of all rename the MainMenu game object to HUD and then change the Canvas Scaler UI Scale Mode to Scale With Screen Size. Next, add an empty game object as a child of HUD and call it MainMenu, then add an empty game object as a child of MainMenu and name it UI. Then make the JoinGameButton a child of UI by dragging it onto the UI game object in the hierarchy.

This is how your Hierarchy should look once all that is done:-

Now we need to write a small script for the MainMenu game object to handle the state of the join game button and the visibility of the main menu, but before we do that we need to add an extension class that we’ll use to find game objects by name, even if they are disabled. So create a new folder in Assets and call it Extensions, and in the extensions folder create a new c# script and call it TransformExtensions.
Then open the TransformExtensions script in your editor and replace the default code with this:-

This will add a new method to instances of transform (transform.FindAnyChild()) that will make it easy to get references to our HUD items without having to drag them into exposed properties in the inspector. Before you move on save the TransformExtensions script.

Now we can get to work on the HUD and MainMenu scripts, so create a new folder in Assets and call it HUD, and in the newly created  HUD folder create a c# script and call it HUD.
We will implement HUD as a singleton and use the DontDestroyOnLoad method to make it persist between scene changes in the same way we did with the GameManager script.

So open up the HUD script and replace the default code with the following and then save it :-

Now add the HUD script to the HUD game object by dragging the script onto the HUD game object in the hierarchy window.

For the time being that’s all we’ll be doing with the HUD, its main purpose is to act as a holder for all the game UI elements, however I may add some extra functionality to it further into the tutorial series.

Next, create a new c# script in the Assets\HUD folder and call it MainMenu, then add it to the MainMenu game object in the hierarchy by dragging the script onto it. Once again this is going to be a singleton, so open the MainMenu script for editing and replace the default code with this :-

You may have noticed that as well as making this a singleton class, it has also been made to inherit from Photon.Punbehaviour, this is so that we can override one of the Photon methods later in the script.

So next we need to start adding some code to allow the MainMenu script to enable the join game button when it’s okay to do so.

So firstly add these two lines to the top of the MainMenu class:-

And then add the following lines to the bottom of the Awake() function:-

What this does is find the UI game object and JoinGameButton in the menu hierarchy and stores the references in the two variables we declared, for easy access later. It then enables the UI game object (in case it has been disabled in the editor), which in turn means the join game button is visible, and then it makes the join game button non-interactable, so we can’t join a game until Photon is ready for us.

Having the menu (and later on, other UI elements) hierarchy organised in this way mean we can easily hide UI elements in the inspector (which can help to keep the scene view less cluttered with UI stuff), without disabling their associated script, which means that we don’t have to worry about their initial state when the game runs, and they will activate/deactivate themselves as required.

Save the MainMenu script and run the game, you should see that the join game button isn’t clickable, and you can’t proceed past the main menu.

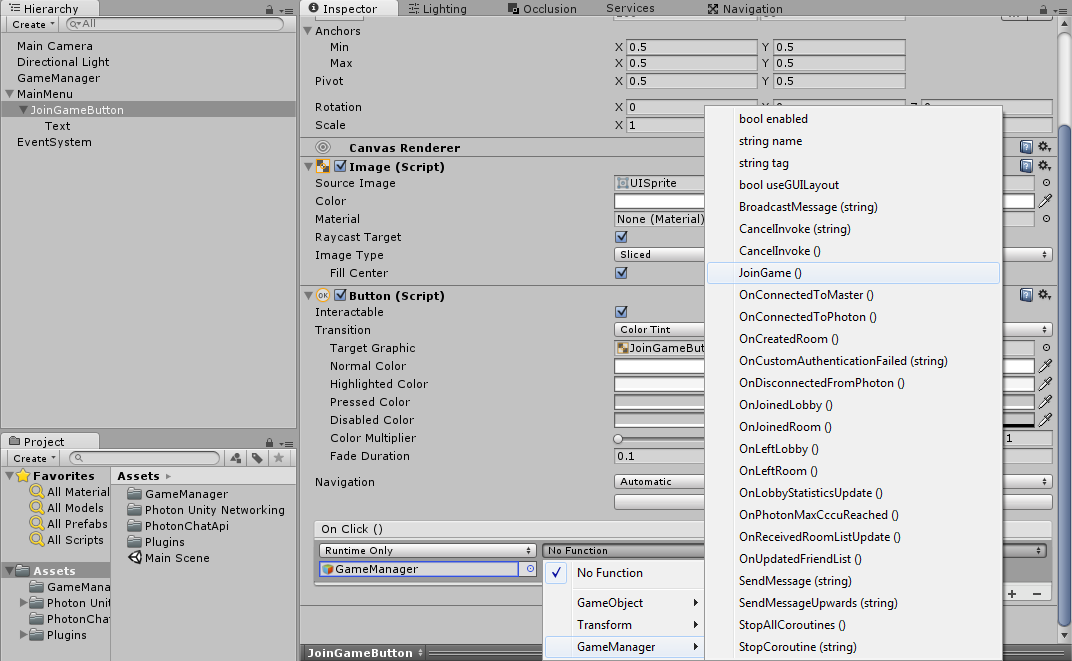
All we need to do to fix this is add the following method :-

This method is called on all Photon.Punbehaviours once the game is connected to the Photon master server and is ready to host or join a game. By overriding it we can take whatever action we want at that point, and in our case we just make the join game button interactable.

We just need the MainMenu script to do one more thing for now, and that is disable or enable itself depending on whether we are in a game or not, we can do this by using the value of PhotonNetwork.inRoom in the Unity OnLevelwasLoaded() method. So add the following method below the OnConnectedToMaster() method:-

When a level is loaded this will hide the Main Menu if PhotonNetwork.inRoom is true, and show the Main Menu if it’s false;

This is the complete MainMenu script as it currently stands :-

If you save the script and run the game, you should notice the join game button starts disabled, but becomes enabled after a few seconds, at which point you can use it to join a game.

Before moving onto the next part make sure to save the scene now if you haven’t already done so.

Part 4b – Spawn Points
As it currently stands all players spawn at the same fixed part of the map, which obviously is far from ideal, so now we’ll put in place a flexible method of adding spawn points to the game level.

The first thing we need to do is create a SpawnPoint class, so create a new folder in Assets\Player and call it SpawnPoints, and in that folder create a new c# script and name it SpawnPoint. Open the SpawnPoint script for editing and replace the default code with the following, and save the script :-

As you can see it’s very simple, and the only thing it actually does is disable the game object it’s attached to as soon as it runs. We don’t actually need it to do anything else, except provide us with position and rotation information, which we can get from its transform component. To make any object in the scene a spawn point you can just add this script to it.

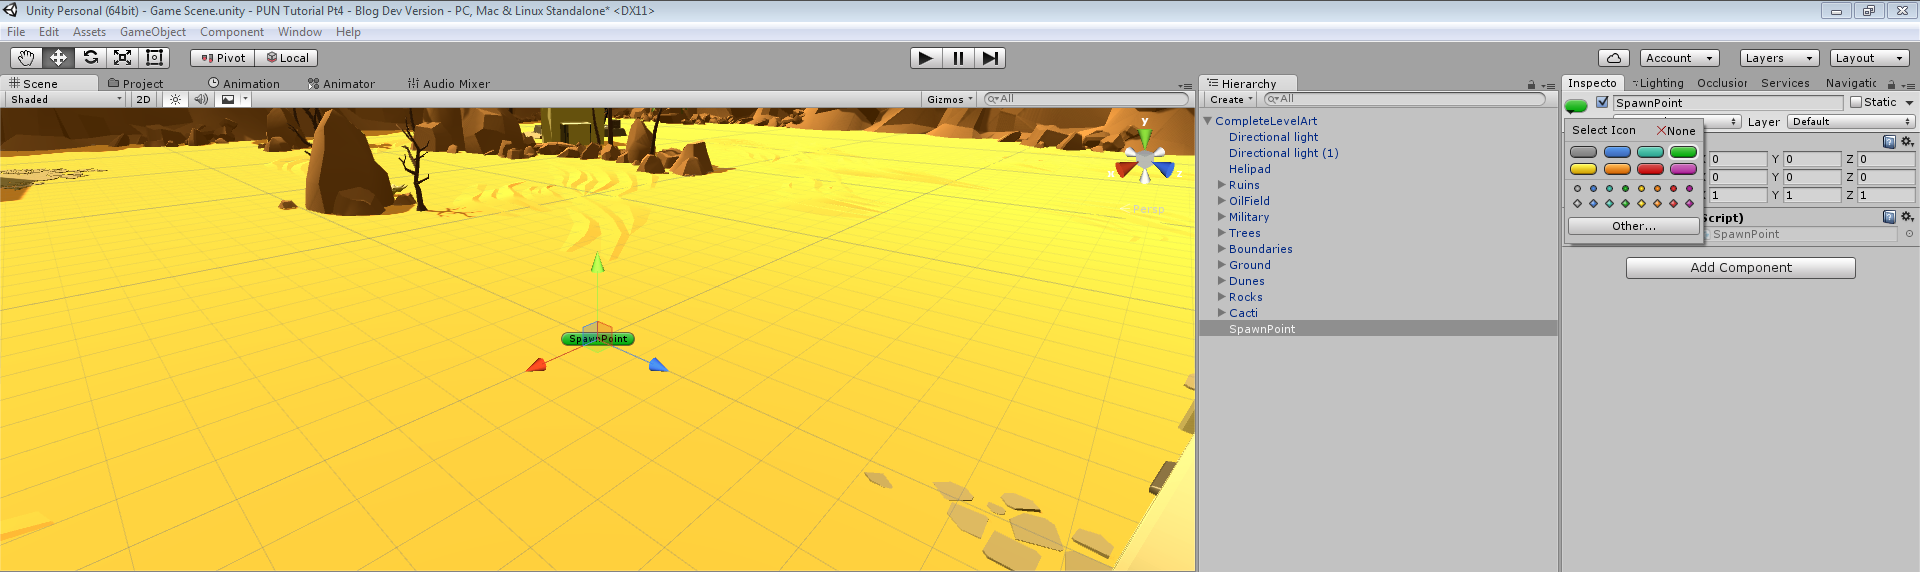
Now we need to add some spawn points to our game level, so open the Game Scene (save the current scene if prompted), select the CompleteLevelArt game object and add an empty child game object (GameObject->Create Empty Child). Rename the empty game object SpawnPoint and then add the SpawnPoint script to it by dragging it onto the SpawnPoint game object in the hierarchy window.

To make it easier to locate in the Scene view, give the SpawnPoint game object an icon, by clicking the coloured cube in the top left hand corner of the inspector window and selecting the green bar icon.

This is how it should look at this point :-
SpawnPoint

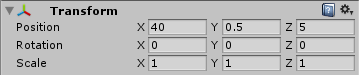
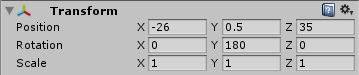
Now change the transform settings for the SpawnPoint as so:-
spTransform1

Then make a duplicate of the SpawnPoint (CTRL + d) and change its transform settings as so:-
spTransform2

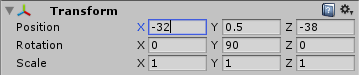
Then make a further duplicate of the SpawnPoint and change its transform settings as so:-
spTransform3

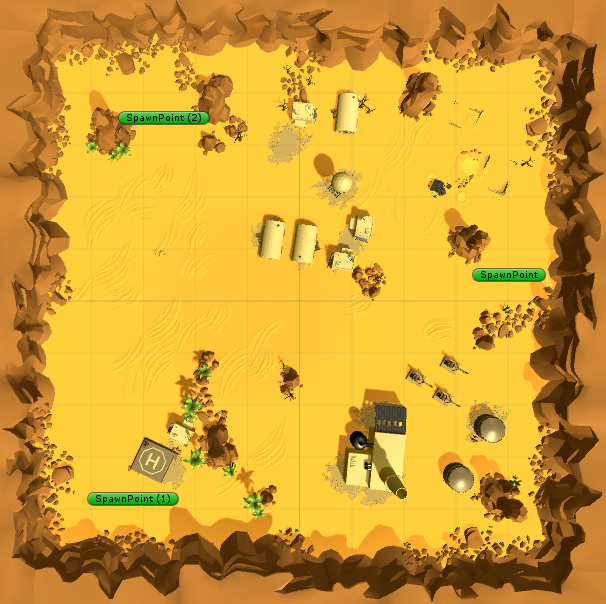
Obviously these placings are just examples and you are free to create as many spawn points as you like and place them however you want. But assuming you followed my example then the game scene should look like this now :-
GameScene

Go ahead and save the Game Scene, and we’ll move on to making it so that the player can randomly pick one of the spawn points when the level is loaded.

The next thing we need to do in order for that to happen is to make some changes to the GameManager script (Assets\GameManager\GameManager.cs). So open it for editing and add the following using statement to the top of the script:-

Next add this static helper method to the bottom of the GameManager script:-

This performs a similar function to the Unity function GameObject.FindObjectsOfType(), but unlike that function it will also find inactive objects. The reason we need it be able to do that, is that we can’t be certain that the SpawnPoints won’t have deactivated themselves by the time we come to search for them.

Next, add this function above the GetAllObjectsOfTypeInScene function :-

This will return the transform component of one of the spawnpoints that it finds in the scene or the default spawn point (we’ll get around to that next) if it doesn’t find any.

To implement the default spawn point we need to add this member variable to the top of the script:-

And we initialise it during the awake function with this code, which just creates a new game object and gives its transform some default values.

The final part of the this particular jigsaw is to give the spawn point position and rotation to the player when it is instantiated. And to do this we need to make a couple of changes to the OnLevelWasLoaded() method.

We add the following line after the PhotonNetwork.inRoom check:-

and then change the statement that instantiates the player, so that it can use the spawn point information, as so:-

This is the full GameManager script with all the above changes in place:-

Save the GameManager script, open the Main Scene (save the current scene if prompted) and run the game, and you should see that the player now spawns at one of the points you placed in the game scene earlier.

So that’s it for this part, we’ve now got a less buggy main menu (the main menu will be completely reworked later in the series) and we have a simple and flexible method for adding spawn points for our players. In the next part we’ll be adding some weaponry.

As always any questions, comments and suggestions are very welcome, see you soon.

Download complete project for Part 4

Photon Unity Networking Game Tutorial Part 2 – Connecting to Photon and joining a game.

Welcome to part two of my Photon Unity Networked Game tutorial. In this part we are going to put in the place the basics to allow us to create or join a networked game.

Disclaimer: There are many solutions to any one given network game design, which will differ greatly due to a number of factors, including but not limited to, target audience numbers, security concerns and whether you are programming for fun or commercial gain.
Therefore, I do not suggest that is this the only approach you might take, or that this is even the best one, rather it is my attempt to demonstrate some core concepts in as clear and concise a fashion as possible, which can be used as a stepping stone into the often murky waters of networked game programming.

Part 2a – Connection to the Photon Cloud service and creating a game session

Having configured our project to work with Photon (in part 1 of the tutorial) our next step is to set up the initial scene which we will use as our entry  point into the game. So we’ll save the current scene and call it Main Scene.

Next let’s change the camera background, because we don’t need a skybox for the menu. So change the Main Camera clear flags to ‘solid color’ and set a suitable background colour, something like so:-
CameraBackground

Next we’ll add an empty GameObject to the scene and call it GameManager.
Now make a new folder Assets\GameManager and create a new c# script in the folder and also name it GameManager, then drag this script onto the GameManager object in the hierarchy.

The GameManager is going to be a Singleton object that doesn’t get destroyed when the scenes change, so we’ll define it initially as follows:-

Open the GameManager script and copy the above code into it, replacing what is already there, then save the script.
One important thing to note is that it is defined as a Photon.PunBehaviour rather than a Monobehaviour. The reason for this is that it will give us access to Photon Unity Networking functions and overrides, which we will be using later in the tutorial.

Having created our GameManager, it’s first job will be to connect us to the Photon Cloud. The Photon Cloud is essentially a collection of PCs running Photon Server, all of which are maintained and controlled by Exit Games. Once connected to the Photon Cloud, you can join a session of the same game being hosted by someone else, or you can host your own game session which other people can join. One of the benefits of using the Cloud is that you don’t need to worry about firewalls and port forwarding to make your game visible to other players. Bear in mind however that you do need an active internet connection to play multiplayer with Photon Cloud, even if all players are on the same LAN.

So we can connect to the Photon Cloud by adding this simple Start() function to the GameManager script. This is necessary because until we are connected to the Photon Cloud we can’t create or join any networked games:-

This simple bit of script uses the information from the server settings asset you configured in the previous part of the tutorial to connect to the Photon Cloud with our AppID and other pre-set settings. The only bit of additional information it needs is the game version string, in our example we use “PUNTutorial_Pt1”. Users are separated from each other by the game version, which means you can make changes to your game which aren’t compatible with previous versions, and as long as you update the game version string your users won’t be able to connect to an incompatible game.

Now we need a way to create or join a game, and for this we will create a Join Game button. So add a canvas to the Hierarchy and then add a button. Call the canvas MainMenu and the button JoinGameButton, and change the button’s text to ‘Join Game’.
Having done all the above, this is how your editor should look:-
Part2aEditor

Now we’ve got our Join Game button, we need to hook it up so that it actually does something. So we’ll add the following function to the GameManager script:-

In this function we use the Photon JoinOrCreate function, which when executed, searches for a room with the specified name (in our case ‘Default Room’) and joins it if found, otherwise it creates a new room and then joins it. We also use the RoomOptions argument to set the maximum number of players that can be in the room at any one time.

Now we want to hook this function up to the OnClick event on our JoinGameButton, so click the + button to add a new event handler, drag the GameManager onto it and select the JoinGame function as so:-
JoinGameButton

The final part of this step, is to create a function that executes when we have successfully joined the room, so add this function to the GameManager script:-

For now this will just print a debug string to notify us that we have joined the room, but in the next part of the tutorial we will use it to load the game scene and player character.

This is the full GameManager script so far:-

Save this and run the game and when you click the Join Game button  you should see a debug output that says ‘Joined Room’, not very exiting yet I grant you, but at this point you are effectively running a networked game. If you build and run two instances of the game they will both be connected with each other, although currently there will be no obvious evidence of this. (NOTE: You may need to wait 4-5 seconds after you run the game before you click the Join Game button, otherwise you may get an error. Part 4 of the tutorial makes a change which prevents this from happening.)
In a later part of the tutorial we will set up a game browser so you will be able to see a list of currently available games which you can join, or if you create your own game, other people will be able to see it listed and join it.

In the next part we will cover loading the game scene and spawning and controlling the player character, so hope to see you next time.

Download Complete Project for Part 2 (Photon Demo folder deleted to save space).

Android App Promotion

Having released 9 android apps over the past few months and trying various methods of promotion along the way I thought I’d share my experiences with the various promotion methods I’ve used, and the results I’ve had from them.

The first few games I released, I didn’t do any promotion as such, except for posting on various forums descriptions of the games and links to the app store. These games predictably didn’t storm the charts and have plodded along at an average of around between 2 – 10 installs per week.

So more recently I decided to try to gain some extra exposure, and I used a couple of the services provided on https://www.fiverr.com/ where for a small fee $10 – $20 in my cases, my apps would be mentioned on blogs and Facebook pages that have hundreds of thousands of daily views.

Unfortunately I didn’t notice any increase in installs for the apps involve so I didn’t think these were worth the money spent.


APKFiles

The next service I looked at was a company called APKFiles www.apkfiles.com which lists free games on their site, with the option to pay and have your app stay at the top of the list.

For $10 dollars your app can stay at the top of the list for 200 downloads ($0.05 per download), so I signed up, uploaded my apk and paid my $10.00.

The site statistics quickly started counting up the downloads, and within 24 hours the whole 200 had completed. However, my analytics website showed no increase in new users or app activity, therefore I have to assume that either their site statistics are fake or wildly inaccurate, or that there is an appalling low download/install ratio.
In any event, I decided not to use APKFiles again and wouldn’t recommend them.


AdMob

For my latest game I decided to step it up and use create an AdMob campaign. On the face of it this looked like a good prospect. It’s a well known service, the pricing model is CPC (cost per click), and I could set a click cost as little as 1p per click and also a daily maximum budget. There was no up front payment required, and no minimum length of time for the campaign to run.
So I went ahead and created a campaign to run for a month, at 1p per click and a £5.00 budget per day (500 clicks per day), which I thought sounded reasonable, assuming I hit my maximum budget every day the whole campaign would cost around £150.00.
Results went as follows:-

Day 1
32265 ad impressions before I hit my 500 click daily limit, took about 30 minutes.
App installs 12

Day 2
31156 ad impressions before I hit my 500 click daily limit, took about 30 minutes again.
App installs 5

Day 3
34156 ad impressions before I hit my 500 click daily limit, once again took about 30 minutes.
App installs 7

So after 3 days, I’d had 24 installs total, at a cost of £15.00, meaning each install was costing me £0.63. Not exactly the result I was hoping for. I can only assume that the vast amount of clicks on my ad were not from people that were interested in installing my game, and that AdMob doesn’t do a very good job of filtering out accidental clicks.
Anyway, at this point I decided that a cost per click promotion wasn’t going to work out cost effective for me and I suspended my AdMob campaign.


AppBrain

Still in search of an effective promotion method, I did some Googling and found a number of posts that mentioned a cost per install service run by a company called AppBrain.

With this service you pay a minimum of $0.20 (approx. 14p) per install, irrespective of the number of impressions your ad has.

You need to credit your account in advance (min $100, approx. £72.00), which due to the good reports I’d read I decided was worth the risk, at $0.20 this will give a guaranteed 500 installs by the time your $100 budget is used. You can set your daily limit to be a percentage of your whole budget, or leave it unlimited to get as many installs per day as possible.
This all sounded good, so I set my daily budget to the whole $100 campaign budget, and waited to see what happened.
The difference compared to AdMob was, to say the least, astounding, within minutes I had thousands of ad impressions, hundreds of clicks and 20-30 installs, already eclipsing the 3 day AdMob campaign.

Results were as follows:-
Day 1
672,343 Impressions, 9573 clicks
App Installs 500

This was much more along the lines I was expecting, and if anything it generated installs at a faster rate than I was expecting based on my minimum bid of $0.20 for my ad campaign.
The daily install rate continuing on from then is up around 30 – 40 per day, which easily eclipses the 1-2 per day that I usually get, so the initial ad campaign seems to have boosted the performance going forward too.

So to sum up, out of the methods I have used AppBrain was by far the best, and whilst I still haven’t produced the million seller I’m after, it still represents, to my mind at least, pretty good value for money and is the best way I’ve found to promote my apps so far.

In addition to the promotion service they also do a monetization service through ads, which I haven’t tried yet, plus you can track the store rating for your apps in all the countries it has been downloaded. All in all a pretty decent service.

If you want to try this service out for yourself you can find it here http://www.appbrain.com

My latest game Cubeology can be found here if you want to take a look.

Scene Transition/Screen Fader Tutorial Part 2

Welcome to part two of my screen fader tutorial. In this part I will provide a short demonstration of how you might use the screen fader to smoothly transition between scenes.

I’ll add two scenes to the project, with different title text and background colour, so it’s obvious when the scene has changed, and a single button in the middle of the screen which will be used to make the scene change.

I’ve added a small script to the button, which exposes an Object property to the editor, into which I drag the scene that I would like the button to load when clicked. Note: any scenes that are to be loaded at runtime must be added to the build settings in the editor.
Build Settings

This button script is how an inexperienced Unity programmer might approach it, but it won’t work properly and if you try it you’ll see that the scene change happens immediately with no fade in or out.

The reason for that is that as soon as the fade out function is called Unity moves immediately onto the next line of code and executes it, this stops the fade out and loads the next scene. It then goes on to start the fade in function, which has no effect as the screen isn’t faded out.

So how do we prevent execution of the line after the fade out call until we are ready for it? One way would be with coroutines, but this can easily get messy and means that we can’t keep all our code in one function. So this is where the callback argument of the fadein/fadeout functions comes into play.

With the above in mind we could write our button code like this instead:-

So now we have separated the fadeout function call from the load scene and fadein function calls, and put them in a separate function. We have then provided the new function as the callback argument for the fadeout routine.

Now if you run the program and click the button you’ll see that it works exactly as it should, the original screen fades out, and then the new scene smoothly fades into view.
This is because now the fadeout routine is executing and only when it’s finished does it invoke the callback function which loads the new scene and fades it back in.

This is much better, in as much as it actually works. However earlier I mentioned that a disadvantage of using coroutines to achieve the same was that we couldn’t contain everything in one function, and you’ll probably have noticed by now that this solution suffers from the same problem.

We can fix that however by writing the callback function inline in the fadout function call, this isn’t strictly speaking necessary, but in a lot of instances it can keep the code simpler and easier to follow in my opinion.

So this is the final version of the button script:-

As you can see the whole process is now contained within a single 7 line script, with execution of the scene change and fadein delayed until the fadeout function has finished. I’ve also added a 0.5f second delay to the fadein function call as I think it looks better with a slight extra delay.

That’s it for this tutorial, as always any and all comments or suggestions are welcome. See you next time.

Unity project file

Scene Transition/Screen Fader Tutorial Part1

A common feature of games is that the screen briefly fades to black during scene changes. This is done to ‘soften’ the transition as a sudden switch from one scene to another can be a bit jarring if it’s visible when it happens.

So I’ve found it handy to have a screen fader that I can easily drop in to a new project any time I want to have fade to black (or some other colour) scene transitions and I decided that it would be a nice subject for a mini tutorial. It will also serve to demonstrate a couple of seemingly often overlooked but very useful features, i.e. callbacks and CanvasGroups.

The aim of this tutorial will be to provide a screen fader that is fairly simple to implement and is also flexible and easy to use.

The way this screen fader will work is by overlaying a UI image on the screen and changing it’s alpha value to fade it in and out.

To make it as easy as possible to add to a project, we’ll have the fader create its own UI elements in code, which means all we have to do is drop the screen fader script onto an empty game objet to make it available for us to use. To make this work we’ll need the screen fader to create its own Canvas, CanvasGroup component and an Image.

Step 1)
This is the code to create the Canvas at runtime:-

What this does is create a new GameObject with a Canvas component attached. It then parents it to the GameObject that script is on, then it sets the RenderMode to ScreenSpace overlay and sets the sort order to the value specified in the inspector (default 99). I have made the sort order easy to change so that you can make sure the fader image is always on top of everything else. However depending on what you wanted you could also use the sort order to have it appear behind some elements.)

Step 2)
This is the code to create the CanvasGroup at runtime:-

We use AddComponent() to add the CanvasGroup component to the canvas we just created, and then store, in a member variable, the reference to the component that it returns for later use. Then we set interactable and blocksraycasts to false, which means that any child objects of the canvas group won’t block mouse clicks. This isn’t strictly necessary for our purposes here, and indeed in some instances you may want your screen fader to block input, in which case you would set interactable and blocksraycasts to true.
Lastly we disable the GameObject as we don’t need to have it enabled until we are ready to use it.

Step 3)
This is the code to create the Image at runtime:-

Firstly we create a new GameObject with an Image Component attached, then we set it as a child of the canvas we created in step 1. Next we set its colour to the value specified in the inspector (default black), and lastly scale it up a bit, this last bit is done to prevent a slight border appearing around the edges in some screen resolutions.

Step 4)
Set the image position and size and make it scale with the screen size:-

The easiest way to change position and size of ScreenSpace UI elements is to use the RectTransform component, so firstly we get a reference to the Image RectTransform using GetComponent().

Next we set the anchors to the bottom left and top right to make the image stretch with the screen size. The anchors are Vector2s with values between 0,0 and 1,1, where 0,0 is the bottom left of the screen and 1,1 is the top right of the screen.
Next we centre the image by setting its anchoredPosition to 0,0;
Lastly we set the width and height to match the current screen size (due to the scaling we did in step 3, it will be slightly larger than the screen).

Now we need to put all of that above into the Awake function of the screen saver. This is the complete Awake() function.

The only part of the Awake() function I haven’t discussed yet is the very first block of code. Basically what this does is make the screen fader not get destroyed during scene changes, and also ensures that the only instance of it that can exist is the first one that is created. It also grabs a static reference to the first instance so that it is possible to access non static methods and properties.

That’s the basic setup finished, so next we’ll define a couple of static methods that will enable us to perform fade outs and fade ins. The methods will invoke callbacks when finished so that we can delay execution of other code whilst the fader is in operation. We will also be able to specify a delay before and/or after the screen fade.

This is the public static method to do a fade out:-

As you can see it is quite simple, all it does is check to see if the callback argument is null, and if so it points it to the default empty callback function and then it sets the canvas active.
Next it stops any current fade in/out operations (I’ll discuss that function further on) and runs the fade out coroutine, which is where most of the work is done.
It uses the variant of StartCoroutine that returns a CoRoutine object, which we store for use by the StopActiveFades() function.

This is the code for the fade out coroutine:-

There again, this is quite straightforward, first of all we yield wait for the delayBefore period.
Then we loop while the group.alpha property is less then 1. The alpha property controls the transparency of all children of the group (in this instance our image we created in step 3), a value of zero means fully transparent and a value of one means fully opaque.

In the while loop we use MathF.MoveTowards to linearly fade from transparent to opaque, we can use the speed property in the inspector to control how quickly this happens.
After the while loop exits we yield wait for the delayAfter period if any, and then we invoke the callback to signal that the fade is done.

The fade in functions are almost identical, except in the while loop we change the group.alpha from one to zero and when it’s finished it disables the canvas.

Now let’s take a look at the StopActiveFades() function:-

This function just ensures that there can’t be two fade operations running at the same time, as that could result in unwanted behaviour.
What it does is check the fadeInCR and fadeOutCR variables and if they aren’t null it stops the coroutine they point to and sets the variable to null.

Last of all is the default empty callback function, which doesn’t need any explanation.

In the next part of this tutorial I will show how we can use the screen fader in our applications, but in the meantime here is the full screen fader script:-

As always any and all comments are welcome, see you next time.

Generic Serialiser Class

It’s been a busy month what with one thing and another, so I haven’t managed to get finished the UNET custom NetworkHUD tutorial I’ve been working on, but I’ll post it as soon as I can.

In the meantime I’ve been doing some groundwork for an RPG idea we’ve had, and one of the first requirements is for an easy way to save and load the state of the various data classes we’ll be using. As this is something that also seems to get asked for on a fairly regular basis in the forums, I thought I’d share what I’ve come up with so far as it might prove useful to others in some situations.

The serialiser as it currently stands is quite simple, it has four static methods, two for serialising the data (one to PlayerPrefs and one as binary data), and two that read in the data and return it in an instance of the corresponding class.
It will serialise any class or struct that is marked as Serialisable and it even works with dictionaries.

This is the code for the serialiser class.

As an example, to save the state of a class to PlayerPrefs you would use something like this:-

To load the data back into the program you would use something like this:-

The way I actually tend to use it though is to wrap the serialiser calls into two methods on the class I want to serialise. An instance method for saving, and a static method for loading the data, which returns an instance of the class populated with the data.

So for example, i might define a PlayerInfo class something like this:-

And then from elsewhere in the program I would load and save the class data like so:-

The Load() function automatically handles the situation where there is no saved data yet, and returns a new instance of the class in that case.

I have made a simple demonstration program that allows you to type in a player name and add and remove items from the inventory. When you exit and restart the program you will see that the changes you made will have been preserved.

Using this generic serialiser it becomes a simple task to save and load even quite complex classes and structs, as long as you remember to mark them as serialisable.

Also remember that if you make any changes to the serialised class definition after you have saved it, you will most likely have to delete the saved data to avoid errors when it tries to load it next.

I hope this proves to be of use to someone, and as always any comments and suggestions are welcome.

You can try out the test program in a Unity WebPlayer here or download the project files here.

See you soon

Martin.