Photon Unity Networking Game Tutorial Part 6 – Health, Score and Nickname

Hello again and welcome to part 6 of my PUN networking tutorial. In this part, we will add score and health display, name labels and destructible tanks.


I’ve made a number of changes to the scripts from the previous part, so before you continue you should download the complete project files for this part which can be found here.

You can download the project .exe here.

Tutorial uses Unity version V2017.2.0f3


Part 6a – Nickname and name label

It would be nice if we could enter a nickname that will be shown above the tank so that we can identify our intended target, so I’ve added a text input field to the start menu where you can type your chosen nickname and a public static property in the MainMenu script which affords us easy access to the name entered.

In the Awake() function, as a convenience, we prefill the nickname input field with the previously saved nickname if we’ve logged in before (the nickname is saved to playerprefs in the JoinGame() function of the GameManager).

To enable other players to see your nickname it will need to be synchronised with all players over the network. Handily PUN comes with a built-in way to do this in the form of The PhotonNetwork.playerName property. We just need to pass the value from the NickName input field to this before we join a room and this will set the NickName property of your PhotonPlayer once created to the same value for retrieval during the game when required. This is automatically synchronized between all clients.

A convenient place to set the PhotonNetwork.playerName property is in the JoinGame() function of the GameManager script as so:-

We want to display the name of other players in the game above their tanks, so to do this I’ve added a canvas and UIText object to the player prefab to act as a name label.
A handy time to set the name label text would be in OnPhotonInstantiate, but as the name label is a child of the player prefab it won’t receive that callback. To solve this, I use BroadcastMessage in the OnPhotonInstatiate method of the Player script to call a method on all ll scripts on the player, including children. In this case, I named the method OnInstantiate. This can be quite a handy way to initialise child GameObjects as soon as the player object is created. BroadcastMessage should be used with a certain amount of care, as it isn’t a particularly fast function, and should be avoided in things like update loops. As it’s only being called once here when the player is first created it won’t affect performance.

I also took the opportunity to rename the Player GameObject to reflect the chosen nickname, as this makes it easier identifying specific clients player objects in the hierarchy.

So the Player script OnPhotonInstantiate method now looks like this:-

I also added a simple script to the name label GameObject:-

As you can see, this script implements a single method, OnInstantiate, wherein it checks to see if it is running on the local player (PhotonView.isMine) and if it is, it disables the name label GameObject because we don’t want to display the name above our own tank (we will display our own nickname at the top of the screen, as described a bit later on), otherwise, it sets the name label text to the PhotonNetwork.playerName value.

This method is invoked by the Player script when the player object is instantiated as described above.

I’ve also added a script to the name label that keeps it orientated towards the screen regardless of the rotation of the tank:-

That’s all that’s required to display the player’s nickname above other player’s tanks.

To display the nickname for the localplayer I have created a gameUI game object as a child of the HUD gameobject, which also displays the health and remaining hit points. This is the script that is attached to the gameUI gameobject:-

the gameUI script uses the SceneLoaded event to enable or disable itself depending on whether we are in a room or not. It also uses the OnJoinedRoom callback to set the NickName text to the value of the PhotonNetwork.playerName, which as described above is the nick name chosen on the main menu.

It has a couple of other public static methods which handle setting the HP text and score text.

Part 6b – Handling player damage
In the previous part of the tutorial, we didn’t synchronize the player health value over the network, as we only showed its value to the local player. However, I want to show a health bar above all players tanks and for this to be possible the player’s health value needs to be synchronised on all clients.

We’ll achieve this by making the HP value a PhotonPlayer.CustomProperty. Custom Properties are a key-value set (Hashtable) which is available to all players in a room. They can relate to the room or individual players and are useful when only the current value of something is of interest. (More info regarding CustomProperties is available from the Photon Unity Networking class reference here.)

Custom properties values are automatically updated on all clients when their value changes and an event is also raised; You can listen for this event and use it to update visual elements to reflect the new value; in this case, we’ll update the health bar on all network instances of the player’s tank and the HUD display for the local player.

To facilitate this, we’ll change the PlayerHealth.hitPoints field into a property and implement the Getter and Setter to manipulate the HP Custom Property as so:-

The getter of the property checks to see if the key exists in the hashtable of custom properties associated with the client, and if it does it returns the associated value. If it doesn’t exist, that means this property value hasn’t been set yet, so it just returns the default value.
The setter of the property updates the key/pair value in the hashtable. For the local player, this happens instantly, for other clients the new value will be sent via the Photon server so there will be a small delay.

As I mentioned earlier whenever a custom property value changes it raises an event which we can handle by overriding the OnPhotonPlayerPropertiesChanged() method which in this case we do like so:-

The OnPhotonPlayerPropertiesChanged() method is passed an array of data which contains the PhotonPlayer of the client that updated its property (in element 0 of the array) and a hash table of the updated properties and their values (in element 1 of the array), so we can use this information to take the appropriate action.

The first thing we do is retrieve the  PhotonPlayer.id of the client that updated its property and compare that with the id of the PhotonPlayer of the photonView that owns this script, and only continue if they match, this is to make sure we only continue on scripts that belong to the player that has had an updated property. Then we check that this is a message relating to a change in the hitPoints by checking if the hash table contains the key “HP”. Assuming the two previous checks are true we call a method (DisplayHealth) to handle the display of the updated hitPoints, which is implemented as follows:-

The first thing displayHealth does is update the size of the health bar above the tank by calling the healthBar.SetHealthBarValue() method ; this will happen on all clients.
Secondly we want to display the HP figure in the HUD for the localplayer only, so we wrap the call to GameUI.SetHealth() in a photonView.isMine check.

I’ve also updated the playerHealth script to check if our hitPoints have reduced to zero, so we can take the appropriate action, which in this case is to blow the tank up and add a point to the attacking player’s score. To do this we send an RPC to the missile owner that will add 1 point to their score and we start a coroutine that will handle the visual display of the tank exploding and respawning.

This is the updated PlayerHealth.DoDamage method :-

and this is the tank explosion coroutine :-

The explosion coroutine invokes the following RPC on all clients, which means that everyone sees the tank explode. It also temporarily disables movement, shooting and collisions…

it then waits 7 seconds and invokes the RPC_Respawn method, passing the respawn position and rotation as arguments. The position vector is converted to an array of 2 Shorts to reduce bandwidth.

The respawn method re-enables movement and shooting for the local player, and then for all clients it re-enables collisions and the tank model, and places it in the respawn position and orientation. It also resets the hitPoints to maximum.

The last line is a bit of a workaround to handle the fact that positioning of remote client tanks doesn’t happen instantly, so to avoid the chance of seeing them reappear in the previous position for a few frames before being moved to the new spawnpoint we wait for a short while before reenabling the tank model for remote clients.

Part 6c – Displaying the score
The final thing we need to do is make a small change to the PlayerScore script to make it display the score on the HUD of the local player which we do by calling the GameUI.SetScore() method as so:-

That’s everything for this part. As always comments and suggestions are very welcome, or if any parts require further clarification post a comment.

In the next part we’ll be adding ammo pickups, hope to see you then.

Project source files

Project executable

Tutorial uses Unity version V2017.2.0f3

Photon Unity Networking Game Tutorial Part 5 – Arming Your Tank

Hi again, as promised here is the next instalment of my networking tutorial for PUN, albeit rather a long time coming!

Before we start I should point out a couple of things. Firstly I have moved on to a newer version of Unity (V2017.2.0f3) and also a new version of PUN (V1.87), and you may encounter some errors if you are still using an older version of Unity, so I would recommend you upgrade your Unity version to match before following this tutorial.

Secondly, I am changing the format of the tutorial slightly, and as such I will now provide the full project for you to download at the beginning of each part of the tutorial; I will then go on to provide explanations of all the new script changes and additions.

The reasoning behind this is that as the tutorial progresses, the game setup will become more complex and I will end up spending more time describing how to add and make changes to the game scene, HUD, game objects etc. than describing how the networking code works, and as this is above all a networking tutorial I didn’t think that was an ideal scenario.

You can download the project files for this part here.
(To run the game in the editor, load Assets/Main Scene and press play.)

You can download the project .exe here.

New scripts added in this part 5.

PlayerShoot.cs
PlayerScore.cs
PlayerHealth.cs
Missile.cs

Part 5a – Player Shooting
The first thing we want to do is give our players the ability to fire their guns and to achieve this I have added a new script to our player prefab called PlayerShoot.cs.

You’ll notice that the PlayerShoot script is a PunBehaviour rather than a mono behaviour. We can do this because it is a component of a GameObject that has a PhotonView component, and by making the PlayerShoot script a PunBehaviour it automatically gets access to the cached photonView and all the Photon events and callbacks.

The PlayerShoot script starts off by setting up a reference to the missile prefab (set in the inspector) and setting a couple of variable values that will be used to control the rate of fire.

We only want this script to run on the PC of the local player, and the easiest way to achieve this is to disable it on all clients where photonView.isMine is false, which we can do in the Awake function as follows.

In the Update function, we check the fire timeout and fire button state to see if we should launch a missile and if both the timeout is up and the fire button is pressed, we can launch one using an RPC call, which I will explain below.

I decided not to give the missile a PhotonView and instead have it as a non-networked object as this will save on network traffic; however, that does mean we can’t use PhotonInstantiate to create a copy of it on every client at once. So if we implemented the missile launch as a normal function, it would only fire a missile on the local client and other players in the game wouldn’t see it.

To overcome this we will give the missile launch function the PunRPC attribute, which marks it as a Remote Procedure Call (RPC), which we invoke with the PhotoView.RPC() method. Essentially what this does is cause the invoked function to run on one or more remote clients as well as our own (depending on the arguments supplied) and we can use this to launch the missile on all clients.

The PhotonView.RPC function takes a minimum of two arguments, the first being the string name of the function we want to invoke and the second is a target player or an enumeration that determines which clients should run the function. In this instance, we give it the name of our missile launch function “RPC_FireMissile” and PhotonTargets.All for the second argument. This means that the function will run on all clients including the player that fired the missile on the GameObject with the corresponding photonView.

RPCs can also take additional parameters, and I will cover that later in the tutorial.

This is the missile launch function. I give all my RPC functions the RPC_ prefix, however, this is a personal preference and isn’t required.

You’ll notice that although we didn’t pass any parameters to the RPC, it has actually got one parameter (PhotonMessageInfo info), this is automatically available for all RPCs and contains a couple of often useful bits of information. In this instance, we will use it to obtain the photonView of the player that fired the missile. (the PhotonMessageInfo parameter can be omitted if you don’t need any of the information it provides).

So the first thing the fire missile script does is instantiate a new missile with the position and rotation of the player object (which this script is attached to) and cache a reference to it. Then it passes the photonView of the player that fired the missile to the missile script so we can know who owns this missile. This will allow us to easily identify who should get a score increase if the missile hits another player. Lastly, it sets the missile GameObject active.

As far as the PlayerShoot script is concerned that’s it for the missile, movement and collisions are handled elsewhere; so it can relax until the next time the fire button is pressed.

Part 5b – PlayerHealth and PlayerScore
Before we move onto the missile let’s take a look at the PlayerScore and PlayerHealth scripts as they will be referenced by the Missile script. For now, both these scripts are quite basic and do little more than output debug.log  text. They will both be expanded upon in the next part of the tutorial series.

This is the PlayerScore script, which is attached to the Player prefab.

This simple script contains a variable for storing the current score and an RPC function for adding points to the score and logging the new value to the debug console.

This is the PlayerHealth script, which is attached to the Player prefab.

This simple script contains a constant and variable relating to max health and current health. It also has a function for applying damage (reducing hitPoints) based on the damage of the missile passed to the function and a function to display in the debug console, the health as a percentage of the maximum HP.

Part 5c – The Missile
So let’s now take a look at the missile.

The missile itself is just a red sphere with a rigidbody and a couple of child particle systems for the trail and explosion. The missile prefab is contained in the Player folder.

The missile script contains references to the rigidbody and particles systems (set in the inspector) and missileOwner, speed and damage variables.

As soon as it is enabled, the missile simply uses FixedUpdate to move forward by
speed * Time.fixedDeltaTime every physics update. As this script runs on every client all players will see the missile moving, even though it isn’t networked. This is workable because the missile trajectory is straight and the missile is relatively short-lived, so there isn’t much opportunity for the missiles to become out of synch with different clients.

Next, we have the SetOwner function, which we called from the PlayerShoot script, this simply caches the passed PhotonView for use later by the collision function.

Now comes the OnTriggerEnter function, which is where we will deal with collisions.

Firstly we check to see if we hit a player. If we did then cache a reference to the attached PlayerHealth script on the player that was hit.

We only want one client to take action in the event of a hit and in this case, we will have the player that is hit be responsible for dealing with it. So we put in a condition that checks hitPlayer.photonView, and if isMine is true then this script is running on the client that was hit.

Next, we want to ignore collisions between our own missile and our own tank (unlikely, but could possibly happen just after being fired), which we can easily do by comparing the hitPlayer’s photonView.viewID with the same as the local player photoView.viewID. If they match we just return from the function.

If we get this far it means we have registered that we have been hit by someone else’s missile, so we call the DoDamage() function on our own PlayerHealth script.

We also need to tell the player that hit us to increase their score, and as this needs to be executed on a remote client we need to make use of the RPC function again, but using a different set of arguments to when we used an RPC in the PlayerShoot script.

The first argument is the name of the RPC_AddScore function in the PlayerScore script.
For the second argument, we use missileOwner.photonView.owner to supply the PhotonPlayer object of the missile owner. This means that the RPC will only be executed on the client of the player that fired the missile; Which in turn means that scores will only be tracked by the local player, which I have done purely to demonstrate a second way to use an RPC. (Later in the series, this will be changed to allow everyone to see all players’ scores.)

Lastly, as the RPC_AddScore function takes an argument for the score, we add 25 as the last parameter to the RPC function, as this will be the amount we want to add to the score each time we score a hit.

That’s all we need to do in the event a player was hit, which only leaves one more thing to do in this function and that is to destroy the missile regardless of what it hit. The last line of the function does this by calling the DestroyMissile function. As this function is called outside of the photonView check above, it will be run for all clients, which is what we want, because all players should see the missile explode.

This function Destroys the missile GameObject. But to allow the explosion particle to play and the trail particle to slowly fade out they are both unparented from the missile first. Then the trail particle is set to stop emitting and the explosion is played. Both particles have been set in the inspector to automatically destroy when they have finished.

Now when you play the game you should be able to fire missiles and when you get hit (if playing in the editor) you will get a Debug.Log of your HP percent and when you hit someone else you will see a Debug.Log of your points score.

That’s it for this part of the tutorial series, in the next part we will expand the health and score system and provide better visuals for them.

Hope to see you then.

You can download the project files for this part here.
(To run the game in the editor, load Assets/Main Scene and press play.)

You can download the project .exe here.

Photon Unity Networking Game Tutorial Part 4 – OnConnectedToMaster and Spawn Points

Welcome to part 4 of my Photon Unity Networked Game tutorial. In this part we will create a system for easily adding spawn points to any level, and also makes some improvements to the main menu.

Part 4a – Menu Changes
If you’ve been following the tutorial up until now, you may have noticed a minor bug when clicking the join game button. If you click it very quickly after starting the game you can get a run time error ‘JoinOrCreateRoom failed. Client is not on Master Server or not yet ready to call operations. Wait for callback: OnJoinedLobby or OnConnectedToMaster.’

This is because it takes a few seconds for the Photon networking system to connect and be ready, and until this is the case you can’t start or join a game. So to avoid the possibility of this happening we’ll disable the join game button until Photon tells us it is ready. While we are at it we’ll also make some changes to the way we have organised the menu in the game scene, in preparation for features that we’ll be adding later in the tutorial.

First of all rename the MainMenu game object to HUD and then change the Canvas Scaler UI Scale Mode to Scale With Screen Size. Next, add an empty game object as a child of HUD and call it MainMenu, then add an empty game object as a child of MainMenu and name it UI. Then make the JoinGameButton a child of UI by dragging it onto the UI game object in the hierarchy.

This is how your Hierarchy should look once all that is done:-

Now we need to write a small script for the MainMenu game object to handle the state of the join game button and the visibility of the main menu, but before we do that we need to add an extension class that we’ll use to find game objects by name, even if they are disabled. So create a new folder in Assets and call it Extensions, and in the extensions folder create a new c# script and call it TransformExtensions.
Then open the TransformExtensions script in your editor and replace the default code with this:-

This will add a new method to instances of transform (transform.FindAnyChild()) that will make it easy to get references to our HUD items without having to drag them into exposed properties in the inspector. Before you move on save the TransformExtensions script.

Now we can get to work on the HUD and MainMenu scripts, so create a new folder in Assets and call it HUD, and in the newly created  HUD folder create a c# script and call it HUD.
We will implement HUD as a singleton and use the DontDestroyOnLoad method to make it persist between scene changes in the same way we did with the GameManager script.

So open up the HUD script and replace the default code with the following and then save it :-

Now add the HUD script to the HUD game object by dragging the script onto the HUD game object in the hierarchy window.

For the time being that’s all we’ll be doing with the HUD, its main purpose is to act as a holder for all the game UI elements, however I may add some extra functionality to it further into the tutorial series.

Next, create a new c# script in the Assets\HUD folder and call it MainMenu, then add it to the MainMenu game object in the hierarchy by dragging the script onto it. Once again this is going to be a singleton, so open the MainMenu script for editing and replace the default code with this :-

You may have noticed that as well as making this a singleton class, it has also been made to inherit from Photon.Punbehaviour, this is so that we can override one of the Photon methods later in the script.

So next we need to start adding some code to allow the MainMenu script to enable the join game button when it’s okay to do so.

So firstly add these two lines to the top of the MainMenu class:-

And then add the following lines to the bottom of the Awake() function:-

What this does is find the UI game object and JoinGameButton in the menu hierarchy and stores the references in the two variables we declared, for easy access later. It then enables the UI game object (in case it has been disabled in the editor), which in turn means the join game button is visible, and then it makes the join game button non-interactable, so we can’t join a game until Photon is ready for us.

Having the menu (and later on, other UI elements) hierarchy organised in this way mean we can easily hide UI elements in the inspector (which can help to keep the scene view less cluttered with UI stuff), without disabling their associated script, which means that we don’t have to worry about their initial state when the game runs, and they will activate/deactivate themselves as required.

Save the MainMenu script and run the game, you should see that the join game button isn’t clickable, and you can’t proceed past the main menu.

All we need to do to fix this is add the following method :-

This method is called on all Photon.Punbehaviours once the game is connected to the Photon master server and is ready to host or join a game. By overriding it we can take whatever action we want at that point, and in our case we just make the join game button interactable.

We just need the MainMenu script to do one more thing for now, and that is disable or enable itself depending on whether we are in a game or not, we can do this by using the value of PhotonNetwork.inRoom in the Unity OnLevelwasLoaded() method. So add the following method below the OnConnectedToMaster() method:-

When a level is loaded this will hide the Main Menu if PhotonNetwork.inRoom is true, and show the Main Menu if it’s false;

This is the complete MainMenu script as it currently stands :-

If you save the script and run the game, you should notice the join game button starts disabled, but becomes enabled after a few seconds, at which point you can use it to join a game.

Before moving onto the next part make sure to save the scene now if you haven’t already done so.

Part 4b – Spawn Points
As it currently stands all players spawn at the same fixed part of the map, which obviously is far from ideal, so now we’ll put in place a flexible method of adding spawn points to the game level.

The first thing we need to do is create a SpawnPoint class, so create a new folder in Assets\Player and call it SpawnPoints, and in that folder create a new c# script and name it SpawnPoint. Open the SpawnPoint script for editing and replace the default code with the following, and save the script :-

As you can see it’s very simple, and the only thing it actually does is disable the game object it’s attached to as soon as it runs. We don’t actually need it to do anything else, except provide us with position and rotation information, which we can get from its transform component. To make any object in the scene a spawn point you can just add this script to it.

Now we need to add some spawn points to our game level, so open the Game Scene (save the current scene if prompted), select the CompleteLevelArt game object and add an empty child game object (GameObject->Create Empty Child). Rename the empty game object SpawnPoint and then add the SpawnPoint script to it by dragging it onto the SpawnPoint game object in the hierarchy window.

To make it easier to locate in the Scene view, give the SpawnPoint game object an icon, by clicking the coloured cube in the top left hand corner of the inspector window and selecting the green bar icon.

This is how it should look at this point :-
SpawnPoint

Now change the transform settings for the SpawnPoint as so:-
spTransform1

Then make a duplicate of the SpawnPoint (CTRL + d) and change its transform settings as so:-
spTransform2

Then make a further duplicate of the SpawnPoint and change its transform settings as so:-
spTransform3

Obviously these placings are just examples and you are free to create as many spawn points as you like and place them however you want. But assuming you followed my example then the game scene should look like this now :-
GameScene

Go ahead and save the Game Scene, and we’ll move on to making it so that the player can randomly pick one of the spawn points when the level is loaded.

The next thing we need to do in order for that to happen is to make some changes to the GameManager script (Assets\GameManager\GameManager.cs). So open it for editing and add the following using statement to the top of the script:-

Next add this static helper method to the bottom of the GameManager script:-

This performs a similar function to the Unity function GameObject.FindObjectsOfType(), but unlike that function it will also find inactive objects. The reason we need it be able to do that, is that we can’t be certain that the SpawnPoints won’t have deactivated themselves by the time we come to search for them.

Next, add this function above the GetAllObjectsOfTypeInScene function :-

This will return the transform component of one of the spawnpoints that it finds in the scene or the default spawn point (we’ll get around to that next) if it doesn’t find any.

To implement the default spawn point we need to add this member variable to the top of the script:-

And we initialise it during the awake function with this code, which just creates a new game object and gives its transform some default values.

The final part of the this particular jigsaw is to give the spawn point position and rotation to the player when it is instantiated. And to do this we need to make a couple of changes to the OnLevelWasLoaded() method.

We add the following line after the PhotonNetwork.inRoom check:-

and then change the statement that instantiates the player, so that it can use the spawn point information, as so:-

This is the full GameManager script with all the above changes in place:-

Save the GameManager script, open the Main Scene (save the current scene if prompted) and run the game, and you should see that the player now spawns at one of the points you placed in the game scene earlier.

So that’s it for this part, we’ve now got a less buggy main menu (the main menu will be completely reworked later in the series) and we have a simple and flexible method for adding spawn points for our players. In the next part we’ll be adding some weaponry.

As always any questions, comments and suggestions are very welcome, see you soon.

Download complete project for Part 4

Photon Unity Networking Game Tutorial Part 3 – Adding the Player and Game Scene

Welcome to part 3 of my Photon Unity Networked Game tutorial. In this part we will add the player object and the game scene.

Disclaimer: There are many solutions to any one given network game design, which will differ greatly due to a number of factors, including but not limited to, target audience numbers, security concerns and whether you are programming for fun or commercial gain.
Therefore, I do not suggest that is this the only approach you might take, or that this is even the best one, rather it is my attempt to demonstrate some core concepts in as clear and concise a fashion as possible, which can be used as a stepping stone into the often murky waters of networked game programming.

Part 3a – Setting up the game scene
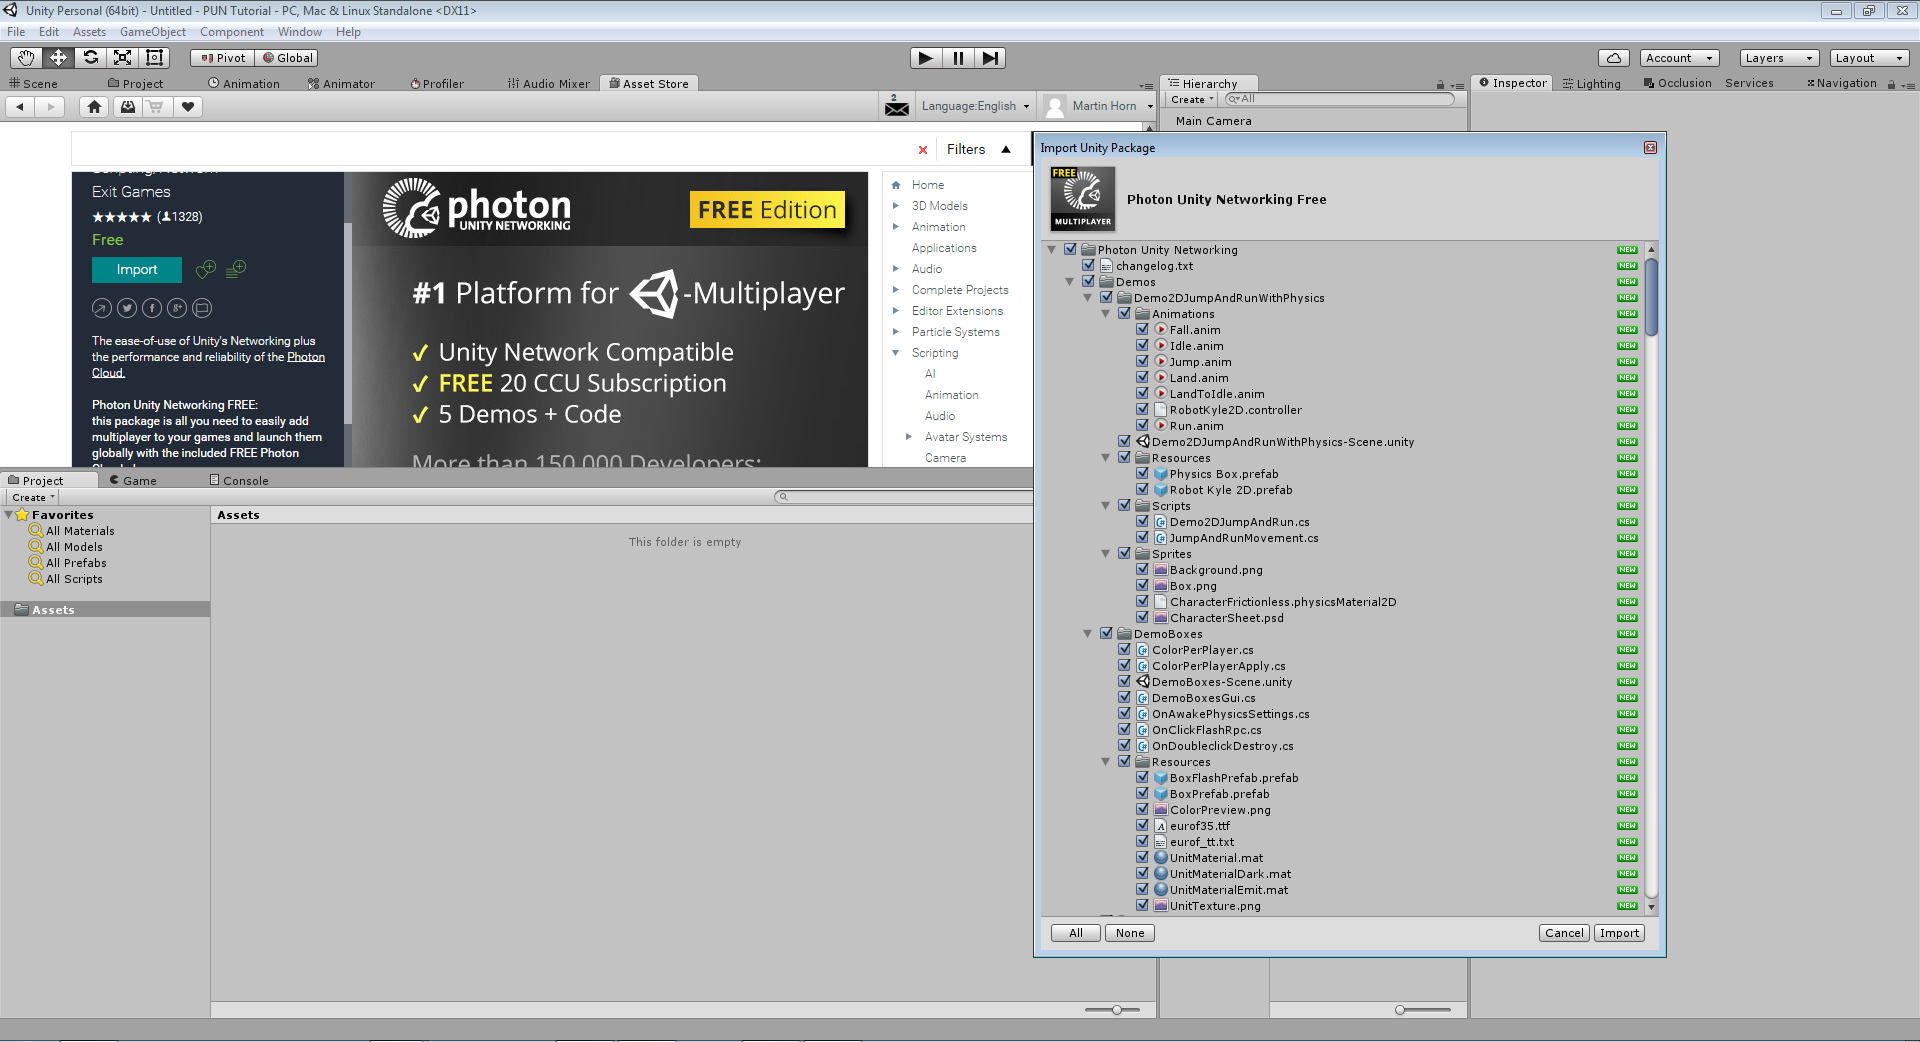
Before we can set up the game scene in the editor we need some assets for the environment. This zip file contains a Unity package which has in it the game scene and player prefabs which are modified versions of some of the excellent assets from the Tanks Tutorial from the Unity Asset Store. Go ahead and download it then extract and install the Unity package.
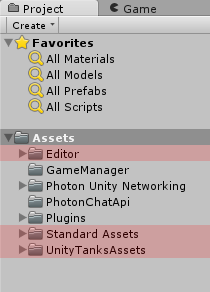
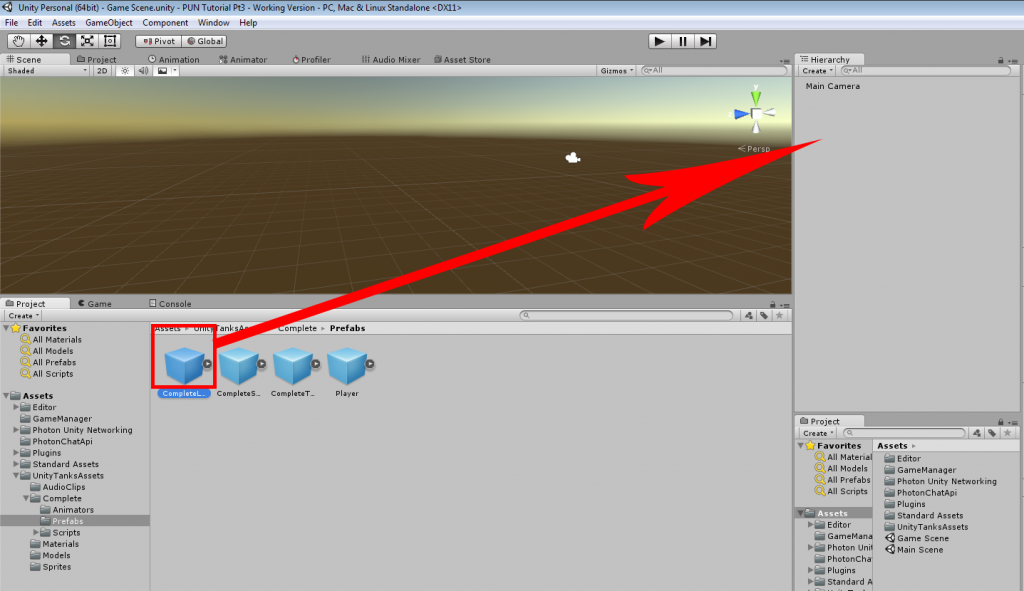
After you’ve installed it your project folders should look like this (I have highlighted the new folders contained in the package).

ProjectWindow

Now that we’ve got the assets installed, make a new scene (File->New Scene).

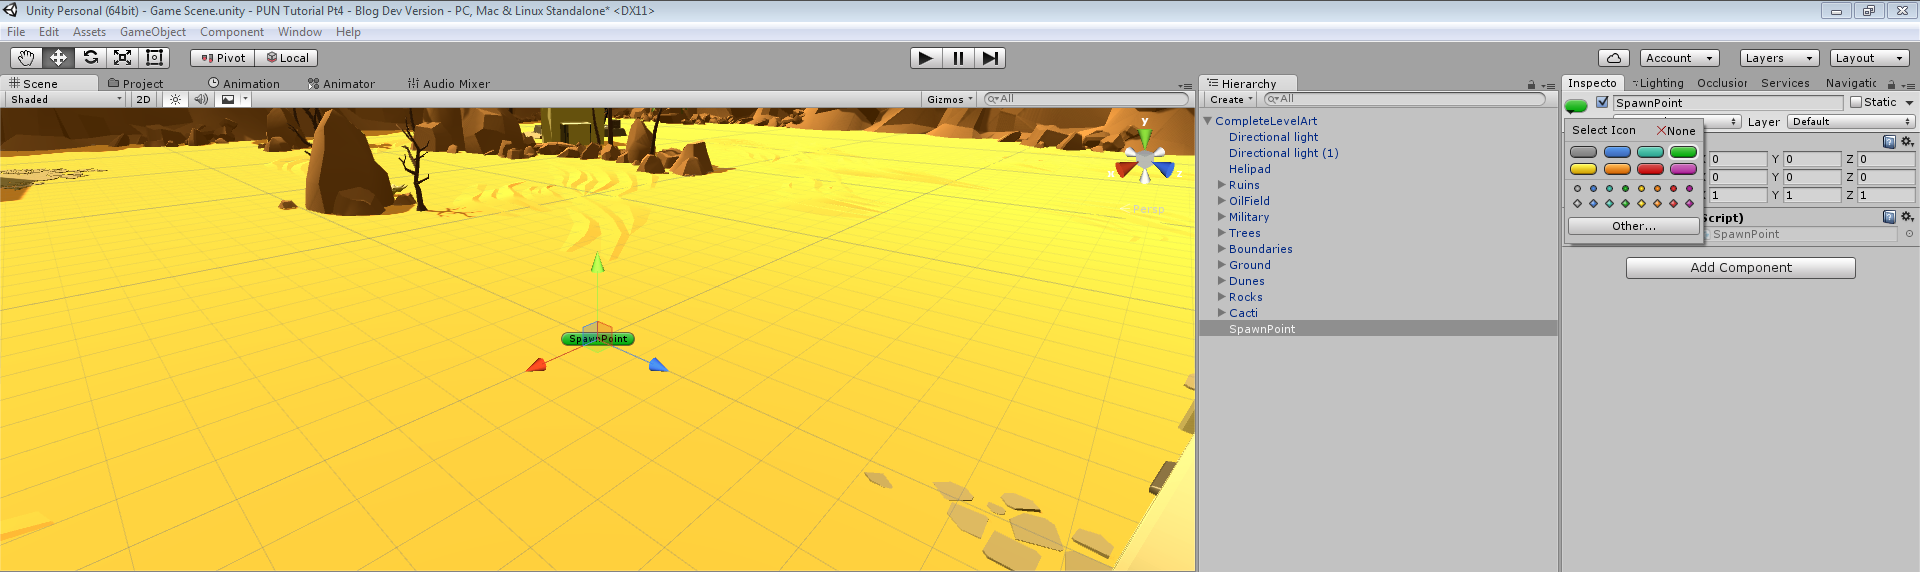
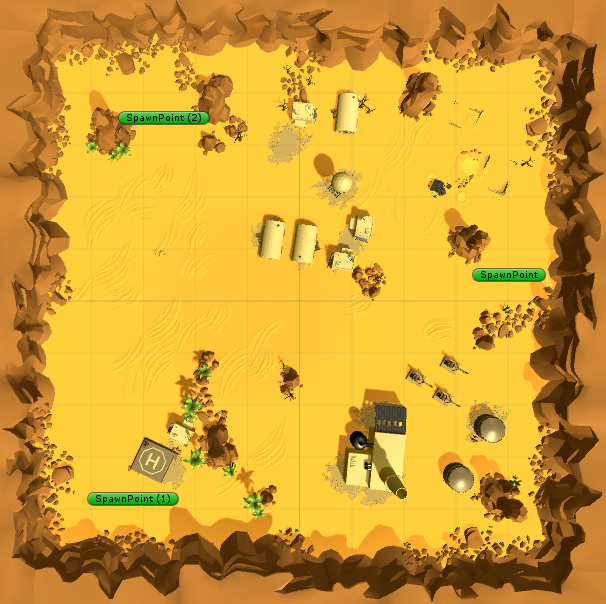
Delete the default directional light (the level art prefab has its own lights) and then find the level art prefab (UnityTanksAssets\Complete\Prefabs\CompleteLevelArt.prefab) and drag it into the Hierarchy Window, and make sure the transform position is 0,0,0.

DragLevelArt2

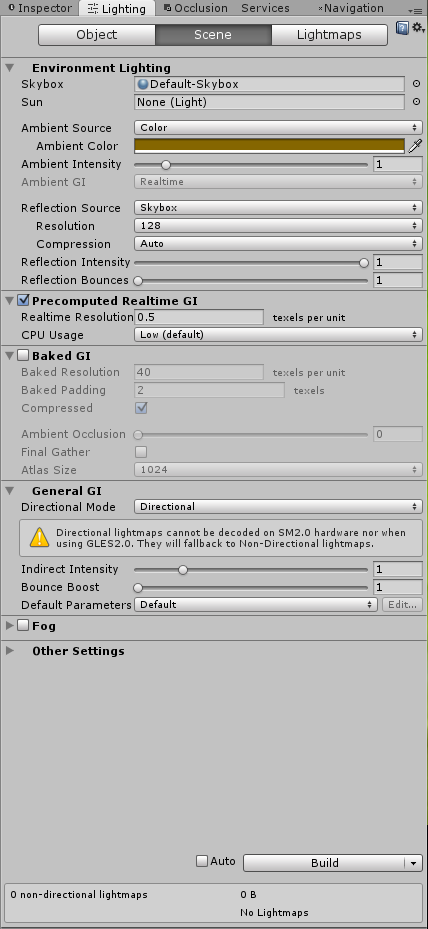
You should now have a nice gaming arena in the scene, however the lighting is a bit ‘flat’ by default, so the next thing we need to do is adjust that. Open the lighting window (Window->Lighting) and set the following values:-

Skybox = Default-Skybox
Sun = None (light)
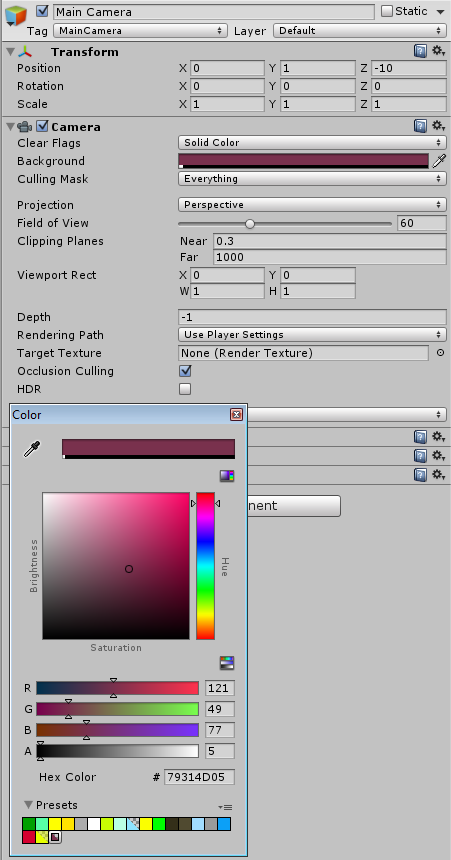
Ambient Source = Color (Set the Ambient Color RGB values to 133, 102, 0 to get a mid brown colour)
Precomputed Realtime GI = Ticked
Baked GI = Un-ticked
Auto Build = Un-ticked

This is how the lighting window should look

LightingSettings

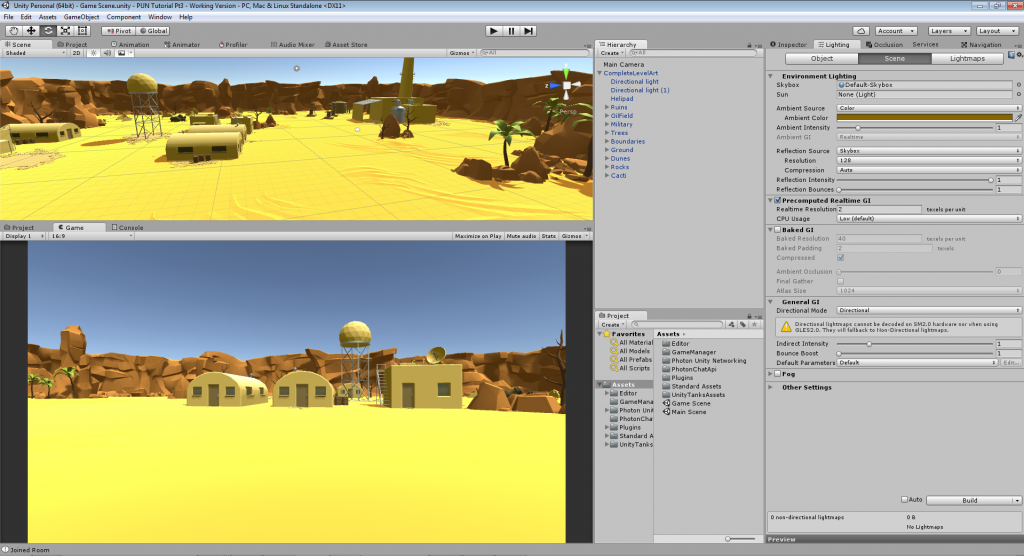
This is how your editor should look if you have correctly imported the assets and added the level art to the scene.

Save the scene in the Assets folder, and call it Game Scene. Next we’ll add some code to handle loading of the game scene when we join a game.

Part 3b – Loading the game scene
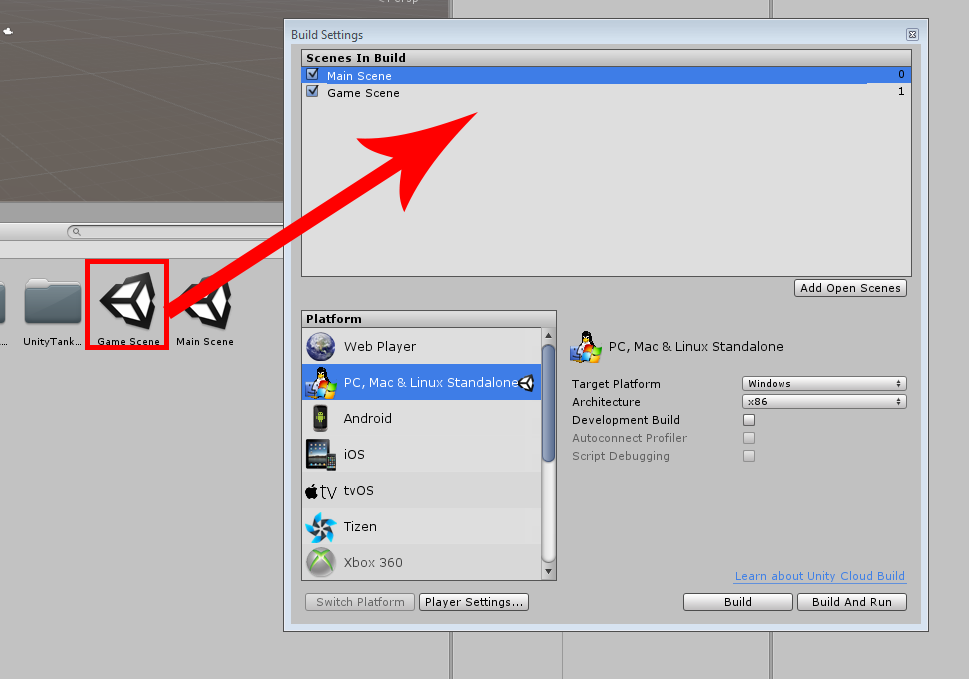
Once you have saved the game scene you need to add both the Main Scene and the Game Scene to the scenes in build, so open the build settings window (File->Build Settings) and drag them both into it as so, making sure that the Main Scene is first in the list.

BuildScenes2

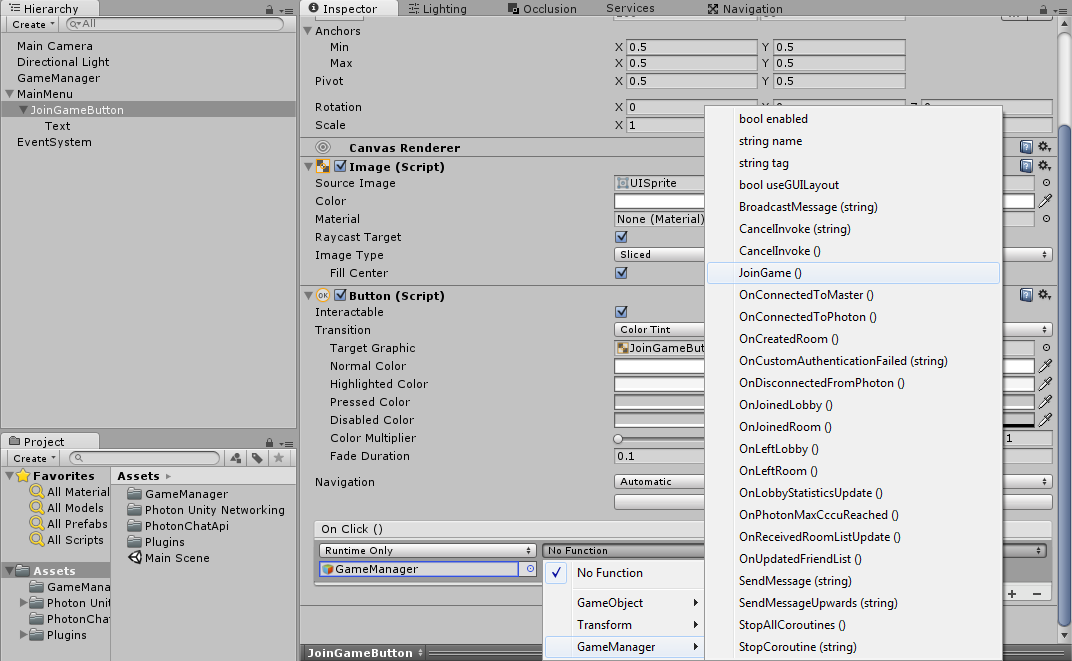
Next, open the GameManager script (Assets\GameManager\GameManager.cs) for editing.

All we need to do is add this snippet of code to the OnJoinedRoom() function

and this line of code to the end of the Awake() function

What this does is, if you are the host (first player in the game) it instructs the Photon Networking system to load the game scene level. And then the line we added to Awake() ensures that any new players joining will automatically load whichever scene the host has currently loaded.

Strictly speaking as we are only using the one game scene at the moment, we could make the host and clients load the game scene manually using Unity’s SceneManagement class, however if we come to add extra game arenas later, doing it this way will make it much easier to keep everyone synchronised. If the host changes its current scene, then all connected clients will automatically change to the same scene, and new clients will join with the same scene active.

Note: Photon uses the term MasterClient to indicate which client is currently the host and ‘in control’. The Master Client can be used as “authoritative” client/player to make decisions, run AI or carry out other tasks that you don’t want all clients to be able to do themselves. If the current Master Client leaves the game, Photon will very quickly assign someone else, which means that the game doesn’t stop if the host leaves.

This is the full GameManager script with the additions we just made, so go ahead and save this now, and then open the Main Scene again in the editor.

If you build and run two instances of the game, you will see that once you click the join button, the scene switches to the game scene. This happens on the client as well, even though we don’t explicitly load the scene on the client, because we set PhotonNetwork.automaticallySyncScene = true.

If you run one of the instances in the editor, and you don’t see the main menu when it runs, that is because you didn’t switch back to the Main Menu scene after you had finished making the Game Scene.

So that’s the game scene working, next we’ll add the player.

Part 3c – The Player
Before we can add the player object, we need to make a couple more changes to the GameManager script as follows:-

First we need to declare a variable to store a reference to the local player object when it is instantiated as so:-

public static GameObject localPlayer;

We can use this as a handy way to reference the player object any time we need to.

Then we need to add the following function:-

The above function will run whenever a scene loads, including the main menu. So to avoid spawning the player when we aren’t in the game scene we check to see if we are in a room or not. The game scene won’t load until we have joined a room, so if we are in a room we know that we must be in the game scene, and therefore we need to instantiate the player object and we also store a reference to it in the variable we just added. Otherwise we just return.

This is the full GameManager script now, which you can now save before proceeding:-

We imported a player object along with the level art, but we need to get it ready for networking before we can use it in our game, so navigate to the Assets\UnityTanksAssets\Complete\Prefabs folder and select the Player prefab located in there.

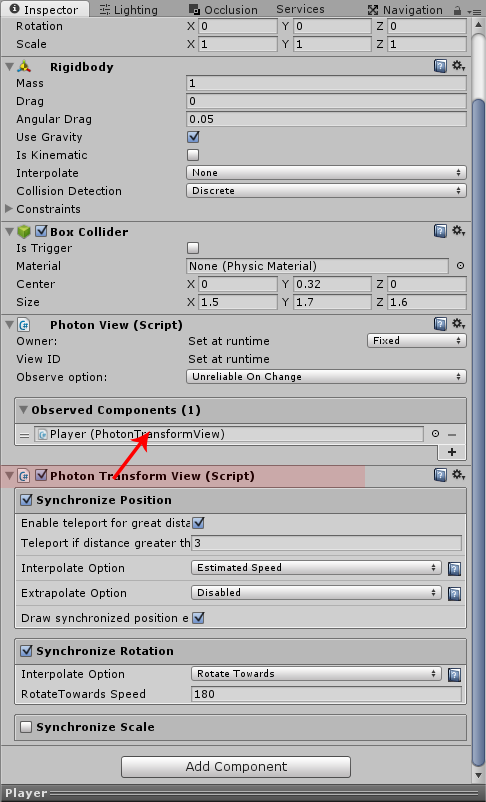
With the player prefab selected, click the Add Component button in the inspector, type photon in the search panel and add a Photon Transform View from the list of components.

TransformView

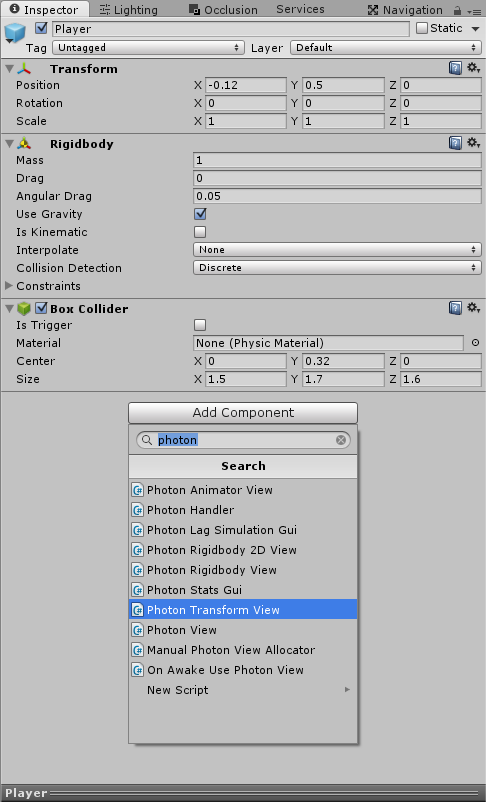
This will add a PhotonTransformView and a PhotonView component to the player prefab, and it is these components that will do the work of synchronizing our player object across the network.

We need to tell the PhotonTransformView what we would like to synchronize, and in our case that will be position and rotation, which we indicate by ticking the two relevant boxes. When we tick each box further options will appear relating to ‘smoothing’ of the networked player movement on remote clients. We’ll leave these values on their defaults for now.

Lastly we drag the PhotonTransformView component into the Observed field of the PhotonView component. The PhotonView will then be able to send the position and rotation of our player object across the network.

TransformView2

The Photon instantiate command requires that the prefab is contained within a Resources folder, so we’ll sort that now. Create a new folder in Assets and call it Player, then in the Player folder create another folder and call it Resources. Next, drag the Player prefab from the Assets\UnityTanksAssets\Complete\Prefabs folder and into the Assets\Player\Resources folder.

Next create a new script in the Assets\Player folder and call it Player and then open it for editing.

Replace the default code with the following:-

This does three things, firstly it makes sure that the player object is set to DontDestroyOnLoad, so that if we change levels during the game our player won’t get destroyed.
Secondly, it grabs a reference to the Camera gameobject attached to the Player prefab.
Thirdly it checks to see if photonView.isMine is false and if it is, it disables the player camera.

photonView.isMine is how we determine if this script is running on the local player object (the one we are controlling) or on a player object belonging to a remote player. True means that it is our Player object, false means it belongs to someone else. We only want the camera to be enabled for our own player object.

Note that this script derives from PUNBehaviour, which gives us easy access to lots of Photon stuff. In this case it gives us convenient access to the attached PhotonView component via the photonView property.

Save the script and then add it to the Player prefab (select the player prefab, click the Add Component button in the inspector and select Scripts->PunTutorial->Player).

You can now build and run two instances of the game, you’ll see that when the 2nd player joins it spawns in the same place as the first player, and the physics moves them apart. You’ll also notice that the positions of the tanks is synchronised in both clients, which means the PhotonTransformView component is doing its job.

Now we need to add a script to allow us to drive the tanks.

Create another new script in the Assets\Player folder and call it PlayerMovement and then open it for editing.

Replace the default code with the following:-

Notice that it derives from Photon.PunBehaviour, so we can easily check photonView.isMine. If it’s false, we disable the script as we only want this to run on our local player object.

I won’t go into much detail about how the rest of this script works, as it isn’t particularly relevant to networking. But basically it reads the values of the horizontal and vertical input axis, and uses those values to move and rotate the rigidbody of the player object.

Save the script and then add it to the Player prefab (select the player prefab, click the Add Component button in the inspector and select Scripts->PunTutorial->PlayerMovement).

There’s just one last thing we need to do, and that’s to remove the camera from the game scene, as our player prefab has its own camera attached and we’ll use that instead. So open the game scene, delete the Main Camera game object, then save the scene.

Next, open the Main Scene again, and if you run the game you’ll see that you can control the tank with the WASD keys. If you build and run two instances of the game, you’ll see that each tank can be controlled independently, and that their movement is synchronised across both clients.

That’s it for this part of the tutorial, in the next part we’ll add a system to handle different spawn positions.

See you next time.

Download UnityTanksAssets package
Download Complete Project for Part 3

Photon Unity Networking Game Tutorial Part 2 – Connecting to Photon and joining a game.

Welcome to part two of my Photon Unity Networked Game tutorial. In this part we are going to put in the place the basics to allow us to create or join a networked game.

Disclaimer: There are many solutions to any one given network game design, which will differ greatly due to a number of factors, including but not limited to, target audience numbers, security concerns and whether you are programming for fun or commercial gain.
Therefore, I do not suggest that is this the only approach you might take, or that this is even the best one, rather it is my attempt to demonstrate some core concepts in as clear and concise a fashion as possible, which can be used as a stepping stone into the often murky waters of networked game programming.

Part 2a – Connection to the Photon Cloud service and creating a game session

Having configured our project to work with Photon (in part 1 of the tutorial) our next step is to set up the initial scene which we will use as our entry  point into the game. So we’ll save the current scene and call it Main Scene.

Next let’s change the camera background, because we don’t need a skybox for the menu. So change the Main Camera clear flags to ‘solid color’ and set a suitable background colour, something like so:-
CameraBackground

Next we’ll add an empty GameObject to the scene and call it GameManager.
Now make a new folder Assets\GameManager and create a new c# script in the folder and also name it GameManager, then drag this script onto the GameManager object in the hierarchy.

The GameManager is going to be a Singleton object that doesn’t get destroyed when the scenes change, so we’ll define it initially as follows:-

Open the GameManager script and copy the above code into it, replacing what is already there, then save the script.
One important thing to note is that it is defined as a Photon.PunBehaviour rather than a Monobehaviour. The reason for this is that it will give us access to Photon Unity Networking functions and overrides, which we will be using later in the tutorial.

Having created our GameManager, it’s first job will be to connect us to the Photon Cloud. The Photon Cloud is essentially a collection of PCs running Photon Server, all of which are maintained and controlled by Exit Games. Once connected to the Photon Cloud, you can join a session of the same game being hosted by someone else, or you can host your own game session which other people can join. One of the benefits of using the Cloud is that you don’t need to worry about firewalls and port forwarding to make your game visible to other players. Bear in mind however that you do need an active internet connection to play multiplayer with Photon Cloud, even if all players are on the same LAN.

So we can connect to the Photon Cloud by adding this simple Start() function to the GameManager script. This is necessary because until we are connected to the Photon Cloud we can’t create or join any networked games:-

This simple bit of script uses the information from the server settings asset you configured in the previous part of the tutorial to connect to the Photon Cloud with our AppID and other pre-set settings. The only bit of additional information it needs is the game version string, in our example we use “PUNTutorial_Pt1”. Users are separated from each other by the game version, which means you can make changes to your game which aren’t compatible with previous versions, and as long as you update the game version string your users won’t be able to connect to an incompatible game.

Now we need a way to create or join a game, and for this we will create a Join Game button. So add a canvas to the Hierarchy and then add a button. Call the canvas MainMenu and the button JoinGameButton, and change the button’s text to ‘Join Game’.
Having done all the above, this is how your editor should look:-
Part2aEditor

Now we’ve got our Join Game button, we need to hook it up so that it actually does something. So we’ll add the following function to the GameManager script:-

In this function we use the Photon JoinOrCreate function, which when executed, searches for a room with the specified name (in our case ‘Default Room’) and joins it if found, otherwise it creates a new room and then joins it. We also use the RoomOptions argument to set the maximum number of players that can be in the room at any one time.

Now we want to hook this function up to the OnClick event on our JoinGameButton, so click the + button to add a new event handler, drag the GameManager onto it and select the JoinGame function as so:-
JoinGameButton

The final part of this step, is to create a function that executes when we have successfully joined the room, so add this function to the GameManager script:-

For now this will just print a debug string to notify us that we have joined the room, but in the next part of the tutorial we will use it to load the game scene and player character.

This is the full GameManager script so far:-

Save this and run the game and when you click the Join Game button  you should see a debug output that says ‘Joined Room’, not very exiting yet I grant you, but at this point you are effectively running a networked game. If you build and run two instances of the game they will both be connected with each other, although currently there will be no obvious evidence of this. (NOTE: You may need to wait 4-5 seconds after you run the game before you click the Join Game button, otherwise you may get an error. Part 4 of the tutorial makes a change which prevents this from happening.)
In a later part of the tutorial we will set up a game browser so you will be able to see a list of currently available games which you can join, or if you create your own game, other people will be able to see it listed and join it.

In the next part we will cover loading the game scene and spawning and controlling the player character, so hope to see you next time.

Download Complete Project for Part 2 (Photon Demo folder deleted to save space).

Photon Unity Networking Game Tutorial Part 1

Part 1

Welcome to my basic tutorial for Photon Unity Networking (PUN). In this tutorial we’ll look at how to download and install the PUN package into your project, and over the course of a number of parts we’ll develop a small multiplayer game that demonstrates some of the core concepts that are required to make a networked game.

The tutorial assumes you are on a Windows PC, have a reasonable level of familiarity with both C# and the Unity interface and little or no experience with programming networked games.

For this tutorial we will use the free version of PUN, however if you are using PUN+ there should be no difference in how it works, but please feel free to let me know if there are any inconsistencies and I will make appropriate notes in the tutorial accordingly.

We will also be making use of some of the assets from the Unity Tanks Tutorial, I will provide download links for the specific assets when it is appropriate.

Part 1a – Creating the project and downloading and installing the PUN SDK

The first thing we need to do is create a new project, I’m going to call it PUN Tutorial, however you can use whichever name you like.

Once you’ve created the new project and have it open in Unity, open the Asset Store Window (Ctrl + 9) and search for Photon Unity Networking. The first match should be the free version of Photon Unity, so click on the Download button, and when it’s finished downloading, click on the import button in the asset store window. When the import dialog opens up in Unity, make sure everything is selected and then click the import button. Strictly speaking you could un-tick the demos folder as we won’t be using anything in it, however it has some excellent example code which is well worth a look if you are just starting out with networking, so we’ll leave it in.

Import PUN

If you are unable to find PUN free in the store by searching, here is the current link to the Asset Store Page Photon Unity Networking Free.

Depending on the speed of your PC, it will take a minute or two to import everything, and once it’s done it will pop up the PUN Wizard dialog as so:-

Pun Wizard

If you already have an AppID or registered email, you can enter them now, but I’m going to assume you haven’t used PUN before and I’ll go through the process of creating a new account and setting up your first project.

Enter the email you would like to use in the box labelled AppID or Email and click setup project. It should respond with a message that the email isn’t registered and give you the option to open the cloud dashboard.
Pun Wizard 3

Click on the Cloud Dashboard Login button, and it will open up the Photon sign in page.

Photon Sign In 2

Click on the Register button, then enter the email address you want to register and click the orange Register button. You will be sent an email which contains an activation link, which you need to click on to set your account password and start using Photon.

Having created your password and activated your Photon account, switch back to Unity and click on the Cloud dashboard Login button on the Pun Wizard dialog. This will open a browser window where you can login to Photon with the email and password you specified in the previous steps.

Once logged in you’ll be taken to your dashboard, where you’ll find Photon has already created an app for Photon Realtime for you, with your registered email address as the app name. This will be where you can add and manage all your network apps using PUN.

Photon apps 2a

Obviously we would prefer a better name for our app, so click where it says [name your app] and enter a new name, I chose Doofah PUN Tutorial, but you can call it whatever you like. It doesn’t have to be the same name as your Unity project, but keeping it similar will make things easier later on if you have a lot of network projects, you can also give it an optional description at this point if you like.
Once you’ve renamed the app and clicked save you will be taken to this screen:-

Photon apps 3

We’ve nearly finished on the Photon dashboard for now, all we need to do is copy to the clipboard the long app ID beneath the app name, so we can paste it into Unity.
photon apps 4

So having selected and copied the app ID, switch back to Unity and paste it into the box labelled AppID or Email, then click the Setup Project button.
Setup 1

Assuming you’ve done everything as above, your project should now be setup for networking with Photon, and your photon server settings should be automatically selected ready for you to edit them. For now the only setting you might want to change is the region, you can click the drop down and select the region closest to where you are located.

Setup 2

So that’s it for the setup of the project and getting it ready for Photon networking, in the next part we will begin the creation of the actual game.

See you next time.

Unity 5 Network Tutorial Part 7 – Improved respawning and health pickups

Welcome to part 7 of my Unity 5 basic network game tutorial, in this, the final part, we will improve the respawn process and implement health pickups.

Part 7a – Improved respawn

In the last part of the tutorial, we implemented respawn behaviour when a player’s health reaches zero, however as it stands there is no delay between the player dying and being respawned, which dosn’t feel quite right. Also there is a subtle bug, whereby if the player dies close to his respawn point, you will see him ‘lerp’ to the respawn point on remote clients.
So we’ll go ahead and fix both of those issues now.

First of all, open the NetworkPlayer script in your editor and make the playerCam variable public.

public Camera playerCam

The reason for making the playerCam variable public is because we want to temporarily detach the camera from a player object when he dies. This enables us to reposition the player without the camera immediately following him. (This is a bit of a workaround to avoid the lerping issue mentioned earlier.

This is the only change we need to make to the NetworkPlayer script, so go ahead and save it, and then open the HealthAndDamage script in your editor, as we also need to make some changes there.

We’ll handle detaching and re-attaching the camera in the HealthAndDamage script, so we’ll store a reference to it in a variable in the HealthAndDamage script.
Add this line below the respawnPos variable:-

Camera playerCam;

And add this line to the OnStartLocalPlayer() function:-

playerCam = GetComponent<NetworkPlayer>().playerCam;

That’s the reference to the player’s camera sorted, so next we’ll add three new functions that will perform the improved respawn.

Add the following code just below the GetRandomSpawnPoint() function:-

So looking at these new fuctions, we have setVisibleState(bool state), what this does is turn on or off the player object renderer and name label, effectively making it invisible or visible depending on the state argument.

Then we have a coroutine, HandlePlayerDeath() which calls setVisibleState with a value of false, which makes all instances of the player object invisible.
Next, only if it’s running on the local player, it detaches the camera, preserving the camera’s current position, and then it repositions the player in the respawn position. As the camera is now not parented to the player, the game view stays in the position it was when the player died, and then it waits for two seconds. This is good for two reasons, first it gives a nice pause between dying and respawning and secondly it allows the clients to lerp to the new spawn position whilst they are invisible, so you don’t see it happen.
Finally it calls the Respawn() function.

The Respawn() function checks to see if it’s running on the local player, and if it is, it re-parents the camera to the player object and sets it’s local position to the correct value.
Then it tells the server to reset the player’s health to 100. Finally it makes the player visible again on all PCs on the network (which is why the last command needs to be outside of the isLocalPlayer check).

The final change we need to make is to the RpcHandlePlayerDeath() function, to make it call the HandlePlayerDeath() coroutine instead of handling the respawning itself. So replace the existing RpcHandlePlayerDeath() function with this new one:-

So that’s the new and improved respawn procedure finished, this is the new HealthAndDamage script with all the above changes implemented:-

Save this and then build and run the game, you will see that after a player dies he disappears for two seconds before reappearing at one of the spawn points with full health.


Part 7B – Health Pickup

Now let’s add a health pack that you can walk over to replenish your health. We’ll implement these as scene objects, so we can just place them in the editor and not have to worry about runtime instantiation and health spawn points etc. etc.

So the first thing we need to do is create a health pack game object. Open the online scene and add a 3d Cube game object (GameObject->3D Object->Cube) and rename it HealthPack.
Now make the following changes to the HealthPack game object:-

  • Set its transform.position to  -8,0.25,-5
  • Set its scale to 0.5,0.5,0.5.
  • Add a NetworkIdentity component to the HealthPack (with the HealthPack game object selected use the menu option (Component->Network->NetworkIdentity)).
  • Set its Box Collider Is Trigger property to ticked

Next we’ll give it some colour; Open the Assets/Materials folder, create a new material in there and rename it HealthPack, then set the albedo Colour to a nice bright green.
Then drag this new material onto the HealthPack game object in the hierarchy and you should see the cube take on the colour of your new material.

Your scene setup should look like this after you have done all the above.

Now let’s add a script to the HealthPack game object to implement the functionality. Create a new folder in Assets and rename it HealthPack, and in that folder create a new c# script and rename it HealthPack. Then open the Healthpack script in your editor and replace the default code with the following:-

This is a fairly straightforward script with only five functions, also notice that it derives from NetworkBehaviour instead of MonoBehaviour. Now let’s take a look at each part in turn and I’ll explain what each one does.

Firstly we declare a variable, bool visible, and make it a SycVar with a hook function. The hook function OnVisibleChanged just activates or deactivates the attached Renderer and Collider based on the newValue argument. This has the effect of hiding or showing the health pack in the scene. Anytime the value of visible is changed this hook function will run and update the state of the HealthPack in the scene.

Next we have OnStartServer(), this will only ever run on a dedicated server when it starts, or the host when it starts. Therefore we can use this function to set the initial state of the HealthPack, and as we want all health packs to start enabled we set visible to true.

Next comes OnStartClient(), this runs on all clients when they join the game, and at this point all SyncVars are guaranteed to have the correct synchronized value, so we manually call the visible hook function, passing the current value of visible, so we can update the state of the health pack in our scene. This ensures that if a health pack is hidden on the server at the time we join the game, our local copy also gets hidden.

Then we have the HandlePickup() coroutine.

All this does is set visible to false, which makes the hook function run, which hides the health pack.
Then it waits 15 seconds and then sets visible to true, which makes the health pack visible and available for use again.
We can make direct changes to the visible variable as this script is running on the server.

Lastly comes OnTriggerEnter(Collider other)

By default, this function runs on all clients whenever a trigger collision is detected, however we only want to handle collisions with the HealthPack on the server. We could ensure this in a couple of ways, either by checking if isServer is true, or (and this is how we do it) with the use of attribute tags.
The use of the [Server] tag, would mean that the function will only run on the server, however as we can’t control when this function is invoked, we can’t prevent clients from calling this function, and although the function won’t run on the client, we would get a console littered with debug warnings. Therefore instead of using the [Server] attribute, we’ll use the [ServerCallback] attribute, which still makes it only run on the server, but also supresses the warning messages if the function is called from the client.

So having ensured this will only run on server, what does it do. Firstly it starts the HandlePickup coroutine as described above, to hide the health pack.
The ‘other’ argument, will contain a reference to the player game object that collided with the HealthPack, so we use GetComponent to access its HealthAndDamage script and add 10 points to its publicly exposed health variable.
There again we can do this directly as this script is running on the server.
This is where the power of SyncVars shows, because this updated health value is now automatically sent to all clients and because we had previously set up a hook function for the health variable, it in turn updates the health display on the HUD. So just by changing the value of the health variable everything automatically synchronizes and updates, very neat!

Save the HealthPack script and add it to the HealthPack game object by dragging it onto the HealthPack in the hierarchy window.

Then save the Online scene, and the open the Offline scene. You can now build and run the game and test the HealthPack.

So now we have a working health pack, which when a player walks over it will add some health and disappear, before respawning again 15 seconds later. You can duplicate the health pack game object as many times as you like and position them around your game scene.

There are a couple of obvious things about the health pack that could be improved, such as preventing it from increasing health above 100, and also stopping the player from flashing yellow when he picks up a health pack when he is below 100 health. But I’ll leave those as an exercise for you to figure out.

So that’s it for this tutorial series, I hope it’s proved understandable and useful and I’ll do my best to answer any questions that might arise.

You can download the complete Unity project files here:-
Unity Networking Tutorial

Unity 5 Network Tutorial Part 6 – Score and Respawning

Welcome to part 6 of my Unity 5 basic networking tutorial, in this part we will add scores and respawning.

Part6a – Death and respawning

In the last part of the tutorial, we left it where a player’s health reduced when hit by a laser shot, but it didn’t detect when it reached zero. So we need to address that now.

Firstly open the HealthAndDamage script in your editor and change the replace the TakeDamage() function with the following new TakeDamage() function.

What this does is prevent the health value from going below zero.
Then if it is zero it calls the DoDeath routine to take the appropriate action, which in this case will be to move the player to one of the spawn points and reset their health to 100.

We need to add the DoDeath() function next, so add this code just below the TakeDamage() function.

We also need a new SyncVar to store the respawn point in, so add this code just below the health SyncVar.

All the above bits of extra code do is call another two functions, which we will add next, one to obtain the new spawn point, which is then stored in the respawnPos syncvar and the other is an RPC to move the player to the respawn point.
We mark the DoDeath() function with the [Server] attribute as we only want respawning to be handled on the server.

Add this code just below the DoDeath() function, this is what we will use to get a new spawn point, it makes use of the spawn points we set up in the NetworkManager previously.

Lastly we need to add the HandlePlayerDeath() function as so

This is the function that does most of the work of respawning our player. Firstly we check isLocalPlayer, as we only want this to run on the local player object (it will automatically synchronize the changes to remote clients).
Then we reset our position to the respawnPos value obtained earlier, and finally we tell the server to set our health back to 100.

This is the entire HealthAndDamage script as it now stands

Save this and build and run the game, you will see that when a player’s health reaches zero, it is instantly respawned in one of the spawn points and it’s health is restored to 100.

Part 6b – Scoring

The only thing left for this part of the tutorial is to handle scoring when a player gets a kill. So we’ll sort that out now.

Firsly we need to update the HUD to give it a way of displaying our score. So open up the Online Scene, and with the HUD game object selected add a Text object (GameObject->UI->Text) and rename it ScoreText, then make the following changes to its properties:-

  • Anchor = Bottom Left
  • Position = 223, 35, 0
  • Width = 410
  • Height = 80
  • Text = Score: 0
  • Font Size = 64
  • Colour = white

Once you’ve done that your Online scene should now look like this
ScoreText
Now we’ve got somewhere to display the score, we need to add some code to actually do that, but before we go on, save the scene with the above changes.

With the scene saved, the next thing we need to do is add a reference to the ScoreText game object and a new function to the HUD script. So open the HUD script in your editor.
Then add this line just below the healthText variable

Text scoreText;

Now add this line to the Awake() function

Now add the function that we can use to display the score for the player as it changes.

The entire HUD script should look like this now:-

Next, open up the HealthAndDamage script in your editor and add the following line to TakeDamage() function:

fromPlayer.GetComponent<PlayerShoot>().AddScore();

so the TakeDamage() function should now look like this:-

This calls the AddScore function on the player that fired the laser, if the targeted player’s health is zero, i.e. he is dead.
We now need to make the AddScore function as it doesn’t actually exist yet. So open the PlayerShoot script in your editor and add the following code beneath the CanFire() function:-

We also need to declare a variable to store the player score in, so add this line just below the nextFireTime variable:-

int score;

We are only interested in keeping track of the player’s score on the local player, so the score variable doesn’t need to be a SyncVar.
The AddScore function has to run on the server, as it invokes the RpcAddScore() RPC function we just added.

In the RpcAddScore() function we check it its running on the local player, as this is the only place we want to update the score, and if it is, we add 5 to the current score and then call the HUD.DisplayeScore() function we made earlier, to display the new score.

This is the entire PlayerShoot script with the above changes implemented:-

Save the PlayerShoot script and the HUD script, load the offline scene and then build and run the game. Now when you shoot and kill an opponent, you will see your score increase by 5 each time.

That’s it for part 6, in the next part we’ll improve the respawn function to add some delay and add health pick up items.