Photon Unity Networking Game Tutorial Part 4 – OnConnectedToMaster and Spawn Points

Welcome to part 4 of my Photon Unity Networked Game tutorial. In this part we will create a system for easily adding spawn points to any level, and also makes some improvements to the main menu.

Part 4a – Menu Changes
If you’ve been following the tutorial up until now, you may have noticed a minor bug when clicking the join game button. If you click it very quickly after starting the game you can get a run time error ‘JoinOrCreateRoom failed. Client is not on Master Server or not yet ready to call operations. Wait for callback: OnJoinedLobby or OnConnectedToMaster.’

This is because it takes a few seconds for the Photon networking system to connect and be ready, and until this is the case you can’t start or join a game. So to avoid the possibility of this happening we’ll disable the join game button until Photon tells us it is ready. While we are at it we’ll also make some changes to the way we have organised the menu in the game scene, in preparation for features that we’ll be adding later in the tutorial.

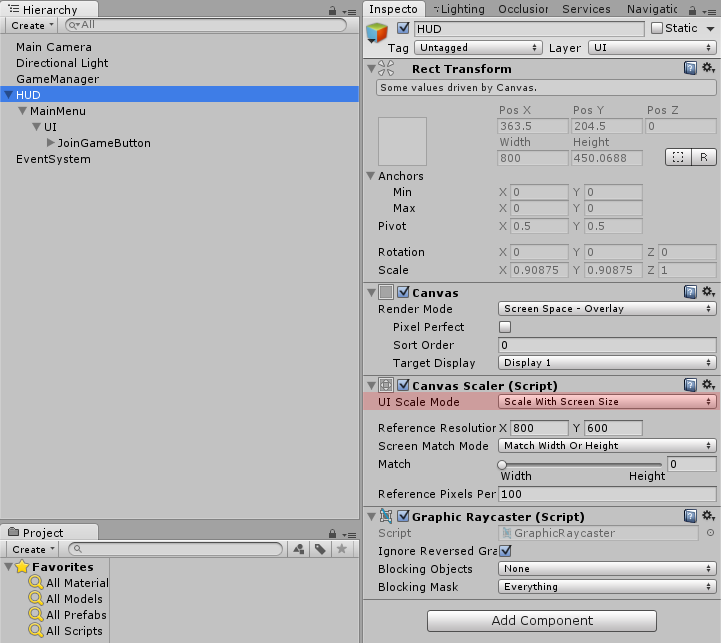
First of all rename the MainMenu game object to HUD and then change the Canvas Scaler UI Scale Mode to Scale With Screen Size. Next, add an empty game object as a child of HUD and call it MainMenu, then add an empty game object as a child of MainMenu and name it UI. Then make the JoinGameButton a child of UI by dragging it onto the UI game object in the hierarchy.

This is how your Hierarchy should look once all that is done:-

Now we need to write a small script for the MainMenu game object to handle the state of the join game button and the visibility of the main menu, but before we do that we need to add an extension class that we’ll use to find game objects by name, even if they are disabled. So create a new folder in Assets and call it Extensions, and in the extensions folder create a new c# script and call it TransformExtensions.
Then open the TransformExtensions script in your editor and replace the default code with this:-

This will add a new method to instances of transform (transform.FindAnyChild()) that will make it easy to get references to our HUD items without having to drag them into exposed properties in the inspector. Before you move on save the TransformExtensions script.

Now we can get to work on the HUD and MainMenu scripts, so create a new folder in Assets and call it HUD, and in the newly created  HUD folder create a c# script and call it HUD.
We will implement HUD as a singleton and use the DontDestroyOnLoad method to make it persist between scene changes in the same way we did with the GameManager script.

So open up the HUD script and replace the default code with the following and then save it :-

Now add the HUD script to the HUD game object by dragging the script onto the HUD game object in the hierarchy window.

For the time being that’s all we’ll be doing with the HUD, its main purpose is to act as a holder for all the game UI elements, however I may add some extra functionality to it further into the tutorial series.

Next, create a new c# script in the Assets\HUD folder and call it MainMenu, then add it to the MainMenu game object in the hierarchy by dragging the script onto it. Once again this is going to be a singleton, so open the MainMenu script for editing and replace the default code with this :-

You may have noticed that as well as making this a singleton class, it has also been made to inherit from Photon.Punbehaviour, this is so that we can override one of the Photon methods later in the script.

So next we need to start adding some code to allow the MainMenu script to enable the join game button when it’s okay to do so.

So firstly add these two lines to the top of the MainMenu class:-

And then add the following lines to the bottom of the Awake() function:-

What this does is find the UI game object and JoinGameButton in the menu hierarchy and stores the references in the two variables we declared, for easy access later. It then enables the UI game object (in case it has been disabled in the editor), which in turn means the join game button is visible, and then it makes the join game button non-interactable, so we can’t join a game until Photon is ready for us.

Having the menu (and later on, other UI elements) hierarchy organised in this way mean we can easily hide UI elements in the inspector (which can help to keep the scene view less cluttered with UI stuff), without disabling their associated script, which means that we don’t have to worry about their initial state when the game runs, and they will activate/deactivate themselves as required.

Save the MainMenu script and run the game, you should see that the join game button isn’t clickable, and you can’t proceed past the main menu.

All we need to do to fix this is add the following method :-

This method is called on all Photon.Punbehaviours once the game is connected to the Photon master server and is ready to host or join a game. By overriding it we can take whatever action we want at that point, and in our case we just make the join game button interactable.

We just need the MainMenu script to do one more thing for now, and that is disable or enable itself depending on whether we are in a game or not, we can do this by using the value of PhotonNetwork.inRoom in the Unity OnLevelwasLoaded() method. So add the following method below the OnConnectedToMaster() method:-

When a level is loaded this will hide the Main Menu if PhotonNetwork.inRoom is true, and show the Main Menu if it’s false;

This is the complete MainMenu script as it currently stands :-

If you save the script and run the game, you should notice the join game button starts disabled, but becomes enabled after a few seconds, at which point you can use it to join a game.

Before moving onto the next part make sure to save the scene now if you haven’t already done so.

Part 4b – Spawn Points
As it currently stands all players spawn at the same fixed part of the map, which obviously is far from ideal, so now we’ll put in place a flexible method of adding spawn points to the game level.

The first thing we need to do is create a SpawnPoint class, so create a new folder in Assets\Player and call it SpawnPoints, and in that folder create a new c# script and name it SpawnPoint. Open the SpawnPoint script for editing and replace the default code with the following, and save the script :-

As you can see it’s very simple, and the only thing it actually does is disable the game object it’s attached to as soon as it runs. We don’t actually need it to do anything else, except provide us with position and rotation information, which we can get from its transform component. To make any object in the scene a spawn point you can just add this script to it.

Now we need to add some spawn points to our game level, so open the Game Scene (save the current scene if prompted), select the CompleteLevelArt game object and add an empty child game object (GameObject->Create Empty Child). Rename the empty game object SpawnPoint and then add the SpawnPoint script to it by dragging it onto the SpawnPoint game object in the hierarchy window.

To make it easier to locate in the Scene view, give the SpawnPoint game object an icon, by clicking the coloured cube in the top left hand corner of the inspector window and selecting the green bar icon.

This is how it should look at this point :-
SpawnPoint

Now change the transform settings for the SpawnPoint as so:-
spTransform1

Then make a duplicate of the SpawnPoint (CTRL + d) and change its transform settings as so:-
spTransform2

Then make a further duplicate of the SpawnPoint and change its transform settings as so:-
spTransform3

Obviously these placings are just examples and you are free to create as many spawn points as you like and place them however you want. But assuming you followed my example then the game scene should look like this now :-
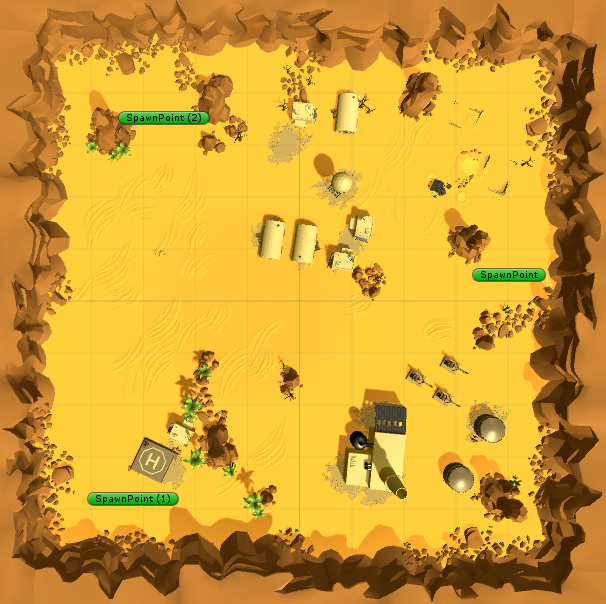
GameScene

Go ahead and save the Game Scene, and we’ll move on to making it so that the player can randomly pick one of the spawn points when the level is loaded.

The next thing we need to do in order for that to happen is to make some changes to the GameManager script (Assets\GameManager\GameManager.cs). So open it for editing and add the following using statement to the top of the script:-

Next add this static helper method to the bottom of the GameManager script:-

This performs a similar function to the Unity function GameObject.FindObjectsOfType(), but unlike that function it will also find inactive objects. The reason we need it be able to do that, is that we can’t be certain that the SpawnPoints won’t have deactivated themselves by the time we come to search for them.

Next, add this function above the GetAllObjectsOfTypeInScene function :-

This will return the transform component of one of the spawnpoints that it finds in the scene or the default spawn point (we’ll get around to that next) if it doesn’t find any.

To implement the default spawn point we need to add this member variable to the top of the script:-

And we initialise it during the awake function with this code, which just creates a new game object and gives its transform some default values.

The final part of the this particular jigsaw is to give the spawn point position and rotation to the player when it is instantiated. And to do this we need to make a couple of changes to the OnLevelWasLoaded() method.

We add the following line after the PhotonNetwork.inRoom check:-

and then change the statement that instantiates the player, so that it can use the spawn point information, as so:-

This is the full GameManager script with all the above changes in place:-

Save the GameManager script, open the Main Scene (save the current scene if prompted) and run the game, and you should see that the player now spawns at one of the points you placed in the game scene earlier.

So that’s it for this part, we’ve now got a less buggy main menu (the main menu will be completely reworked later in the series) and we have a simple and flexible method for adding spawn points for our players. In the next part we’ll be adding some weaponry.

As always any questions, comments and suggestions are very welcome, see you soon.
Download complete project for Part 4

Photon Unity Networking Game Tutorial Part 3 – Adding the Player and Game Scene

Welcome to part 3 of my Photon Unity Networked Game tutorial. In this part we will add the player object and the game scene.

Disclaimer: There are many solutions to any one given network game design, which will differ greatly due to a number of factors, including but not limited to, target audience numbers, security concerns and whether you are programming for fun or commercial gain.
Therefore, I do not suggest that is this the only approach you might take, or that this is even the best one, rather it is my attempt to demonstrate some core concepts in as clear and concise a fashion as possible, which can be used as a stepping stone into the often murky waters of networked game programming.

Part 3a – Setting up the game scene
Before we can set up the game scene in the editor we need some assets for the environment. This zip file contains a Unity package which has in it the game scene and player prefabs which are modified versions of some of the excellent assets from the Tanks Tutorial from the Unity Asset Store. Go ahead and download it then extract and install the Unity package.
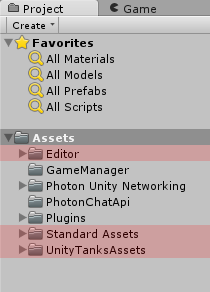
After you’ve installed it your project folders should look like this (I have highlighted the new folders contained in the package).

ProjectWindow

Now that we’ve got the assets installed, make a new scene (File->New Scene).

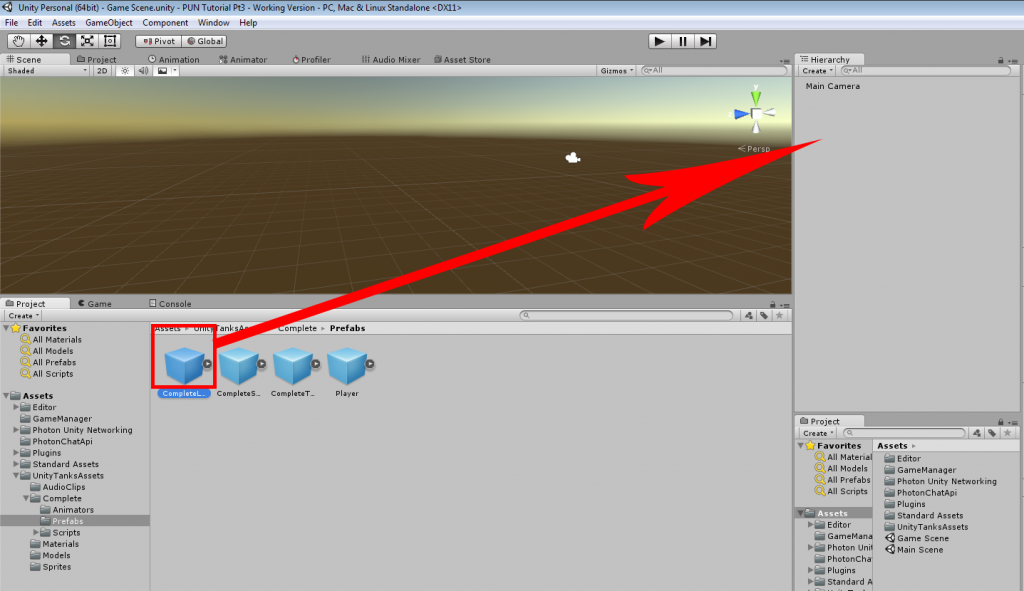
Delete the default directional light (the level art prefab has its own lights) and then find the level art prefab (UnityTanksAssets\Complete\Prefabs\CompleteLevelArt.prefab) and drag it into the Hierarchy Window, and make sure the transform position is 0,0,0.

DragLevelArt2

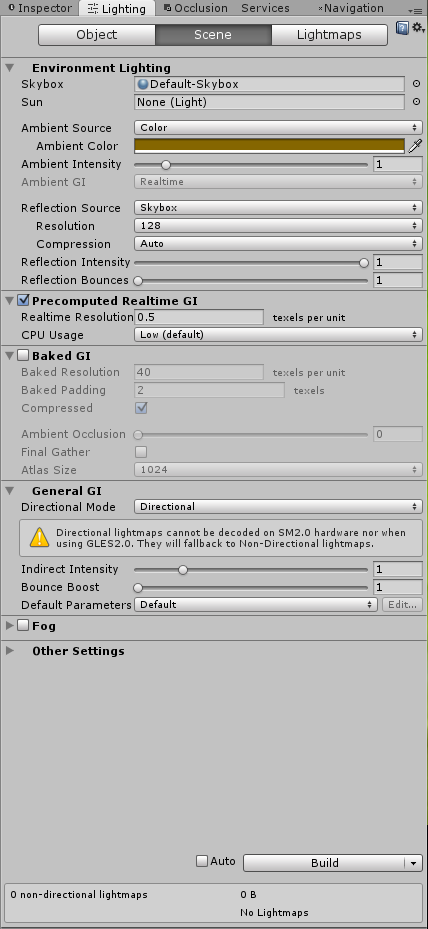
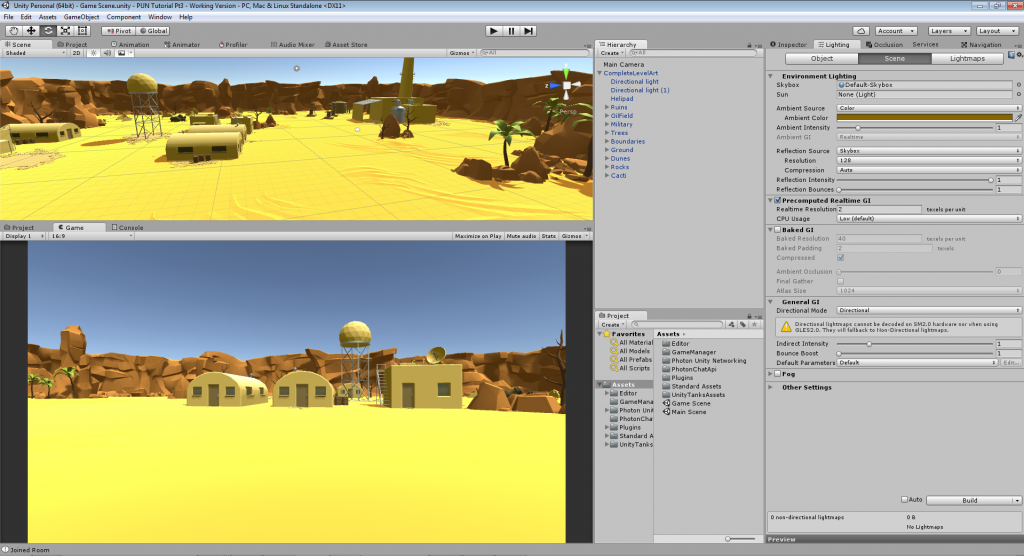
You should now have a nice gaming arena in the scene, however the lighting is a bit ‘flat’ by default, so the next thing we need to do is adjust that. Open the lighting window (Window->Lighting) and set the following values:-

Skybox = Default-Skybox
Sun = None (light)
Ambient Source = Color (Set the Ambient Color RGB values to 133, 102, 0 to get a mid brown colour)
Precomputed Realtime GI = Ticked
Baked GI = Un-ticked
Auto Build = Un-ticked

This is how the lighting window should look

LightingSettings

This is how your editor should look if you have correctly imported the assets and added the level art to the scene.

Save the scene in the Assets folder, and call it Game Scene. Next we’ll add some code to handle loading of the game scene when we join a game.

Part 3b – Loading the game scene
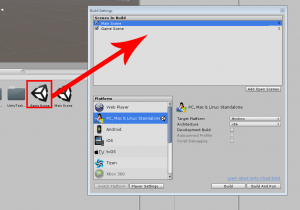
Once you have saved the game scene you need to add both the Main Scene and the Game Scene to the scenes in build, so open the build settings window (File->Build Settings) and drag them both into it as so, making sure that the Main Scene is first in the list.

BuildScenes2

Next, open the GameManager script (Assets\GameManager\GameManager.cs) for editing.

All we need to do is add this snippet of code to the OnJoinedRoom() function

and this line of code to the end of the Awake() function

What this does is, if you are the host (first player in the game) it instructs the Photon Networking system to load the game scene level. And then the line we added to Awake() ensures that any new players joining will automatically load whichever scene the host has currently loaded.

Strictly speaking as we are only using the one game scene at the moment, we could make the host and clients load the game scene manually using Unity’s SceneManagement class, however if we come to add extra game arenas later, doing it this way will make it much easier to keep everyone synchronised. If the host changes its current scene, then all connected clients will automatically change to the same scene, and new clients will join with the same scene active.

Note: Photon uses the term MasterClient to indicate which client is currently the host and ‘in control’. The Master Client can be used as “authoritative” client/player to make decisions, run AI or carry out other tasks that you don’t want all clients to be able to do themselves. If the current Master Client leaves the game, Photon will very quickly assign someone else, which means that the game doesn’t stop if the host leaves.

This is the full GameManager script with the additions we just made, so go ahead and save this now, and then open the Main Scene again in the editor.

If you build and run two instances of the game, you will see that once you click the join button, the scene switches to the game scene. This happens on the client as well, even though we don’t explicitly load the scene on the client, because we set PhotonNetwork.automaticallySyncScene = true.

If you run one of the instances in the editor, and you don’t see the main menu when it runs, that is because you didn’t switch back to the Main Menu scene after you had finished making the Game Scene.

So that’s the game scene working, next we’ll add the player.

Part 3c – The Player
Before we can add the player object, we need to make a couple more changes to the GameManager script as follows:-

First we need to declare a variable to store a reference to the local player object when it is instantiated as so:-

public static GameObject localPlayer;

We can use this as a handy way to reference the player object any time we need to.

Then we need to add the following function:-

The above function will run whenever a scene loads, including the main menu. So to avoid spawning the player when we aren’t in the game scene we check to see if we are in a room or not. The game scene won’t load until we have joined a room, so if we are in a room we know that we must be in the game scene, and therefore we need to instantiate the player object and we also store a reference to it in the variable we just added. Otherwise we just return.

This is the full GameManager script now, which you can now save before proceeding:-

We imported a player object along with the level art, but we need to get it ready for networking before we can use it in our game, so navigate to the Assets\UnityTanksAssets\Complete\Prefabs folder and select the Player prefab located in there.

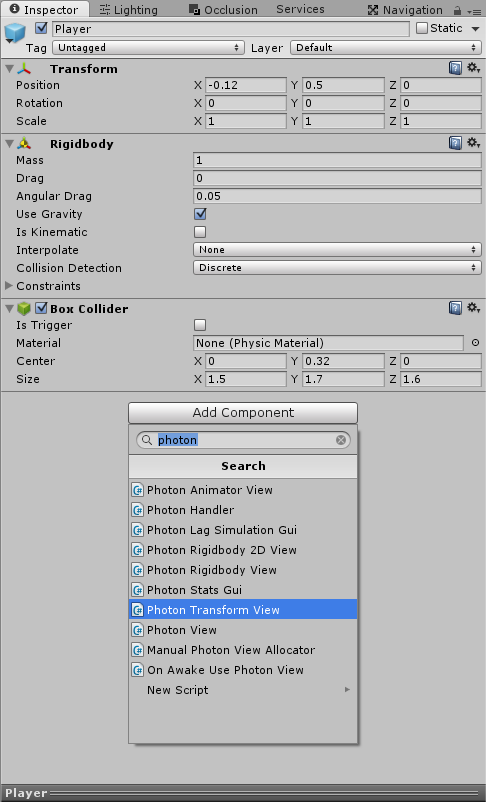
With the player prefab selected, click the Add Component button in the inspector, type photon in the search panel and add a Photon Transform View from the list of components.

TransformView

This will add a PhotonTransformView and a PhotonView component to the player prefab, and it is these components that will do the work of synchronizing our player object across the network.

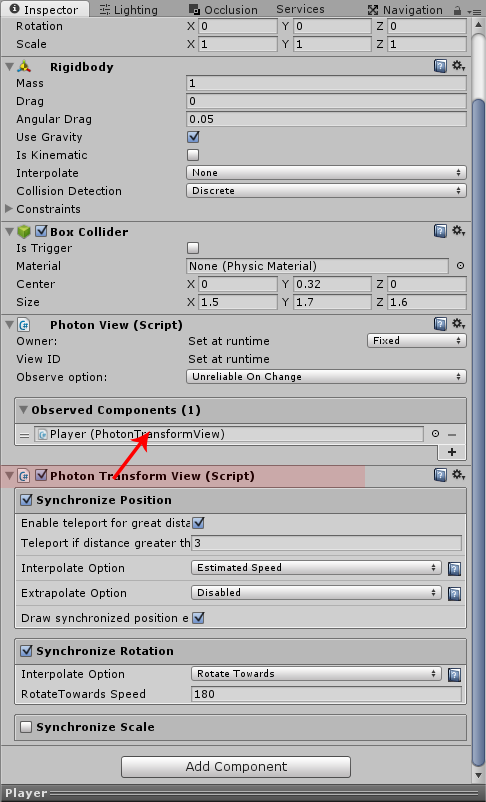
We need to tell the PhotonTransformView what we would like to synchronize, and in our case that will be position and rotation, which we indicate by ticking the two relevant boxes. When we tick each box further options will appear relating to ‘smoothing’ of the networked player movement on remote clients. We’ll leave these values on their defaults for now.

Lastly we drag the PhotonTransformView component into the Observed field of the PhotonView component. The PhotonView will then be able to send the position and rotation of our player object across the network.

TransformView2

The Photon instantiate command requires that the prefab is contained within a Resources folder, so we’ll sort that now. Create a new folder in Assets and call it Player, then in the Player folder create another folder and call it Resources. Next, drag the Player prefab from the Assets\UnityTanksAssets\Complete\Prefabs folder and into the Assets\Player\Resources folder.

Next create a new script in the Assets\Player folder and call it Player and then open it for editing.

Replace the default code with the following:-

This does three things, firstly it makes sure that the player object is set to DontDestroyOnLoad, so that if we change levels during the game our player won’t get destroyed.
Secondly, it grabs a reference to the Camera gameobject attached to the Player prefab.
Thirdly it checks to see if photonView.isMine is false and if it is, it disables the player camera.

photonView.isMine is how we determine if this script is running on the local player object (the one we are controlling) or on a player object belonging to a remote player. True means that it is our Player object, false means it belongs to someone else. We only want the camera to be enabled for our own player object.

Note that this script derives from PUNBehaviour, which gives us easy access to lots of Photon stuff. In this case it gives us convenient access to the attached PhotonView component via the photonView property.

Save the script and then add it to the Player prefab (select the player prefab, click the Add Component button in the inspector and select Scripts->PunTutorial->Player).

You can now build and run two instances of the game, you’ll see that when the 2nd player joins it spawns in the same place as the first player, and the physics moves them apart. You’ll also notice that the positions of the tanks is synchronised in both clients, which means the PhotonTransformView component is doing its job.

Now we need to add a script to allow us to drive the tanks.

Create another new script in the Assets\Player folder and call it PlayerMovement and then open it for editing.

Replace the default code with the following:-

Notice that it derives from Photon.PunBehaviour, so we can easily check photonView.isMine. If it’s false, we disable the script as we only want this to run on our local player object.

I won’t go into much detail about how the rest of this script works, as it isn’t particularly relevant to networking. But basically it reads the values of the horizontal and vertical input axis, and uses those values to move and rotate the rigidbody of the player object.

Save the script and then add it to the Player prefab (select the player prefab, click the Add Component button in the inspector and select Scripts->PunTutorial->PlayerMovement).

There’s just one last thing we need to do, and that’s to remove the camera from the game scene, as our player prefab has its own camera attached and we’ll use that instead. So open the game scene, delete the Main Camera game object, then save the scene.

Next, open the Main Scene again, and if you run the game you’ll see that you can control the tank with the WASD keys. If you build and run two instances of the game, you’ll see that each tank can be controlled independently, and that their movement is synchronised across both clients.

That’s it for this part of the tutorial, in the next part we’ll add a system to handle different spawn positions.

See you next time.

Download UnityTanksAssets package
Download Complete Project for Part 3

Arcade Style Bouncy Vehicle Physics Tutorial

What is this tutorial?
In this tutorial we will look at how to set up arcade style vehicle physics on a 3D model. As with my previous tutorial, in an attempt to keep it as clear and concise as possible I will keep the game design quite simple, therefore this should be seen as a basis from which to build a game, rather than a tutorial for a complete and finished game.

Who is this tutorial aimed at?
This is aimed at people with a reasonable knowledge of C# and Unity as I won’t be explaining in depth basic C# programming concepts or basic Unity concepts, unless it is appropriate to do so within the scope of the tutorial.

Part 1 – The vehicle game object

 As this is a tutorial on coding rather than building game objects in the editor, I’m not going to give step by step instructions on how to put together the car and terrain, instead I’ll just give a brief description of the important bits and how they relate to the code, and I’ll provide all assets in a download link at the end of the tutorial.

First of all I should point out that the method we will be using isn’t a realistic physics simulation, instead it uses forces to ‘fake’ the physics, but the outcome is reasonable and gives a nice Mario Kart style feel to the vehicle handling.

The way we’ll achieve this is by firing a raycast down from each corner of  the vehicle a certain distance (hoverheight), and if it detects a hit, it adds an upward force. We also adjust the strength of the upward force depending on the distance from the vehicle that the raycast detects the hit. So effectively the closer the vehicle gets to the ground the stronger it is pushed back away from it, and vice versa.

The length of the ray we fire can be adjusted, and the longer it is the further the vehicle will float above the ground, we will be using a fairly short ray, because we want this to appear as if it is actually on the ground. However by increasing the hoverheight and hoverforce you can simulate a nice hover car type behaviour instead.

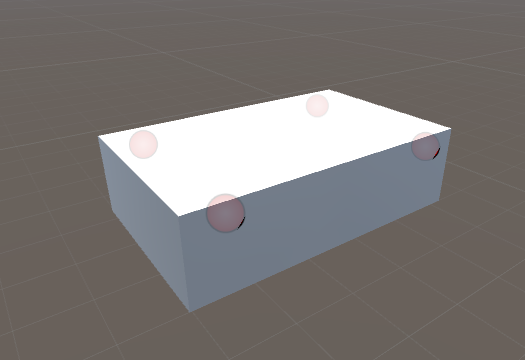
This is a very basic example of how we would set up the vehicle game object with the hover points. The red circles indicate where the hover points are positioned. Notice that they are placed vertically above the centre of the vehicle, this is because of the way we simulate gravity in our code, as I’ll explain a bit further on.

HoverCarBasic

We’ll also attach a rigidbody component, and for this example we’ll give it a mass of 70, drag 3 and angular drag 4. These figures work quite well as they are, but you can achieve different handling effects by tweaking them also.
Lastly we give it a box collider to detect collisions with other scene objects and also to prevent the vehicle from falling through the terrain when the downward velocity is very high and we’ll put it on its own layer (vehicle), so we can ignore it in the raycasts.
We’ll also untick Use Gravity, as we will be handling gravity ourselves.

So that’s pretty much all that’s needed for a basic vehicle setup (in the finished project I have added a buggy model which looks a bit nicer than a plain cube).

Part 2 – The code

So now let’s take a look at the code that will turn this into something a bit more interesting. First off we’ll add the various properties that we’ll use to control the behaviour of the buggy as so.


Most of this should be pretty self explanatory, but I’ll explain what some of them do.

The deadZone value is just a way to make the controller not so sensitive to small movements. Basically any input below the deadZone threshold is ignored.

The groundedDrag value is used to change the buggy RigidBody drag factor depending on whether the buggy is grounded or in the air.

The dustTrails array will hold references to the particle systems that play when the wheels are grounded.

The layerMask property is used to prevent the hover point raycasts from registering hits on the buggy.

Next we have the Start function, which stores a reference to the buggy Rigidbody and stores a reference to the inverse of its LayerMask, for use in the Raycast later.
It also sets the Rigidbody.centerOfMass to be one unit below the buggy, this helps to keep it a bit more stable when it’s in the air.

In the Update function we read the current input and assign a value to the acceleration and rotation from it.

Most of the work is done in FixedUpdate, so let’s take a look at this one bit at a time:-

This block of code above handles the hover/bounce behaviour.
To start with it clears the grounded flag.
Then, for each of the hover points, it fires a raycast of hoverHeight length downwards, and if it detects a hit it applies a force in the opposite direction and scales it depending on the distance the hover point is away from the hit point. So the closer the hover point is to the point which the ray cast hits, the greater the force that is applied to push it back. Kind of like what happens when you compress a spring.
Grounded is also set to true if any of the raycasts detect a hit.

If, however the hover point raycast doesn’t detect a hit, then that means this wheel/corner of the vehicle is off the ground, so we need to handle this differently as follows.

It compares the y position of each hover point with the y position of the vehicle, and pushes it up if it’s below it, or down if it’s above it. This serves two purposes, firstly it makes the vehicle automatically level out when it’s in the air, and secondly it applies a fake gravity effect. This is why the hover points need to be positioned above the centre of the vehicle transform, so that when the vehicle is in the air it will be pushed back down by the gravityForce amount. If we positioned the hover points below the y position of the vehicle transform, once it left the ground it would fly up into the air and never come down.

The next section of code handles other behaviour differences between when the vehicle is grounded and when it is airborne.

So basically, if the vehicle is on the ground, we set the Rigidbody.drag value to the amount we set in the inspector, and we give the dust trail particles a suitable emission rate.
But if the vehicle is in the air we set the Rigidbody.drag to a very low value, and we also drastically reduce the thrust and turn values, as we don’t want to have full control whilst we aren’t on the ground.
Lastly for this section, we iterate through the dustTrails array and set the particle emissionRate to the appropriate value (10 if grounded, zero if in the air).

Last of all we apply the thrust and turn forces to the vehicle and then limit it’s velocity to the maxVelocity value we set in the inspector.

So that’s the entire vehicle controller script, it produces quite a nice arcade style drive and with a bit more work could form the basis of a fun driving game, you can test out the complete project which can be downloaded from here. Once you have loaded it into Unity you will need to open Assets\Scene 1.

The behaviour of the vehicle can be modified to make it feel like it’s driving on different surfaces by changing the various properties exposed in the inspector, for example to make it feel like it’s on ice change the following properties:-

  • Grounded Drag = 0.5
  • Max Velocity = 30
  • Forward Acceleration = 1500
  • Reverse Acceleration = 750
  • Turn Strength = 500

It uses the standard WASD and Arrow keys to control acceleration, braking and turning.

Thanks to Carbon Concept for the free buggy model

I hope you enjoyed this tutorial, and please feel free to post any comments or suggestions.

Download project files