Scene Transition/Screen Fader Tutorial Part1

A common feature of games is that the screen briefly fades to black during scene changes. This is done to ‘soften’ the transition as a sudden switch from one scene to another can be a bit jarring if it’s visible when it happens.

So I’ve found it handy to have a screen fader that I can easily drop in to a new project any time I want to have fade to black (or some other colour) scene transitions and I decided that it would be a nice subject for a mini tutorial. It will also serve to demonstrate a couple of seemingly often overlooked but very useful features, i.e. callbacks and CanvasGroups.

The aim of this tutorial will be to provide a screen fader that is fairly simple to implement and is also flexible and easy to use.

The way this screen fader will work is by overlaying a UI image on the screen and changing it’s alpha value to fade it in and out.

To make it as easy as possible to add to a project, we’ll have the fader create its own UI elements in code, which means all we have to do is drop the screen fader script onto an empty game objet to make it available for us to use. To make this work we’ll need the screen fader to create its own Canvas, CanvasGroup component and an Image.

Step 1)
This is the code to create the Canvas at runtime:-

What this does is create a new GameObject with a Canvas component attached. It then parents it to the GameObject that script is on, then it sets the RenderMode to ScreenSpace overlay and sets the sort order to the value specified in the inspector (default 99). I have made the sort order easy to change so that you can make sure the fader image is always on top of everything else. However depending on what you wanted you could also use the sort order to have it appear behind some elements.)

Step 2)
This is the code to create the CanvasGroup at runtime:-

We use AddComponent() to add the CanvasGroup component to the canvas we just created, and then store, in a member variable, the reference to the component that it returns for later use. Then we set interactable and blocksraycasts to false, which means that any child objects of the canvas group won’t block mouse clicks. This isn’t strictly necessary for our purposes here, and indeed in some instances you may want your screen fader to block input, in which case you would set interactable and blocksraycasts to true.
Lastly we disable the GameObject as we don’t need to have it enabled until we are ready to use it.

Step 3)
This is the code to create the Image at runtime:-

Firstly we create a new GameObject with an Image Component attached, then we set it as a child of the canvas we created in step 1. Next we set its colour to the value specified in the inspector (default black), and lastly scale it up a bit, this last bit is done to prevent a slight border appearing around the edges in some screen resolutions.

Step 4)
Set the image position and size and make it scale with the screen size:-

The easiest way to change position and size of ScreenSpace UI elements is to use the RectTransform component, so firstly we get a reference to the Image RectTransform using GetComponent().

Next we set the anchors to the bottom left and top right to make the image stretch with the screen size. The anchors are Vector2s with values between 0,0 and 1,1, where 0,0 is the bottom left of the screen and 1,1 is the top right of the screen.
Next we centre the image by setting its anchoredPosition to 0,0;
Lastly we set the width and height to match the current screen size (due to the scaling we did in step 3, it will be slightly larger than the screen).

Now we need to put all of that above into the Awake function of the screen saver. This is the complete Awake() function.

The only part of the Awake() function I haven’t discussed yet is the very first block of code. Basically what this does is make the screen fader not get destroyed during scene changes, and also ensures that the only instance of it that can exist is the first one that is created. It also grabs a static reference to the first instance so that it is possible to access non static methods and properties.

That’s the basic setup finished, so next we’ll define a couple of static methods that will enable us to perform fade outs and fade ins. The methods will invoke callbacks when finished so that we can delay execution of other code whilst the fader is in operation. We will also be able to specify a delay before and/or after the screen fade.

This is the public static method to do a fade out:-

As you can see it is quite simple, all it does is check to see if the callback argument is null, and if so it points it to the default empty callback function and then it sets the canvas active.
Next it stops any current fade in/out operations (I’ll discuss that function further on) and runs the fade out coroutine, which is where most of the work is done.
It uses the variant of StartCoroutine that returns a CoRoutine object, which we store for use by the StopActiveFades() function.

This is the code for the fade out coroutine:-

There again, this is quite straightforward, first of all we yield wait for the delayBefore period.
Then we loop while the group.alpha property is less then 1. The alpha property controls the transparency of all children of the group (in this instance our image we created in step 3), a value of zero means fully transparent and a value of one means fully opaque.

In the while loop we use MathF.MoveTowards to linearly fade from transparent to opaque, we can use the speed property in the inspector to control how quickly this happens.
After the while loop exits we yield wait for the delayAfter period if any, and then we invoke the callback to signal that the fade is done.

The fade in functions are almost identical, except in the while loop we change the group.alpha from one to zero and when it’s finished it disables the canvas.

Now let’s take a look at the StopActiveFades() function:-

This function just ensures that there can’t be two fade operations running at the same time, as that could result in unwanted behaviour.
What it does is check the fadeInCR and fadeOutCR variables and if they aren’t null it stops the coroutine they point to and sets the variable to null.

Last of all is the default empty callback function, which doesn’t need any explanation.

In the next part of this tutorial I will show how we can use the screen fader in our applications, but in the meantime here is the full screen fader script:-

As always any and all comments are welcome, see you next time.

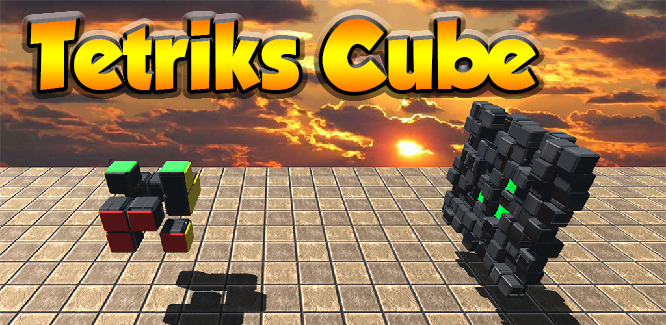
Tetriks Cube

Just released the Android version of our Ludum Dare #35 game jam entry, Tetriks Cube.

Tetriks Cube is a kind of fusion of Rubik’s cube, Tetris and Hole In The Wall.

The aim of the game is to get your cube to pass through as many walls as possible by rotating the cube so that the coloured blocks facing you line up with the coloured hole in the approaching walls. Get it lined up properly and you destroy the wall and score points, get it wrong and the wall destroys you and it’s game over.

As you progress the speed you move increases, giving you less and less time to react. How many walls can you negotiate on hard difficulty?

There are three levels of difficultly, the higher the difficulty the faster your cube moves at the start of the game. But you score more points per wall as a reward.

There are separate Google Play Game Services leaderboards for each difficulty level and various achievements to unlock. Are you skilled enough to be the top scorer?

The simple swipe control system makes this an easy game to pick up, but it will require quick thinking and fast reactions to stay at the top of the leaderboard.

Google Play Store Page

Feature Graphic


UNET Tutorials

Sadly due to the current state of UNET, specifically the number of bugs and inconsistencies it suffers from, I have decided to abandon my series of networking tutorials for it for the time being.

This has been prompted by the discovery that my simple MatchMaker based project, which I was writing to demonstrate a custom network manager and HUD, disconnects clients after around 15 seconds due to a bug in UNET (which I have reported, tracker no. 794106). There are also further bugs and omissions in the Matchmaker system that make it difficult to produce a clean and reliable end user experience at the moment.

Consequently I have begun work converting my previous UNET tutorial series to Photon PUN and all further networking tutorials will be based on the same.

Once UNET is more stable I may consider carrying on with tutorials for it, however I think this won’t be likely in the near future.

In case anyone is interested though, here is a link to the abandoned Unity Project I was working on, and these are the scripts, hopefully they may prove to be of use to someone.

Generic Serialiser Class

It’s been a busy month what with one thing and another, so I haven’t managed to get finished the UNET custom NetworkHUD tutorial I’ve been working on, but I’ll post it as soon as I can.

In the meantime I’ve been doing some groundwork for an RPG idea we’ve had, and one of the first requirements is for an easy way to save and load the state of the various data classes we’ll be using. As this is something that also seems to get asked for on a fairly regular basis in the forums, I thought I’d share what I’ve come up with so far as it might prove useful to others in some situations.

The serialiser as it currently stands is quite simple, it has four static methods, two for serialising the data (one to PlayerPrefs and one as binary data), and two that read in the data and return it in an instance of the corresponding class.
It will serialise any class or struct that is marked as Serialisable and it even works with dictionaries.

This is the code for the serialiser class.

As an example, to save the state of a class to PlayerPrefs you would use something like this:-

To load the data back into the program you would use something like this:-

The way I actually tend to use it though is to wrap the serialiser calls into two methods on the class I want to serialise. An instance method for saving, and a static method for loading the data, which returns an instance of the class populated with the data.

So for example, i might define a PlayerInfo class something like this:-

And then from elsewhere in the program I would load and save the class data like so:-

The Load() function automatically handles the situation where there is no saved data yet, and returns a new instance of the class in that case.

I have made a simple demonstration program that allows you to type in a player name and add and remove items from the inventory. When you exit and restart the program you will see that the changes you made will have been preserved.

Using this generic serialiser it becomes a simple task to save and load even quite complex classes and structs, as long as you remember to mark them as serialisable.

Also remember that if you make any changes to the serialised class definition after you have saved it, you will most likely have to delete the saved data to avoid errors when it tries to load it next.

I hope this proves to be of use to someone, and as always any comments and suggestions are welcome.

You can try out the test program in a Unity WebPlayer here or download the project files here.

See you soon

Martin.

Arcade Style Bouncy Vehicle Physics Tutorial

What is this tutorial?
In this tutorial we will look at how to set up arcade style vehicle physics on a 3D model. As with my previous tutorial, in an attempt to keep it as clear and concise as possible I will keep the game design quite simple, therefore this should be seen as a basis from which to build a game, rather than a tutorial for a complete and finished game.

Who is this tutorial aimed at?
This is aimed at people with a reasonable knowledge of C# and Unity as I won’t be explaining in depth basic C# programming concepts or basic Unity concepts, unless it is appropriate to do so within the scope of the tutorial.

Part 1 – The vehicle game object

 As this is a tutorial on coding rather than building game objects in the editor, I’m not going to give step by step instructions on how to put together the car and terrain, instead I’ll just give a brief description of the important bits and how they relate to the code, and I’ll provide all assets in a download link at the end of the tutorial.

First of all I should point out that the method we will be using isn’t a realistic physics simulation, instead it uses forces to ‘fake’ the physics, but the outcome is reasonable and gives a nice Mario Kart style feel to the vehicle handling.

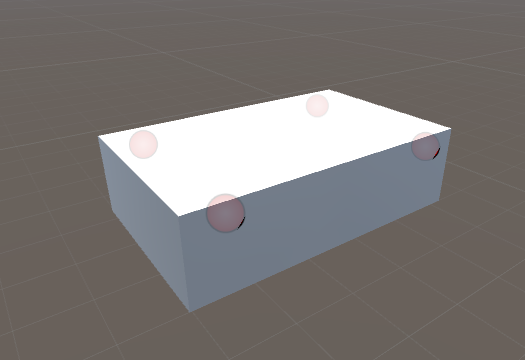
The way we’ll achieve this is by firing a raycast down from each corner of  the vehicle a certain distance (hoverheight), and if it detects a hit, it adds an upward force. We also adjust the strength of the upward force depending on the distance from the vehicle that the raycast detects the hit. So effectively the closer the vehicle gets to the ground the stronger it is pushed back away from it, and vice versa.

The length of the ray we fire can be adjusted, and the longer it is the further the vehicle will float above the ground, we will be using a fairly short ray, because we want this to appear as if it is actually on the ground. However by increasing the hoverheight and hoverforce you can simulate a nice hover car type behaviour instead.

This is a very basic example of how we would set up the vehicle game object with the hover points. The red circles indicate where the hover points are positioned. Notice that they are placed vertically above the centre of the vehicle, this is because of the way we simulate gravity in our code, as I’ll explain a bit further on.

HoverCarBasic

We’ll also attach a rigidbody component, and for this example we’ll give it a mass of 70, drag 3 and angular drag 4. These figures work quite well as they are, but you can achieve different handling effects by tweaking them also.
Lastly we give it a box collider to detect collisions with other scene objects and also to prevent the vehicle from falling through the terrain when the downward velocity is very high and we’ll put it on its own layer (vehicle), so we can ignore it in the raycasts.
We’ll also untick Use Gravity, as we will be handling gravity ourselves.

So that’s pretty much all that’s needed for a basic vehicle setup (in the finished project I have added a buggy model which looks a bit nicer than a plain cube).

Part 2 – The code

So now let’s take a look at the code that will turn this into something a bit more interesting. First off we’ll add the various properties that we’ll use to control the behaviour of the buggy as so.


Most of this should be pretty self explanatory, but I’ll explain what some of them do.

The deadZone value is just a way to make the controller not so sensitive to small movements. Basically any input below the deadZone threshold is ignored.

The groundedDrag value is used to change the buggy RigidBody drag factor depending on whether the buggy is grounded or in the air.

The dustTrails array will hold references to the particle systems that play when the wheels are grounded.

The layerMask property is used to prevent the hover point raycasts from registering hits on the buggy.

Next we have the Start function, which stores a reference to the buggy Rigidbody and stores a reference to the inverse of its LayerMask, for use in the Raycast later.
It also sets the Rigidbody.centerOfMass to be one unit below the buggy, this helps to keep it a bit more stable when it’s in the air.

In the Update function we read the current input and assign a value to the acceleration and rotation from it.

Most of the work is done in FixedUpdate, so let’s take a look at this one bit at a time:-

This block of code above handles the hover/bounce behaviour.
To start with it clears the grounded flag.
Then, for each of the hover points, it fires a raycast of hoverHeight length downwards, and if it detects a hit it applies a force in the opposite direction and scales it depending on the distance the hover point is away from the hit point. So the closer the hover point is to the point which the ray cast hits, the greater the force that is applied to push it back. Kind of like what happens when you compress a spring.
Grounded is also set to true if any of the raycasts detect a hit.

If, however the hover point raycast doesn’t detect a hit, then that means this wheel/corner of the vehicle is off the ground, so we need to handle this differently as follows.

It compares the y position of each hover point with the y position of the vehicle, and pushes it up if it’s below it, or down if it’s above it. This serves two purposes, firstly it makes the vehicle automatically level out when it’s in the air, and secondly it applies a fake gravity effect. This is why the hover points need to be positioned above the centre of the vehicle transform, so that when the vehicle is in the air it will be pushed back down by the gravityForce amount. If we positioned the hover points below the y position of the vehicle transform, once it left the ground it would fly up into the air and never come down.

The next section of code handles other behaviour differences between when the vehicle is grounded and when it is airborne.

So basically, if the vehicle is on the ground, we set the Rigidbody.drag value to the amount we set in the inspector, and we give the dust trail particles a suitable emission rate.
But if the vehicle is in the air we set the Rigidbody.drag to a very low value, and we also drastically reduce the thrust and turn values, as we don’t want to have full control whilst we aren’t on the ground.
Lastly for this section, we iterate through the dustTrails array and set the particle emissionRate to the appropriate value (10 if grounded, zero if in the air).

Last of all we apply the thrust and turn forces to the vehicle and then limit it’s velocity to the maxVelocity value we set in the inspector.

So that’s the entire vehicle controller script, it produces quite a nice arcade style drive and with a bit more work could form the basis of a fun driving game, you can test out the complete project which can be downloaded from here. Once you have loaded it into Unity you will need to open Assets\Scene 1.

The behaviour of the vehicle can be modified to make it feel like it’s driving on different surfaces by changing the various properties exposed in the inspector, for example to make it feel like it’s on ice change the following properties:-

  • Grounded Drag = 0.5
  • Max Velocity = 30
  • Forward Acceleration = 1500
  • Reverse Acceleration = 750
  • Turn Strength = 500

It uses the standard WASD and Arrow keys to control acceleration, braking and turning.

Thanks to Carbon Concept for the free buggy model

I hope you enjoyed this tutorial, and please feel free to post any comments or suggestions.

Download project files

Progress update

Currently working on a new one part tutorial, Bouncy Arcade Style Vehicle Physics. It will demonstrate a basic method to create a Mario Kart style of vehicle.

Hoping to have it published by the weekend.

In the meantime here’s a video I made which shows what the end result of the tutorial will be.

Picture Slider – released on Play Store

We released our latest game yesterday.

Picture Slider – tile sliding puzzle game

Unity Web player version available here

How quickly can you unscramble the pictures by sliding horizontal and vertical rows of tiles?

★ 60+ Pictures to choose from – unlock pictures as you play
★ 5 Levels of difficulty
4 Tiles – Very Easy
9 Tiles – Easy
16 Tiles – Challenging
25 Tiles – Extremely Challenging
36 Tiles – For experts only
★ Records progress for each picture on each difficulty
★ Simple swipe to move controls

On 16 tile puzzles and above this is a very difficult puzzle to solve, and will definitely suit those puzzlers that seek a challenge. Can you solve a 36 tile puzzle?

All pictures Designed by Freepik.com

Upcoming features:-
More pictures
Friends leaderboard

Gameplay video on YouTube

Unity 5 Network Tutorial Part 7 – Improved respawning and health pickups

Welcome to part 7 of my Unity 5 basic network game tutorial, in this, the final part, we will improve the respawn process and implement health pickups.

Part 7a – Improved respawn

In the last part of the tutorial, we implemented respawn behaviour when a player’s health reaches zero, however as it stands there is no delay between the player dying and being respawned, which dosn’t feel quite right. Also there is a subtle bug, whereby if the player dies close to his respawn point, you will see him ‘lerp’ to the respawn point on remote clients.
So we’ll go ahead and fix both of those issues now.

First of all, open the NetworkPlayer script in your editor and make the playerCam variable public.

public Camera playerCam

The reason for making the playerCam variable public is because we want to temporarily detach the camera from a player object when he dies. This enables us to reposition the player without the camera immediately following him. (This is a bit of a workaround to avoid the lerping issue mentioned earlier.

This is the only change we need to make to the NetworkPlayer script, so go ahead and save it, and then open the HealthAndDamage script in your editor, as we also need to make some changes there.

We’ll handle detaching and re-attaching the camera in the HealthAndDamage script, so we’ll store a reference to it in a variable in the HealthAndDamage script.
Add this line below the respawnPos variable:-

Camera playerCam;

And add this line to the OnStartLocalPlayer() function:-

playerCam = GetComponent<NetworkPlayer>().playerCam;

That’s the reference to the player’s camera sorted, so next we’ll add three new functions that will perform the improved respawn.

Add the following code just below the GetRandomSpawnPoint() function:-

So looking at these new fuctions, we have setVisibleState(bool state), what this does is turn on or off the player object renderer and name label, effectively making it invisible or visible depending on the state argument.

Then we have a coroutine, HandlePlayerDeath() which calls setVisibleState with a value of false, which makes all instances of the player object invisible.
Next, only if it’s running on the local player, it detaches the camera, preserving the camera’s current position, and then it repositions the player in the respawn position. As the camera is now not parented to the player, the game view stays in the position it was when the player died, and then it waits for two seconds. This is good for two reasons, first it gives a nice pause between dying and respawning and secondly it allows the clients to lerp to the new spawn position whilst they are invisible, so you don’t see it happen.
Finally it calls the Respawn() function.

The Respawn() function checks to see if it’s running on the local player, and if it is, it re-parents the camera to the player object and sets it’s local position to the correct value.
Then it tells the server to reset the player’s health to 100. Finally it makes the player visible again on all PCs on the network (which is why the last command needs to be outside of the isLocalPlayer check).

The final change we need to make is to the RpcHandlePlayerDeath() function, to make it call the HandlePlayerDeath() coroutine instead of handling the respawning itself. So replace the existing RpcHandlePlayerDeath() function with this new one:-

So that’s the new and improved respawn procedure finished, this is the new HealthAndDamage script with all the above changes implemented:-

Save this and then build and run the game, you will see that after a player dies he disappears for two seconds before reappearing at one of the spawn points with full health.


Part 7B – Health Pickup

Now let’s add a health pack that you can walk over to replenish your health. We’ll implement these as scene objects, so we can just place them in the editor and not have to worry about runtime instantiation and health spawn points etc. etc.

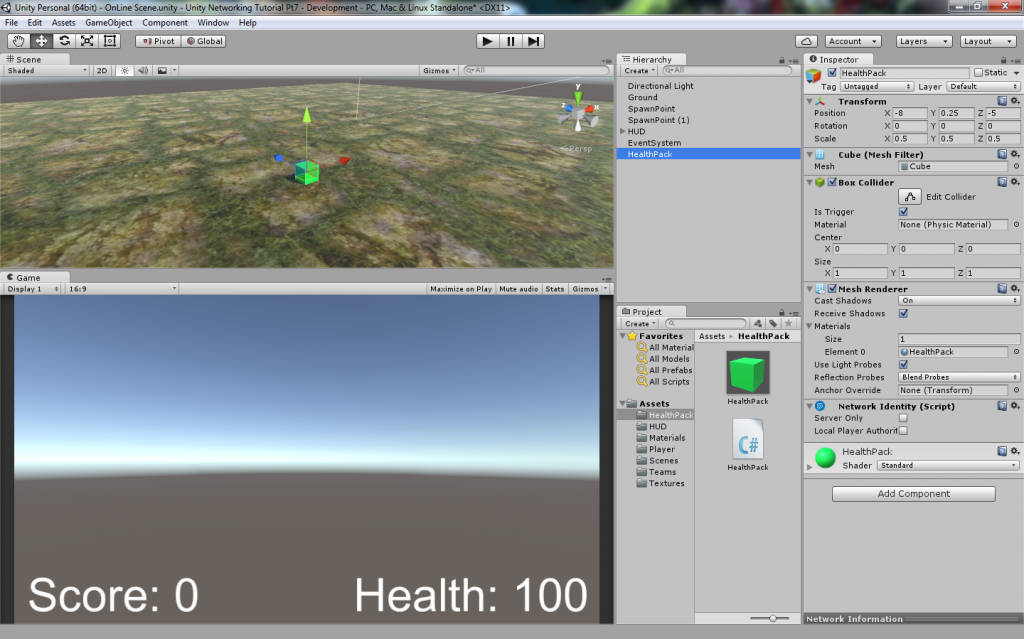
So the first thing we need to do is create a health pack game object. Open the online scene and add a 3d Cube game object (GameObject->3D Object->Cube) and rename it HealthPack.
Now make the following changes to the HealthPack game object:-

  • Set its transform.position to  -8,0.25,-5
  • Set its scale to 0.5,0.5,0.5.
  • Add a NetworkIdentity component to the HealthPack (with the HealthPack game object selected use the menu option (Component->Network->NetworkIdentity)).
  • Set its Box Collider Is Trigger property to ticked

Next we’ll give it some colour; Open the Assets/Materials folder, create a new material in there and rename it HealthPack, then set the albedo Colour to a nice bright green.
Then drag this new material onto the HealthPack game object in the hierarchy and you should see the cube take on the colour of your new material.

Your scene setup should look like this after you have done all the above.

Now let’s add a script to the HealthPack game object to implement the functionality. Create a new folder in Assets and rename it HealthPack, and in that folder create a new c# script and rename it HealthPack. Then open the Healthpack script in your editor and replace the default code with the following:-

This is a fairly straightforward script with only five functions, also notice that it derives from NetworkBehaviour instead of MonoBehaviour. Now let’s take a look at each part in turn and I’ll explain what each one does.

Firstly we declare a variable, bool visible, and make it a SycVar with a hook function. The hook function OnVisibleChanged just activates or deactivates the attached Renderer and Collider based on the newValue argument. This has the effect of hiding or showing the health pack in the scene. Anytime the value of visible is changed this hook function will run and update the state of the HealthPack in the scene.

Next we have OnStartServer(), this will only ever run on a dedicated server when it starts, or the host when it starts. Therefore we can use this function to set the initial state of the HealthPack, and as we want all health packs to start enabled we set visible to true.

Next comes OnStartClient(), this runs on all clients when they join the game, and at this point all SyncVars are guaranteed to have the correct synchronized value, so we manually call the visible hook function, passing the current value of visible, so we can update the state of the health pack in our scene. This ensures that if a health pack is hidden on the server at the time we join the game, our local copy also gets hidden.

Then we have the HandlePickup() coroutine.

All this does is set visible to false, which makes the hook function run, which hides the health pack.
Then it waits 15 seconds and then sets visible to true, which makes the health pack visible and available for use again.
We can make direct changes to the visible variable as this script is running on the server.

Lastly comes OnTriggerEnter(Collider other)

By default, this function runs on all clients whenever a trigger collision is detected, however we only want to handle collisions with the HealthPack on the server. We could ensure this in a couple of ways, either by checking if isServer is true, or (and this is how we do it) with the use of attribute tags.
The use of the [Server] tag, would mean that the function will only run on the server, however as we can’t control when this function is invoked, we can’t prevent clients from calling this function, and although the function won’t run on the client, we would get a console littered with debug warnings. Therefore instead of using the [Server] attribute, we’ll use the [ServerCallback] attribute, which still makes it only run on the server, but also supresses the warning messages if the function is called from the client.

So having ensured this will only run on server, what does it do. Firstly it starts the HandlePickup coroutine as described above, to hide the health pack.
The ‘other’ argument, will contain a reference to the player game object that collided with the HealthPack, so we use GetComponent to access its HealthAndDamage script and add 10 points to its publicly exposed health variable.
There again we can do this directly as this script is running on the server.
This is where the power of SyncVars shows, because this updated health value is now automatically sent to all clients and because we had previously set up a hook function for the health variable, it in turn updates the health display on the HUD. So just by changing the value of the health variable everything automatically synchronizes and updates, very neat!

Save the HealthPack script and add it to the HealthPack game object by dragging it onto the HealthPack in the hierarchy window.

Then save the Online scene, and the open the Offline scene. You can now build and run the game and test the HealthPack.

So now we have a working health pack, which when a player walks over it will add some health and disappear, before respawning again 15 seconds later. You can duplicate the health pack game object as many times as you like and position them around your game scene.

There are a couple of obvious things about the health pack that could be improved, such as preventing it from increasing health above 100, and also stopping the player from flashing yellow when he picks up a health pack when he is below 100 health. But I’ll leave those as an exercise for you to figure out.

So that’s it for this tutorial series, I hope it’s proved understandable and useful and I’ll do my best to answer any questions that might arise.

You can download the complete Unity project files here:-
Unity Networking Tutorial